Stat Graph
Level Filter:
Experience
Click on individual legend entries to toggle on/off in charts
Classes
Statistics & Equipment
Monster Data
Beastmaster Lv:
2
Recruit %:
1 / 2
Evasion:
1 / 16
Resistance
Blaze
Firebal
Bang
Icebolt
Infernos
Zap
Flame
Blizzard
Rock
ArmyCall
Beat
Expel
RobMagic
Sap
Surround
Sleep
Chaos
Poison
Paralysis
Lose-turn
Stopspell
DanceShut
Learn
Equipment
Experience
Area Limits
Training Lv: Max level for unit to rank up in classes
Escape Lv: Max level for any unit for guaranteed escape
Maps
Click on each map to load to a separate tab
Original maps by realmofdarkness
Original maps by realmofdarkness
Real World
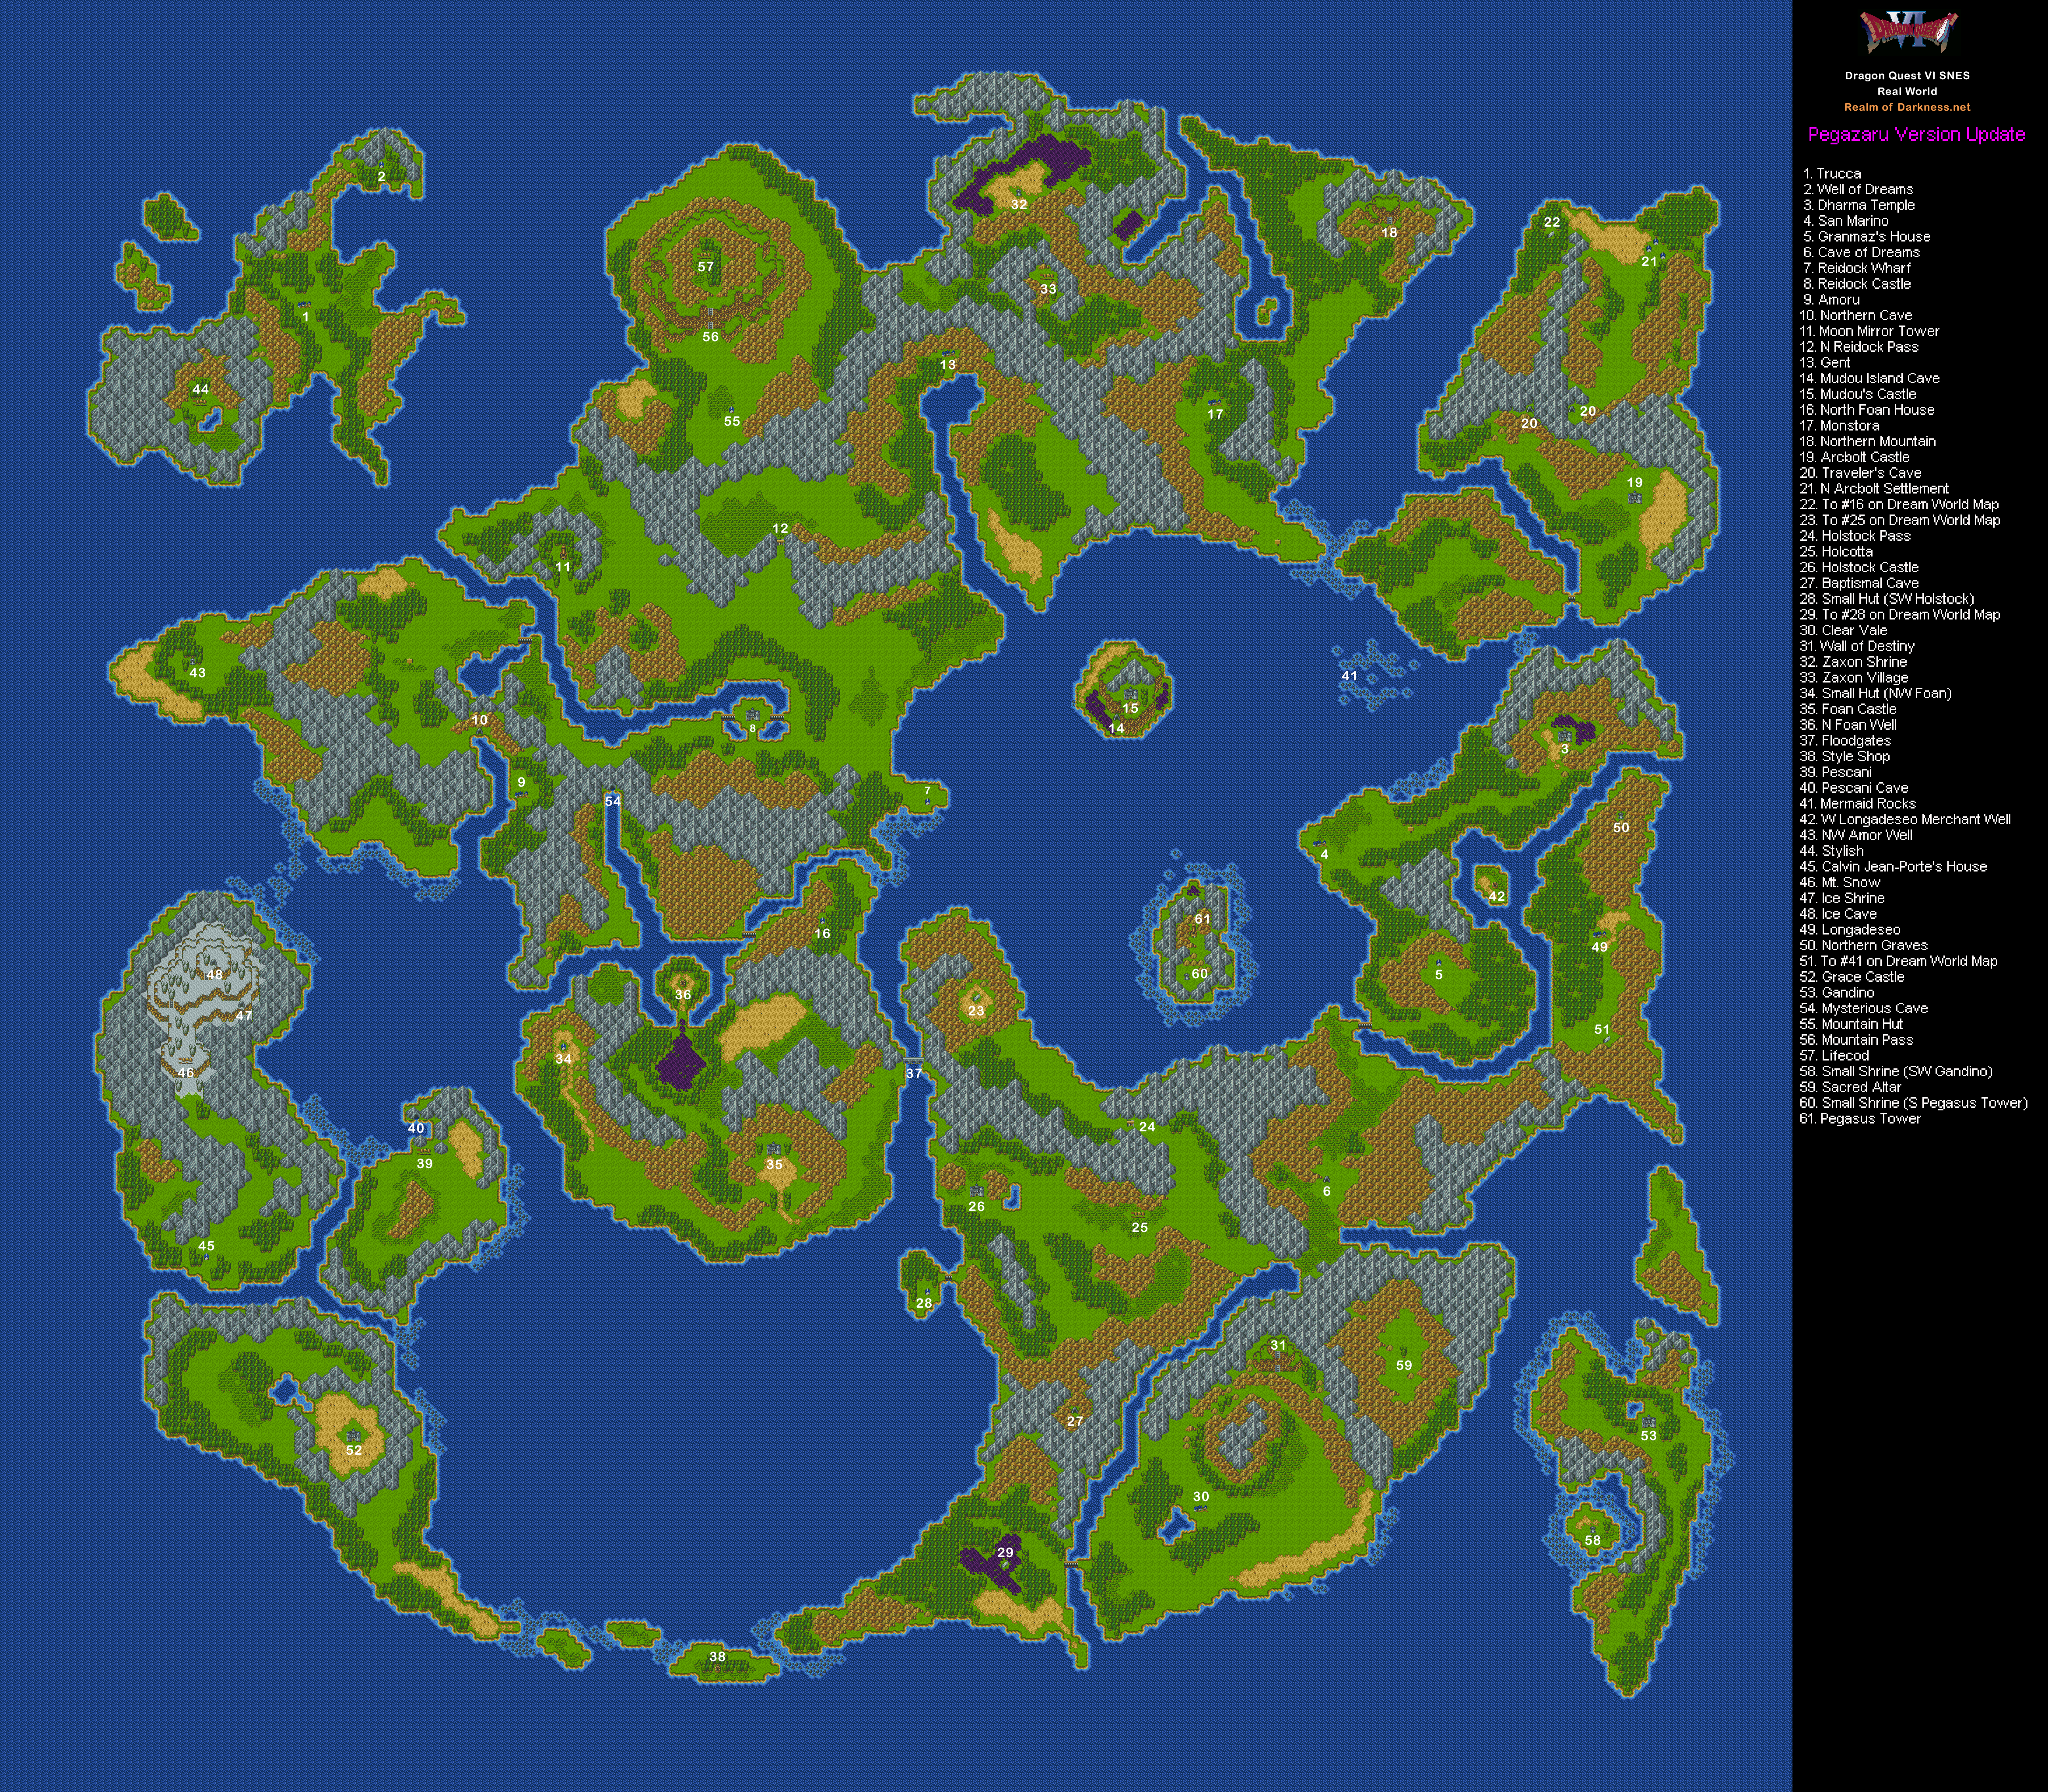
Dream World
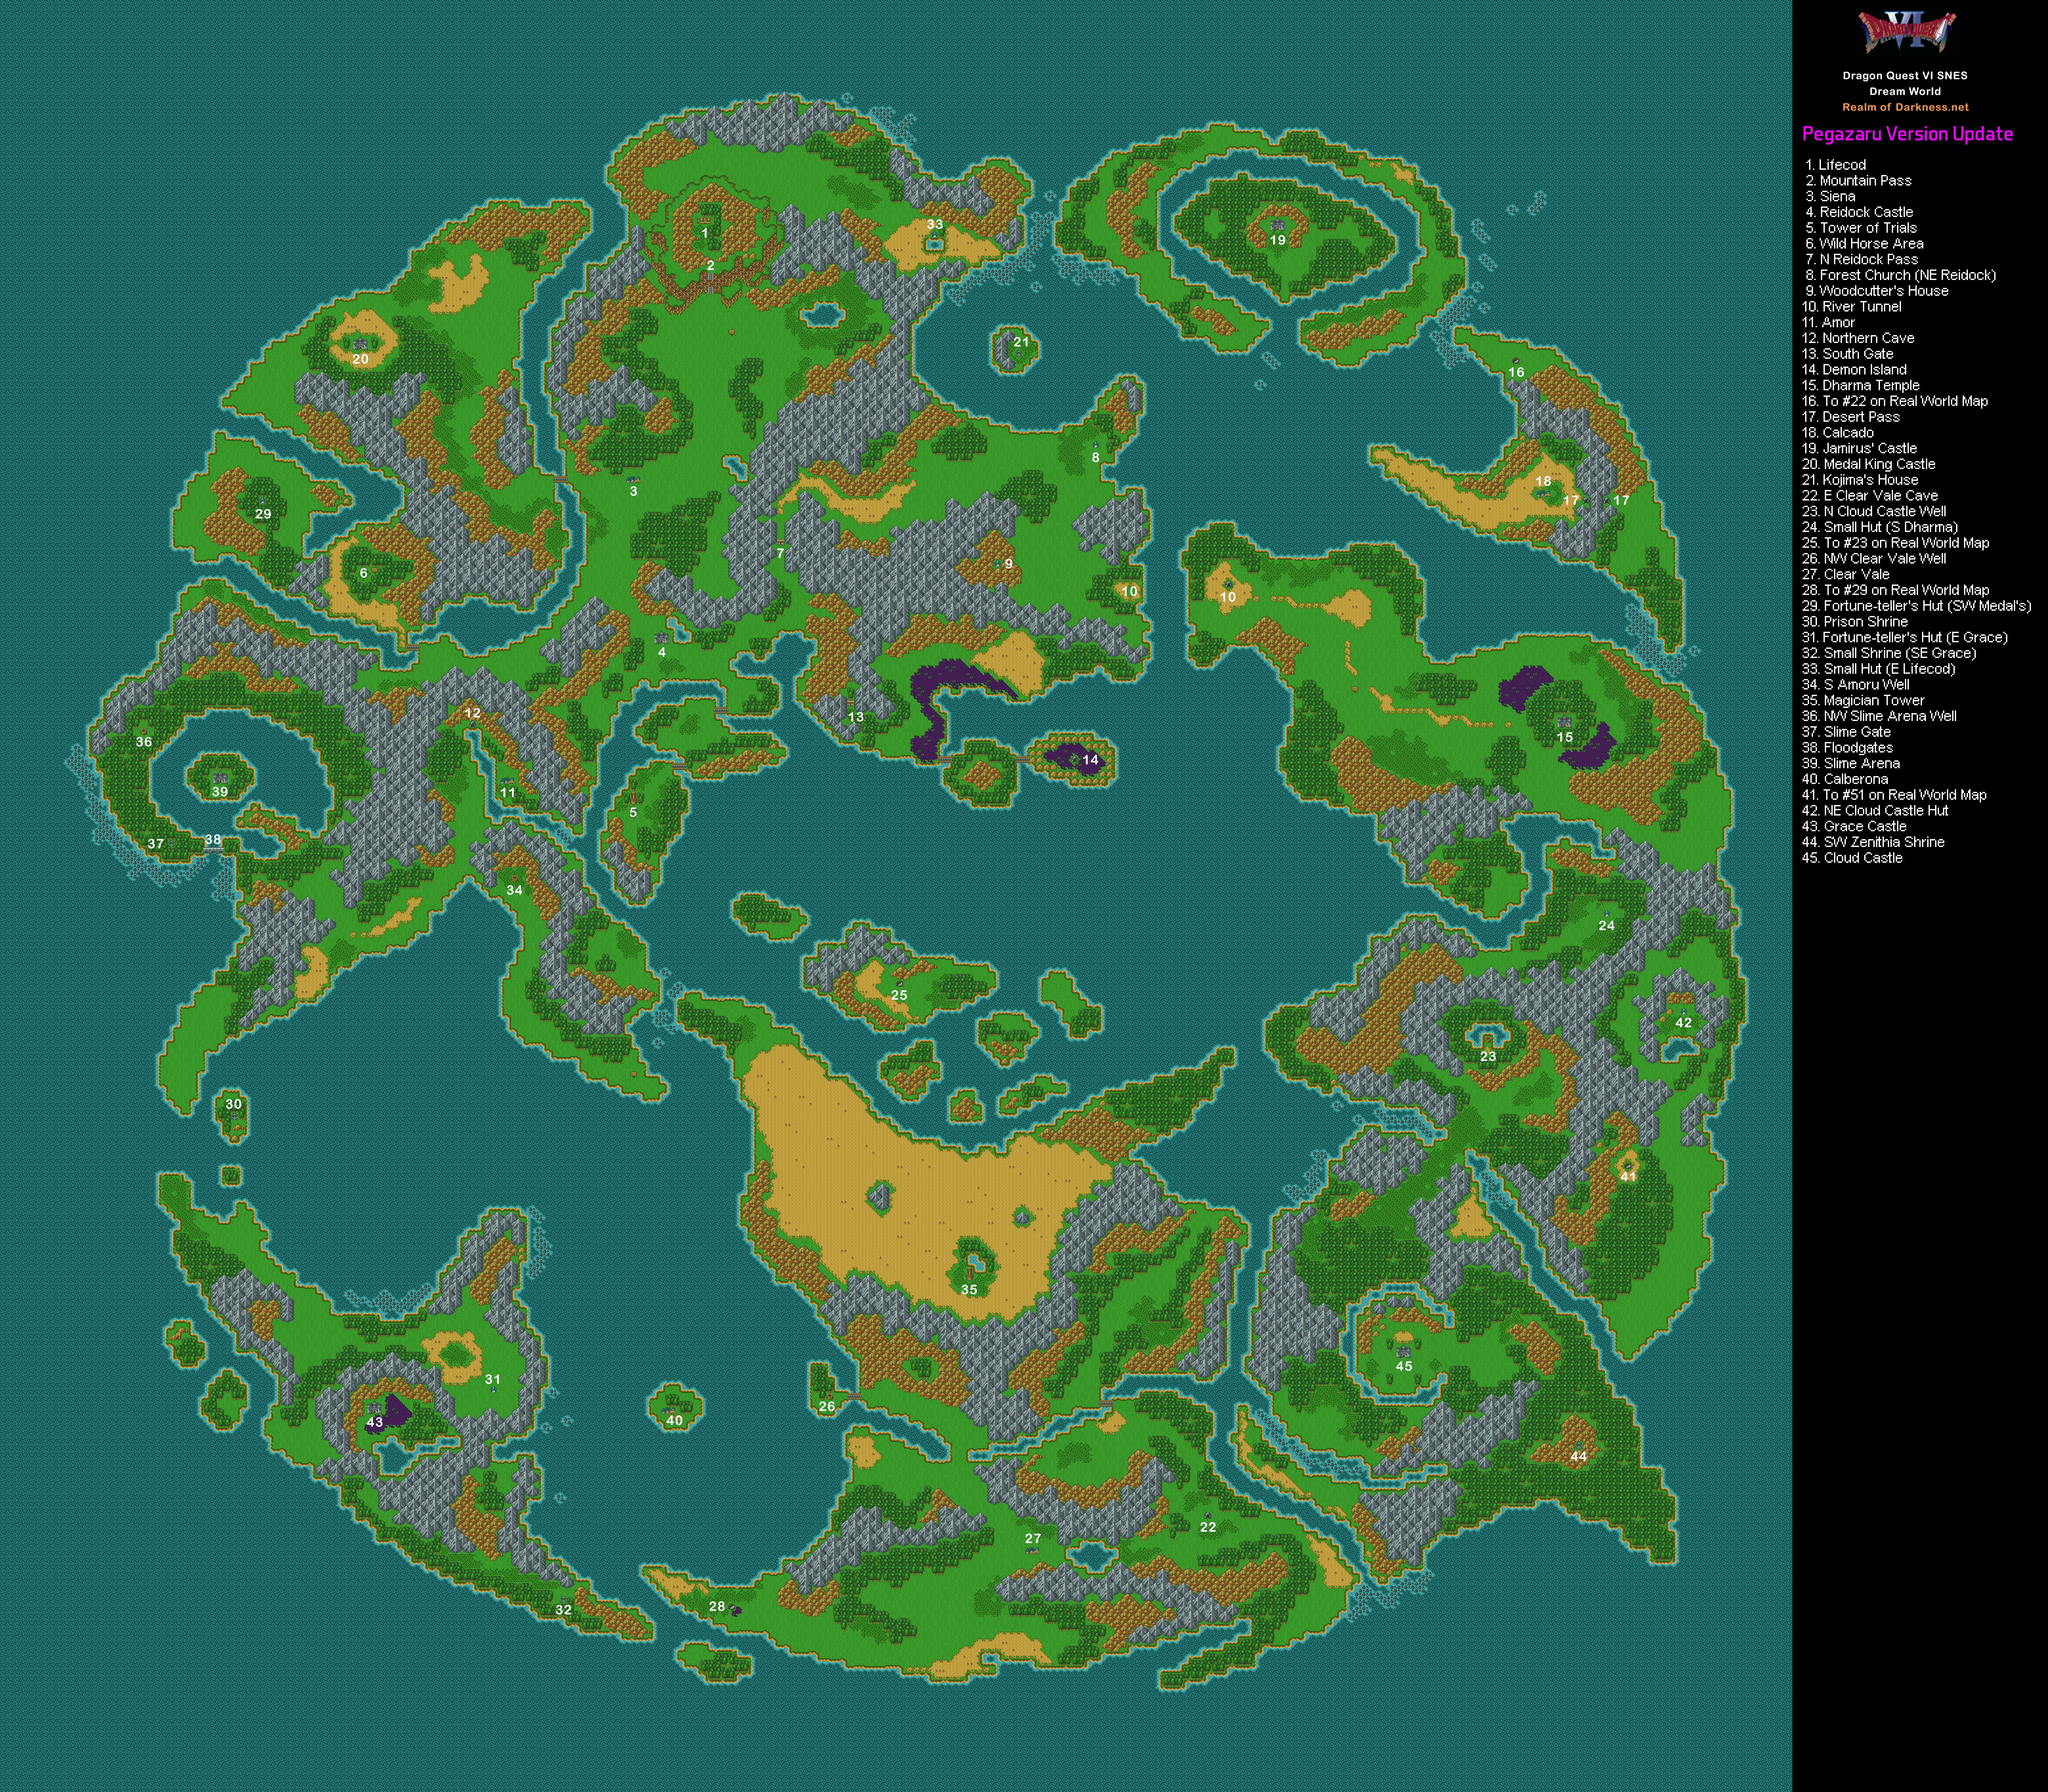
Underwater (Real)
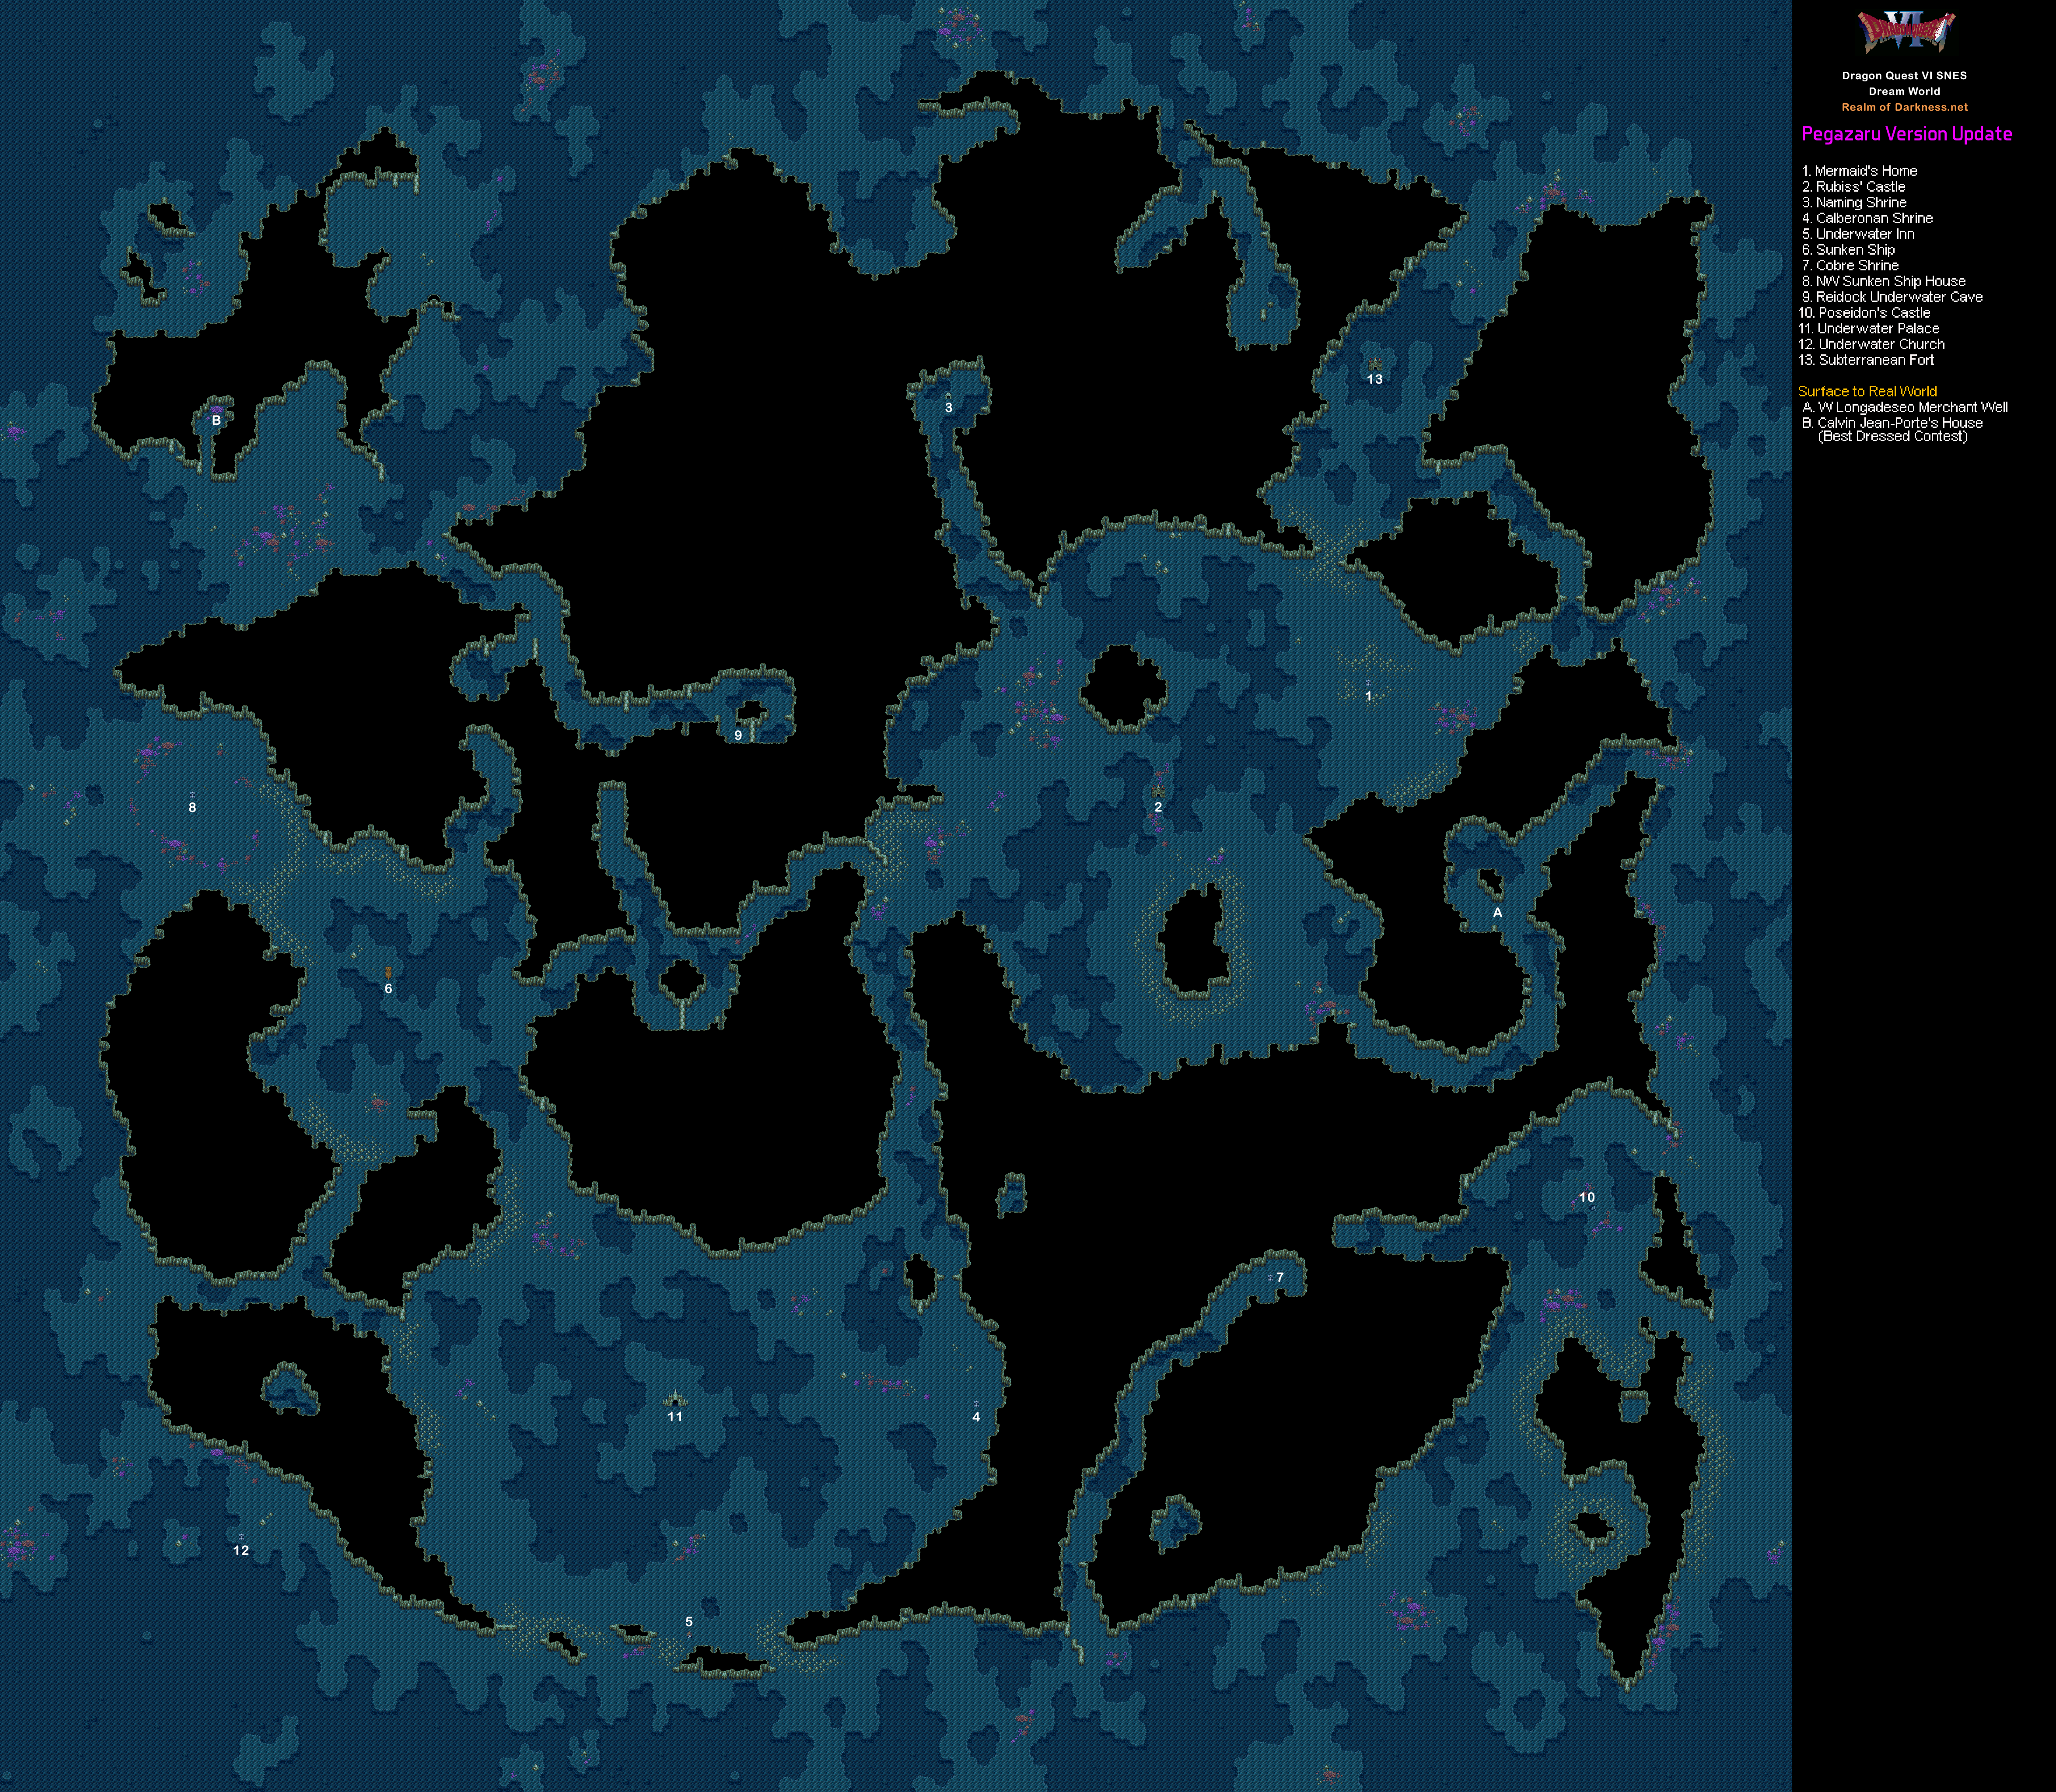
Dark World
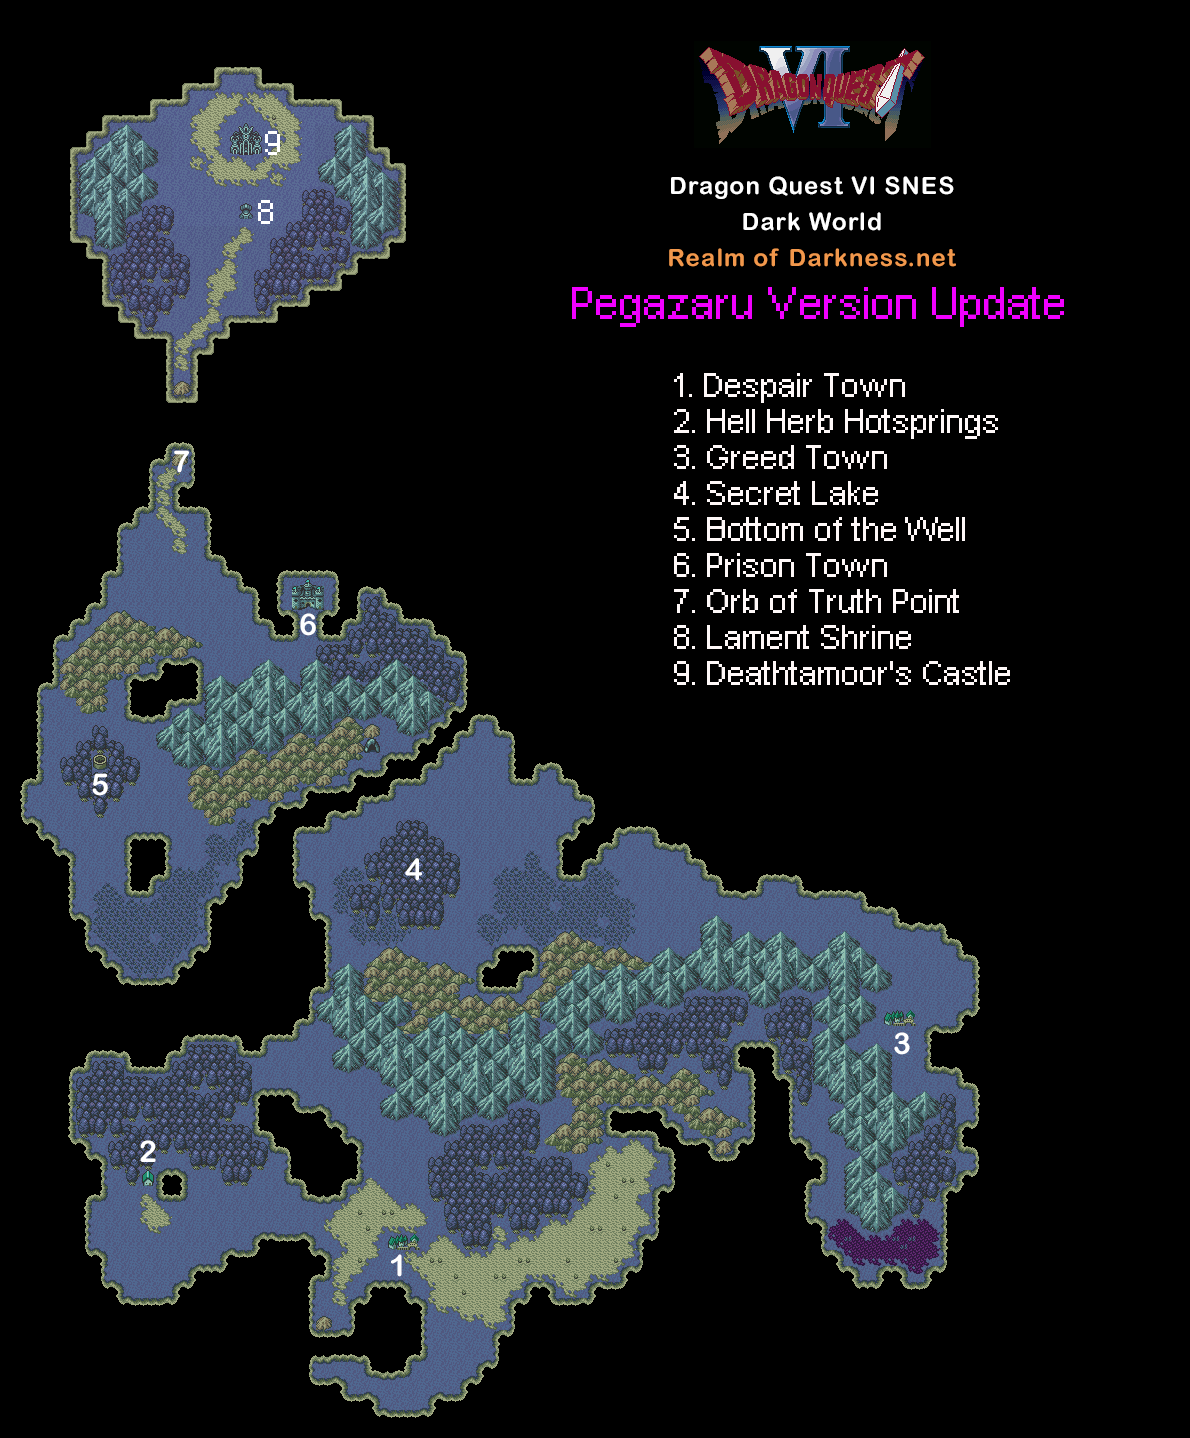
Walkthrough
This walkthrough is a minimalist guide to tell you exactly what triggers to hit in order to progress the game.
Intro
- Confront Mudou
- In Lifecod, talk with Elder, receive Sack
- Leave Lifecod, head south down Mountain Pass
- Enter Siena (technically optional)
- Head NW on world map to giant chasm, interact with Bilte
- Enter Trucca, visit NE house with Eliza & Beth
- Leave Trucca
- Head NE to Dream Well, enter
- Return to Siena
- Visit NE house, speak with Bilte, receive Spirit Crown
- Return to Lifecod
- Go to Hero's house, go to sleep
- Begin the festival
- View cutscene NW of Elder's house
- Speak with Elder, get Pass
- Go to Hero's house, go to sleep
- Return to Siena, head south to Reidock
Reidock
- Talk to guard outside of castle, say Yes
- Visit Church, interact with Hassan
- Go to castle, accept mission
- Leave Reidock, head south to Tower of Trials
- Complete Tower of Trials. You can avoid fighting Nelson at the top by falling off the side of the Tower and leaving the area, then by also opening an optional door in the 3 door area (where the right door gives the Gold Ring and a Small Medal)- then, Hassan will succeed the trial first when you go to the top floor
- Return to Reidock
- Speak with Soldi in the castle, either handing in the Steadfast Heart yourself or witnessing Hassan's success
- Leave Reidock, walk west, Hassan joins
- Head NW on world map to Wild Horse Area
- Tame Falchion
- Return to Reidock
- Go to castle (say No to enter)
- Talk to old man in courtyard
- Witness cutscenes in throne room
- Leave Reidock
- Head NE on world map through pass
- Head E Woodcutter's House
- Interact with him (No, Yes, Yes), cutscenes
- Talk with Woodcutter in new shack
- Leave, head E on world map, inspect funny tile
- Head W through River Tunnel
- Head E/SE on map to giant chasm, fall through
- Visit Dharma Temple, then leave immediately
- Head W on world map to San Marino
San Marino
- Head to western part of town's SW docks to watch Joseph/Sandy cutscene
- Head to eastern part of town's mayor's house
- Speak with Sandy downstairs, then speak with her upstairs
- Attempt to leave the house, watch cutscenes
- After all Pero related cutscenes, head to western docks/ticket area
- Speak with Mireille
- Leave town
- Follow Mireille to Granmaz'
- Accept Granmaz' mission (technically you can say no and still progress, but doing so will deny you 10 free Medicinal Herbs)
- Head south to Dream Cave
- Defeat boss in Dream Cave
- Return to Granmaz'
- Mireille joins
- Return to San Marino
- Take ferry to Reidock
- Leave Wharf area, head NW to Reidock
Reidock
- Buy Royal Clothes from armor shop, equip on Hero
- Enter castle
- First floor, top left room's stairs down, speak with prisoner in left cell
- Go to throne room on second floor's top right area
- Watch cutscenes (any choice for name results in failure)
- Leave Reidock
- Head W, then S, then E to town of Amor
Amor
- Talk to innkeeper
- Talk to scholar in NE house
- Talk to man in the house west of the church/north of the weapon & armor shops
- Talk to adventurer in the outdoor armor/weapon shops
- Enter church (if the priest is still blocking the way, check if you talked to the above NPCs)
- Talk to priest indoors
- Go to cellar, talk with Gina to stay overnight
- Wake up, leave Amor
- Head to Northern Cave
- Defeat boss in cave
- Leave Northern Cave
- Walk to Amor
- Enter church, stay overnight
- Wake up, receive Mirror Key
- Return to Reidock
- On world map, head N/NW to Moon Mirror Tower
Moon Mirror Tower
- Complete Tower, use Dream Dew on Barbara
- Barbara joins
- Pick up Mirror of Ra (you must interact with it)
- Return to Reidock (upper)
- Talk with King in throne room
- Cutscenes overnight, Shera joins
- Leave Reidock
- Head SE on world map through South Pass
- Enter Demon Island
- Defeat boss & view cutscenes
- Leave dungeon
- Return to Reidock (upper)
- Speak with Minister in throne room, cutscenes
- Head to lower world
- Return to Reidock (lower)
- Head to throne room, speak with King & Queen
- Follow King to bottom left spire, receive Royal Letter
- Leave Reidock
- Head N through N Reidock Pass
- Head NE to Gent
Gent
- Enter NE Elder's house
- Cutscenes, follow Chamoro to ship
- Depart for Mudou Island, Chamoro joins
Mudou's Castle
- Traverse Mudou Island Cave
- Traverse Mudou's Castle, defeat Mudou
- Leave Reidock throne room
- Recommended visit to Dharma Temple in dream world via the well in Dharma Temple real world
Monstora (optional)
- Return to San Marino
- Head N/NW on world map to Monstora
- Talk with Amos in NW house
- Stay overnight at inn (say no at first)
- Leave Monstora
- Head to NE mountain
- Ascend, speak with plant, find Seed of Reasoning
- Return to Monstora
- Administer Seed of Reasoning to Amos
- Amos joins
Arcbolt
- Talk with guard blocking 2F, defeat Garcia
- Talk to guards blocking throne room, defeat Scott and Holiday
- Talk to King, accept challenge
- Follow to SW spire, defeat Brast
- Return to throne room, talking with King, receive coffin from Minister
- Leave Arcbolt
- Head NW on world map to Traveler's Cave
- Defeat monsters at entrance
- Watch cutscenes with Terry
- Leave dungeon
- Return to Arcbolt
- Talk with King
- Leave Arcbolt
- Head NE on world map to Traveler's Cave
- Pass through to NE world map
- Head west to staircase to dream world
- Head south to Desert Pass
- Head west to Calcado
Calcado
- Talk with man in the well
- Talk with Mahamed in 2F inn/weapon shop
- Talk with man in NW house
- Talk with old man in W house
- Talk with sister in S church
- Talk with woman in SE house
- Night time begins, leave Calcado
- Head W to Floating Island
- Speak with bartender, say Yes x3
- Defeat boss
- Head to Holcotta Pass (Return to Demon Island in dream world, then head SW to staircase to real world, then head E)
- Head S, then W to Holcotta and Holstock
Holstock
- Speak with King, accept mission
- Go underground, head W, talk with kid in isolated room
- Return to castle 1F, inspect barrels to find Holse
- Talk to King
- Go underground, head S to find Holse outside
- Leave Holstock
- Head S to Baptismal Cave
- Walk forward, leave once Holse leaves
- Leave dungeon
- Walk to Holcotta
- Find Holse in NW house
- Head back to Baptismal Cave
- Defeat boss (1 of 3)
- Find Holse on the same floor
- Pass first checkpoint
- Defeat boss (2 of 3)
- Find Holse on the same floor
- Pass second checkpoint
- Defeat boss (3 of 3)
- Proceed, cutscenes, pick up Holse after baptism
- Leave dungeon
- Return to Holstock
- Talk with King, cutscenes
- Talk with King after, receive Magic Key
- Leave Holstock
- Head SW to hut
- Take well to dream world
- Walk SE to Clear Vale (dream)
Clear Vale
- Leave Clear Vale (dream)
- Walk W to staircase to real world
- Walk E to Clear Vale (real)
- Enter church
- Leave Clear Vale, head NE on world map to Wall of Destiny
- Find Golden Pickaxe
- Ascend, receive Fragment of Courage
- Return to Clear Vale (real)
- Visit NE house, speak with Harris
- Cutscenes, get Flying Bed
- Return to Reidock (dream)
- Head S on world map to well (S of Amor)
- Head SE to Foan
Foan
- Head to throne room, talk to Minister
- Go to lower Mirror Hall entrance, encounter with King
- Talk to King in throne room twice, follow down to Mirror Hall
- Cutscenes in Mirror Hall, return to throne room
- Talk to King, accept request. Speak with Minister for details
- Leave Foan
- Travel to dream world (any way is fine, but Dharma well is consistent)
- Return to Reidock, ride Flying Bed SE on world map to desert
- Enter Magician Tower
- Cast Identify on the door
- Defeat boss at top of tower
- Travel to real world (again, lower Dharma well is consistent)
- Return to Foan
- Talk to King, follow to Mirror Hall, cutscenes
- Go to throne room, speak with King and receive Floodgate Key
- Leave Foan Castle
- Return to Reidock (real), sail south to open floodgate
- Continue traveling here, or return to Amor and sail south
- Enter Pescani
Pescani
- Head to north house, speak to man behind counter who will leave his house
- Head to SE house, speak with man, then watch Rob leave
- Follow Rob to NW cave
- Follow Rob through cave (stealth mission)
- Speak with Rob at the end, say No first
- Speak with Rob again, say Yes
- Return to Pescani
- Sail into cave, navigate to a specific tile to begin conversation with Rob and Denae
- Return to San Marino
- Head N to Mermaid Rocks
- Speak with Dinae, receive Mermaid Harp
Final Key
- Return to Pescani
- Submerge (with Mermaid Harp), head N/NW to Sunken Ship
- Obtain Final Key
Mt. Snow
- Return to Pescani
- Submerge underwater
- Head SW through channel, then resurface
- Land on continent, then head N (past the house) to Mt. Snow
- Visit NE house, speak with old man downstairs
- Leave Mt. Snow
- Walk NE on world map to Ice Shrine, speak with woman, then leave
- Return to Mt. Snow
- Visit NE house, speak with old man downstairs (Terry cutscene)
- Leave Mt. Snow
- Walk NE on world map to Ice Shrine, speak with woman (she unfreezes town), then leave
- Return to Mt. Snow
- Visit NW house, speak with Zam, say Yes
- Leave Mt. Snow
- Walk N to Ice Cave
- Interact with door, then give answers 1, 3, 2
- Proceed to last room, puzzle is N > W > E > S
- Terry cutscene, receive Rusted Sword
- Leave Ice Cave
- Return to Mt. Snow
- Visit NW house, speak with Zam. Receive Longadeseo Pass
Sufida's Shield
- Return to Pescani
- Head NE to river, then north into Mysterious Cave
- 1F - head N to wall, head E to second crossroads (ignore first), head S to stairs down
- B1 - Proceed to statue room in the center. Inspect corner grass tile roughly 7 steps N, 2 steps E of room entrance, take stairs down
- B2 - go down stairs 3x, go up stairs 2x, then head S in room to proceed
- B3 - Head E, N then W to find Sufida's Shield
Underwater Palace
- Return to Foan (real)
- Walk S to ship
- Use Mermaid Harp to submerge
- Sail S/SW to Underwater Palace
- Find the Sand Vessel on the penultimate floor
- Defeat boss
- Leave dungeon
Stylish Contest
- Return to Trucca (real)
- Board ship, submerge with Mermaid Harp
- Sail SW, hugging the continent then heading N through inlet & ascend
- Enter Calvin Jean-Porte's house
- Complete Level 3 Stylish Contest and receive Beautiful Carpet
Calberona
- Return to Clear Vale (dream)
- Board Flying Bed, fly W/NW to Calberona
- Enter with Barbara and place Sand Vessel in Barbara's inventory
- Head to NW house through central area's lower passages, use Barbara's Sand Vessel on sands
- Enter Elder Bubole's house, speak with her
- Leave house, head to NW house near the town border
- Speak with Calbe, receive Magic Carpet
Grace Castle
- Return to Pescani (real)
- Board Magic Carpet
- Fly E to continent's edge, then fly SW to lower part of continent
- Dismount, walk north to find small lake, then use Flying Carpet over it
- Enter Grace Castle
- Optional - enter well to watch cutscenes
- In real world (where the castle is in ruins), head up the stairs, enter left ruined structure
- Use the Golden Pickaxe on the top right floorboards, descend
- Search the tile in the southern center of the room, descend
- Obtain the Armor of Orgo
Lifecod (Real)
- Return to Trucca (real world)
- Ride Magic Carpet east to continent, head N up Mountain Pass
- Enter Lifecod with Hero in party
- Talk to Elder
- Talk to Tania
- Talk to Elder, witness cutscene with other Hero
- Leave Lifecod
- Go to Mountain Pass, fall down right side and enter cave
- Speak with other Hero, then leave
- Return to Lifecod
- Defeat all available monsters (9 fights). (You can get a free full HP/MP heal from the priest in the church)
- After all monsters are defeated, enter Hero & Tania's house
- Reunite with Hero (technically optional for now, but not fusing makes the boss much harder)
- Defeat boss
- Leave Lifecod
- Return to Reidock (real)
- Many cutscenes
- Receive Helmet of Cevas
Longadeseo
- Return to Dharma (dream)
- Walk SE to continent's edge (where sea & mountains meet)
- Ride Magic Carpet S past the trees and land on the E coast
- Walk W to staircase
- Walk N to Longadeseo
- Must have Longadeseo Pass to enter
- Enter NE hidden bar from top left side
- Head upstairs, talk to Hock
- Head downstairs, say yes to Hock
- Enter church, talk with priest (Hock #1)
- Enter dance hall, talk with woman in underground (Hock #2)
- Head to upper part of town, then head left and down to talk with bartender behind the bar. Say No, No, then Yes. (Hock #3)
- Walk to east part of town, descend well, talk to Hock
- Leave Longadeseo
- Walk north to Northern Graves
- Speak with Sally
- Return to Longadeseo
- Enter NE house, speak with Sally below
- Give Rusted Sword
- Receive Sword of Ramias. Sally will only finish working on the Rusted Sword if the player has the other 3 legendary equipment (Sufida, Orgo, Cevas)
Hell Cloud Castle
- Warp to Clear Vale (dream)
- Ride Flying Bed E past small lake, NE past cave, and land NE past the water shoals
- Walk NE as far as possible
- Ride Flying Carpet N, land
- Fall down giant chasm
- Enter forest tile to Sacred Altar
- Bottom - Heart, Left - Lightning, Top - Sun, Right - Cross. You only may progress after collecting the four legendary equipment
- Defeat boss
- Enter Hell Cloud Castle
- Walk to throne room
- Highly recommended to save the game sometime before the next segment
- Defeat boss gauntlet
- Terry joins
- Leave castle
- Re-enter puzzle and rise
- Enter Cloud Castle (Zenithia)
- Speak with King
- Head to middle area in castle, enter well
- Walk N to Pegasus Tower
Pegasus Tower
- Defeat boss at the top of the tower
- Falchion reunites with Pegasus
- Return to Zenithia (dream)
- Talk with King, receive Reigns of Pegasus
Dark World
- Go to world map
- Use the Reins of Pegasus
- Press the "blue" button (SNES X button)
- Walk E to Despair Town
- Enter NW underground area
- Speak with Ende, receive Old Pipe
- Leave Despair Town
- Walk W to Hell Herb Hotsprings
- Talk with attendant
- Wait in line, enter hot springs
- Enter middle structure from the right, holding left when at the top right corner
- Take well back to real world
- If you have a Wing of the Wyvern, warp to Gent. Otherwise, navigate to the Reidock/Gent area with the Reins of Pegasus
- Ride Pegasus N past Gent to find Zaxon
- Enter Zaxon
- Present the Old Pipe to the dog in the W house
- Cutscenes, receive Ende's Tools
- Leave Zaxon
- Use Reigns of Pegasus, go to dark world (blue button/X)
- Walk to Despair Town
- Speak with Ende, choose equipment, stay overnight
- Leave Despair Town (party's stats are restored)
Greed Town
- Enter Greed Town (technically, there is nothing you need to do here)
- Walk NW to find hidden lake in middle of forest
- Talk with man in red on right, say Yes, enter scenario
- Walk right (do not fall down slope), then inspect treasure chest. Villagers leave
- Inspect the treasure chest again, traverse passage
- Walk NE on world map to Prison Town
Prison Town
- Defeat boss outside
- Enter, get captured
- Leave cell, walk up to stairs
- Speak with Soldi, receive Soldier's Uniforms
- Use Soldier's Uniforms immediately
- Walk upstairs to the central room, with a staircase in the middle and two strategy rooms in the bottom left/right corner. Speak with guard on the left
- Go upstairs toward throne room, speak with enemy General outside the gated area
- Return to villagers' quarters. Use Soldier's Uniforms to unequip them
- Walk down, speak with Rui from behind bar
- Speak with right side shopkeeper (with two barrels behind him) on the right from the left
- Walk to bottom of room, then right to talk to Gon
- Talk with shopkeeper behind counter
- Walk towards center of room, cutscenes start
- Fight enemies (can either win or lose)
- Wake up in cell, speak with guard from behind cell
- Head to throne room
- Defeat boss
- Head to deepest part of prison (where Soldi initially was)
- Use Prison Key on cell door, then on chained man
- Speak with chained man, receive Orb of Truth
- Very important - speak with Soldi AGAIN
- Leave, cutscene plays immediately
- Leave Prison Town
Lament Prison
- Walk NW to edge of cape, use Orb of Truth
- Walk NE to Lament Prison
- Descend, watch cutscenes with chained man
- Leave
- Return to Prison Town
- Talk with Klimt, Klimt joins
- Leave
- Walk NW to edge of cape, use Orb of Truth
- Walk NE to Lament Prison
- Descend, watch cutscenes
- Defeat boss
- Watch cutscenes
Final
- Enter Deathtamoor's Castle
- Beat the game