 Dragon Quest III Speedrunning Guide

Foreward
This document is a comprehensive guide to speedrunning Dragon Quest III ("DQIII"). DQIII is a very complex speedgame with a rich history of strategies. This guide attempts to describe to the reader what the speedrun route is doing, how the route achieves short term and long term goals, and most of the necessary details to understand what is and is not in the player's control. As will be noted many times, DQIII is a game where many players have individual preferences, and deviations may occur. However, the overall goal of most segments in speedruns is almost always aligned.
This guide covers the standard "nico rule" category, which is effectively "any% glitchless". This is far and away the most popular category for this game, but there are a few others, including Hero-only, defeat Dark Zoma, and "complete Sugoruku domination" (which involves defeating Shinryuu and clearing all Sugoroku (Pachisi) boards). There are not many glitches in this game, but there is an item duplication trick which is banned in this category. There are some exploits, such as the in-battle defense reset bug, which are allowed.
Each section has a high level summary of what the route does, but by double clicking anywhere with a "+" icon, details are available regarding route strategy, and especially detailed information about encounters and bosses. Further, there are tooltips to provide helpful translations for common terms that are usually referred to by their Japanese name, most notably spell names, but also including item names. Many of English translation names come from the Super Famicom fan translation version of this game, including enemy and item names. Finally, there are helpful "equipment checks" for the reader to review what the current item & equipment loadout should be at a particular point in the game.
The is a symbol for timestamp links to morisot's fastest time, who as of writing this guide has the fastest time in this game. The video linked is a YouTube reupload for ease of viewing and timestamp linking.
This guide covers the standard "nico rule" category, which is effectively "any% glitchless". This is far and away the most popular category for this game, but there are a few others, including Hero-only, defeat Dark Zoma, and "complete Sugoruku domination" (which involves defeating Shinryuu and clearing all Sugoroku (Pachisi) boards). There are not many glitches in this game, but there is an item duplication trick which is banned in this category. There are some exploits, such as the in-battle defense reset bug, which are allowed.
Each section has a high level summary of what the route does, but by double clicking anywhere with a "+" icon, details are available regarding route strategy, and especially detailed information about encounters and bosses. Further, there are tooltips to provide helpful translations for common terms that are usually referred to by their Japanese name, most notably spell names, but also including item names. Many of English translation names come from the Super Famicom fan translation version of this game, including enemy and item names. Finally, there are helpful "equipment checks" for the reader to review what the current item & equipment loadout should be at a particular point in the game.
The
is a symbol for timestamp links to morisot's fastest time, who as of writing this guide has the fastest time in this game. The video linked is a YouTube reupload for ease of viewing and timestamp linking.
Contributors
- Written by cleartonic
 Twitch
 Discord
 Twitter
 YouTube
 GitHub
This guide's first version was completed in November of 2020.
This guide's layout was inspired by TheCowness' guide to Dragon Warrior IV RTA. TheCowness kindly let me use his website's backend code for this guide.
Twitch
Discord
Twitter
YouTube
GitHub
This guide's first version was completed in November of 2020.
This guide's layout was inspired by TheCowness' guide to Dragon Warrior IV RTA. TheCowness kindly let me use his website's backend code for this guide.
Notes to this guide
Notes & Details:
This section covers a swath of general knowledge about this game and how the guide is written. This is an important section for new players to read & ingest, or to refer back to for certain game mechanics.
This guide is primarily geared towards beginner to intermediate players. The guide is written to spell out both what the speedrun route is doing and why the route is doing what it does. Although people who have been playing the game a long time may learn some things from reading these notes, most advanced players will either know most of what is in this document, or have varying opinions on some strategies and utilize different methods for overall RTA approach, including different routes altogether. This is a complex game where intermediate to advanced players truly have a lot of customization on how they handle problems, based on risk acceptance and sometimes simply preference.
These notes are designed relatively light-weight for descriptions on where and how to get around the world. An assumption is made that the reader can review a VOD and follow along, because almost all runs will generally follow the same path, with some minor deviations. For example, there will not be detailed notes about how to walk on the world map or in dungeons - those are easily accessible and learned via VODs. This route will closely follow morisot's fastest time, the current fastest time for this game & category (any% glitchless), with the exception of the King Sword route being elaborated upon late in the route.
There will be some discussion in these notes about backup strategies and specifically race strategies, which are often slightly slower strategies to collect more gear & money and to fight some optional encounters for general safety. This game can be very difficult in a single-segment race scenario (to be clear, racing means when multiple players race the game at the same time to completion), so there are often minor tweaks the player chooses to employ. Further, the player must decide their safety level and reset threshold. This game can be very not friendly to new players - and frankly, sometimes trudging through runs that have full party deaths early on is not really beneficial to learning.
As mentioned in the foreward, this document & its route is for the standard any% glitchless category. The rules are:Timing begins from Power On of the console
Timing ends when the final "To Be Continued To Dragon Quest I & II" screen finishes appearing and the BGM ends.
Turbo controller is allowed
Many players use a commonly available "ASCIIPad" Super Famicom controller, and set the B and X buttons to Turbo (and never toggle). Most menuing for confirming is done with Turbo X. Manually confirming is done with the A button. Turbo B is mostly used to advance text. The Y button is used for fully canceling menus, such as canceling all the way from a character's inventory to player control in 1 action, as opposed to using Turbo B.
It is very important to note that many players play this game slightly different. Everyone has their little preferences. It takes a lot of time to discover these preferences as the player. This guide may be telling the player to do a specific thing, but sometimes players like to deviate for the sake of handling battles, some menuing, some purchasing options. A general take-away is to almost never deviate on 'what' the the player is doing in this guide, but the player can deviate on 'how' the player do it. For example, in almost all cases, and a few rogue exceptions by routing choice, the player should never deviate from going to the Pyramid immediately after going to Romaly. The target should be to get the Magic Key as soon as possible. But, how the player gets there, with some menuing and purchasing choices is largely up to the player based on risk levels. The player can buy some safety gear, buy some extra herbs, revive dead characters, etc., but the goal at that time is to get to the Pyramid. This guide will attempt to make these destinations explicitly clear. In contrast, although there will be notes on menus and purchasing, realize that there is room for experimentation and deviation. Keep in mind that this is a very competitive game, and although there is room for deviation, many top level runners have similar menuing methods that do minimize inputs and minimize time in menus/shops.
Menuing is a very important part of going fast in this game, however, menuing optimization is not covered in this guide - the reasoning being that the player will most assuredly have to review VODs to see how fast players make menuing choices. There is little value in spelling this concept out in text form. Menuing speed is not important for a new player to learn the game, and will come in time with a combination of playing the game more often, and dedicating practice & research time towards other players. This guide will follow some of the faster runners' regular strategies for doing menu related tasks such as sorting items and distributing inventory items, but won't cover things such as button presses and navigation in detail.
Further, it is important for newer players to pay close attention to these notes and reference VODs for keeping inventory menus clean and organized. There are times when the player will want to be executing commands in battle as quickly as possible and should enforce good habits early on to keep their inventory consistent. For example, during the walk through the Necrogond, these notes call for the Sage to have no weapon and for her first non-equipped slot to be the Sleep Staff, so that she can menu very quickly in battle to Sleep Staff, and the player shouldn't think twice about it. This is especially true for the Sage in the Dark World, where she should have consistent ordering of all her items, because she uses multiple in battle (Sage's Staff, Sleep Staff, Mist Staff).
It is important to understand up front how the threat level system (the "encounter rate") works on the world map. When reviewing VODs, pay close attention to how players walk on the world map. In general, try to walk on fields as much as possible, and minimize time on forest, mountains, swamps, all of which have higher threat levels. Almost all sailing areas have much lower threat levels.
Another prevalent part of this speedrun is the use of the Thief ability called "Shinobi Feet", modernly translated as Tiptoe. It drastically reduces the number of random encounters the player enters by slowing down the threat depletion. It costs 0 MP. While watching VODs, one can notice that many players use Shinobi Feet at the same or very similar locations. Use of Shinobi Feet will not be highlighted specifically in this guide, as the player should learn these locations, but this guide will occasionally remind the player to use it. Generally the player should always have Shinobi Feet active after the Thief turns into a Sage (for over half the game), but there are a few exceptions. Shinobi Feet will be abbreviated as SF for this guide.
When using either Wings or Rura (Return) spell, this guide will use a convention for what position the warp location is in the menu. The convention is in (x,y) format, where x is the page of the menu, and y is the number of slots down on that page. For example, if Dharma is on the 2nd page, and the 4th entry down, the notes will say “Wing to Dharma (2,4)”. The player can save inputs by pressing up instead of down to menu vertically when y = 4 or 5, because those entries are closer to the bottom of the page. The notation for “L” means press left on the d-pad, and “B” means bottom, which implies pressing up - these allow for consistent menus.
Whenever party members are defeated, except when the route specifically calls for it, they should be revived. Generally the player shoul revive in towns when they're doing other things in the early game, but throughout the mid-game, warping to Kazave is the fastest place to access a cleric to revive. When Ramia is obtained, the player should warp to Dharma and fly north to get Yggdrasil Leaves to both use existing leaves and replenish.
Every enemy has 8 AI slots, meaning they can choose from 8 actions every turn. There are some exceptions where enemies do have these 8 slots, but use them in a certain pattern (e.g., Baramos's routine). There are some other exceptions as well, like cat flies using Mahoton on turn 1, or grey antbears in the Cave of Temptation focusing attacks on one ally. But for the most part, enemies and bosses draw from one of their eight slots and then do the action, then repeat.
Enemies do not have standard critical hits on any given physical attack. Instead, enemies that can critically hit have it as part of their AI slots. Typically there's an animation that tells, and for most enemies that animation being played is at that point a 1 in 8 chance to get critically hit. For example, Boss Troll has standard attacks without critical, but his large overhead swing animation has a 1 in 8 chance to critical.
The player can choose the Hero's gender. This guide will refer to Hero as a male. The rest of the party's genders must be followed for Male Warrior, Female Thief, Female Mage. The gender of the Merchant does not matter.
Encounter cancelling is an often referred-to term in this guide. First, it is important to describe the way this game handles encounters, and many other modern DQ games. The game draws a number when entering an area, leaving a battle, or through some other means, called the "threat level". As the player walks around areas with encounters, that threat level depletes towards zero. When the threat reaches zero, a battle happens, then the number is re-drawn. The number drawn is from a normally distributed bell curve (refer to the "Encounter Analysis" in the links in the next section, at the end for more details). This ensures a normalized system where the player will get into encounters at a regulated rate, compared to the older DQ titles on NES where the system was much more pure percentage chance of encounter per step. Different tiles, like mountains, forests and swamps, will decrease the threat level (the tiles' "depletion" value) more. SF decreases the depletion of any tile by 62.5%, which is very significant.
Encounter cancelling is the idea of forcing the game to redraw the threat level without getting into a fight. On the world map, it usually involves either entering a town, shrine or some area, then leaving immediately. Also on the world map is use of the Lamp of Darkness, which allows the player to reset the threat level if it is daytime. In dungeons, threat level is reset by transitioning floors. Dungeons with floor transitions close to each other often yield very low overall encounters, such as Ra Mirror Cave and Baramos Castle. Notably, getting into a battle will reset the threat level - so there are times where the point of going slightly out of the player's way to encounter cancel is completely lost when a battle has already happened. In practice this usually happens when the player is just a few steps from a place to encounter cancel and they get an encounter on the way there, so the player should just turn around and keep going.
Newer players can simply encounter cancel every time this guide asks. More veteran players learn how to assess whether or not an encounter cancel is worth the time, but in the vast majority of cases, it is.
This guide is primarily geared towards beginner to intermediate players. The guide is written to spell out both what the speedrun route is doing and why the route is doing what it does. Although people who have been playing the game a long time may learn some things from reading these notes, most advanced players will either know most of what is in this document, or have varying opinions on some strategies and utilize different methods for overall RTA approach, including different routes altogether. This is a complex game where intermediate to advanced players truly have a lot of customization on how they handle problems, based on risk acceptance and sometimes simply preference.
These notes are designed relatively light-weight for descriptions on where and how to get around the world. An assumption is made that the reader can review a VOD and follow along, because almost all runs will generally follow the same path, with some minor deviations. For example, there will not be detailed notes about how to walk on the world map or in dungeons - those are easily accessible and learned via VODs. This route will closely follow morisot's fastest time, the current fastest time for this game & category (any% glitchless), with the exception of the King Sword route being elaborated upon late in the route.
There will be some discussion in these notes about backup strategies and specifically race strategies, which are often slightly slower strategies to collect more gear & money and to fight some optional encounters for general safety. This game can be very difficult in a single-segment race scenario (to be clear, racing means when multiple players race the game at the same time to completion), so there are often minor tweaks the player chooses to employ. Further, the player must decide their safety level and reset threshold. This game can be very not friendly to new players - and frankly, sometimes trudging through runs that have full party deaths early on is not really beneficial to learning.
As mentioned in the foreward, this document & its route is for the standard any% glitchless category. The rules are:
Many players use a commonly available "ASCIIPad" Super Famicom controller, and set the B and X buttons to Turbo (and never toggle). Most menuing for confirming is done with Turbo X. Manually confirming is done with the A button. Turbo B is mostly used to advance text. The Y button is used for fully canceling menus, such as canceling all the way from a character's inventory to player control in 1 action, as opposed to using Turbo B.
It is very important to note that many players play this game slightly different. Everyone has their little preferences. It takes a lot of time to discover these preferences as the player. This guide may be telling the player to do a specific thing, but sometimes players like to deviate for the sake of handling battles, some menuing, some purchasing options. A general take-away is to almost never deviate on 'what' the the player is doing in this guide, but the player can deviate on 'how' the player do it. For example, in almost all cases, and a few rogue exceptions by routing choice, the player should never deviate from going to the Pyramid immediately after going to Romaly. The target should be to get the Magic Key as soon as possible. But, how the player gets there, with some menuing and purchasing choices is largely up to the player based on risk levels. The player can buy some safety gear, buy some extra herbs, revive dead characters, etc., but the goal at that time is to get to the Pyramid. This guide will attempt to make these destinations explicitly clear. In contrast, although there will be notes on menus and purchasing, realize that there is room for experimentation and deviation. Keep in mind that this is a very competitive game, and although there is room for deviation, many top level runners have similar menuing methods that do minimize inputs and minimize time in menus/shops.
Menuing is a very important part of going fast in this game, however, menuing optimization is not covered in this guide - the reasoning being that the player will most assuredly have to review VODs to see how fast players make menuing choices. There is little value in spelling this concept out in text form. Menuing speed is not important for a new player to learn the game, and will come in time with a combination of playing the game more often, and dedicating practice & research time towards other players. This guide will follow some of the faster runners' regular strategies for doing menu related tasks such as sorting items and distributing inventory items, but won't cover things such as button presses and navigation in detail.
Further, it is important for newer players to pay close attention to these notes and reference VODs for keeping inventory menus clean and organized. There are times when the player will want to be executing commands in battle as quickly as possible and should enforce good habits early on to keep their inventory consistent. For example, during the walk through the Necrogond, these notes call for the Sage to have no weapon and for her first non-equipped slot to be the Sleep Staff, so that she can menu very quickly in battle to Sleep Staff, and the player shouldn't think twice about it. This is especially true for the Sage in the Dark World, where she should have consistent ordering of all her items, because she uses multiple in battle (Sage's Staff, Sleep Staff, Mist Staff).
It is important to understand up front how the threat level system (the "encounter rate") works on the world map. When reviewing VODs, pay close attention to how players walk on the world map. In general, try to walk on fields as much as possible, and minimize time on forest, mountains, swamps, all of which have higher threat levels. Almost all sailing areas have much lower threat levels.
Another prevalent part of this speedrun is the use of the Thief ability called "Shinobi Feet", modernly translated as Tiptoe. It drastically reduces the number of random encounters the player enters by slowing down the threat depletion. It costs 0 MP. While watching VODs, one can notice that many players use Shinobi Feet at the same or very similar locations. Use of Shinobi Feet will not be highlighted specifically in this guide, as the player should learn these locations, but this guide will occasionally remind the player to use it. Generally the player should always have Shinobi Feet active after the Thief turns into a Sage (for over half the game), but there are a few exceptions. Shinobi Feet will be abbreviated as SF for this guide.
When using either Wings or Rura (Return) spell, this guide will use a convention for what position the warp location is in the menu. The convention is in (x,y) format, where x is the page of the menu, and y is the number of slots down on that page. For example, if Dharma is on the 2nd page, and the 4th entry down, the notes will say “Wing to Dharma (2,4)”. The player can save inputs by pressing up instead of down to menu vertically when y = 4 or 5, because those entries are closer to the bottom of the page. The notation for “L” means press left on the d-pad, and “B” means bottom, which implies pressing up - these allow for consistent menus.
Whenever party members are defeated, except when the route specifically calls for it, they should be revived. Generally the player shoul revive in towns when they're doing other things in the early game, but throughout the mid-game, warping to Kazave is the fastest place to access a cleric to revive. When Ramia is obtained, the player should warp to Dharma and fly north to get Yggdrasil Leaves to both use existing leaves and replenish.
Every enemy has 8 AI slots, meaning they can choose from 8 actions every turn. There are some exceptions where enemies do have these 8 slots, but use them in a certain pattern (e.g., Baramos's routine). There are some other exceptions as well, like cat flies using Mahoton on turn 1, or grey antbears in the Cave of Temptation focusing attacks on one ally. But for the most part, enemies and bosses draw from one of their eight slots and then do the action, then repeat.
Enemies do not have standard critical hits on any given physical attack. Instead, enemies that can critically hit have it as part of their AI slots. Typically there's an animation that tells, and for most enemies that animation being played is at that point a 1 in 8 chance to get critically hit. For example, Boss Troll has standard attacks without critical, but his large overhead swing animation has a 1 in 8 chance to critical.
The player can choose the Hero's gender. This guide will refer to Hero as a male. The rest of the party's genders must be followed for Male Warrior, Female Thief, Female Mage. The gender of the Merchant does not matter.
Encounter cancelling is an often referred-to term in this guide. First, it is important to describe the way this game handles encounters, and many other modern DQ games. The game draws a number when entering an area, leaving a battle, or through some other means, called the "threat level". As the player walks around areas with encounters, that threat level depletes towards zero. When the threat reaches zero, a battle happens, then the number is re-drawn. The number drawn is from a normally distributed bell curve (refer to the "Encounter Analysis" in the links in the next section, at the end for more details). This ensures a normalized system where the player will get into encounters at a regulated rate, compared to the older DQ titles on NES where the system was much more pure percentage chance of encounter per step. Different tiles, like mountains, forests and swamps, will decrease the threat level (the tiles' "depletion" value) more. SF decreases the depletion of any tile by 62.5%, which is very significant.
Encounter cancelling is the idea of forcing the game to redraw the threat level without getting into a fight. On the world map, it usually involves either entering a town, shrine or some area, then leaving immediately. Also on the world map is use of the Lamp of Darkness, which allows the player to reset the threat level if it is daytime. In dungeons, threat level is reset by transitioning floors. Dungeons with floor transitions close to each other often yield very low overall encounters, such as Ra Mirror Cave and Baramos Castle. Notably, getting into a battle will reset the threat level - so there are times where the point of going slightly out of the player's way to encounter cancel is completely lost when a battle has already happened. In practice this usually happens when the player is just a few steps from a place to encounter cancel and they get an encounter on the way there, so the player should just turn around and keep going.
Newer players can simply encounter cancel every time this guide asks. More veteran players learn how to assess whether or not an encounter cancel is worth the time, but in the vast majority of cases, it is.
Links to resources:
Link: Niconamarta DQIII page. May need to navigate to "ドラゴンクエストシリーズ" on the left side, then "ドラゴンクエスト3"
Link: Speedrun.com DQIII page
Link: Dragon Quest III RTA FAQ. Provides in depth details about various hidden/unexplained game mechanics
Link: Dragon Quest III Encounter Analysis. Holds Details about likelihood of encounters relevant to RTA
Link: Dragon Quest RTA Compendium, DQIII tab. This is a community organized document for many DQ series RTA resources
Link: YouTube discussion of DQIII speedrun route (by me, 2016)
Link: Dragon Quest III Practice Hack, allows for efficient practice and follows the standards of this guide
New Game to Personality Test
Create a new character slot. Name the Hero any name, choose a gender, choose message speed 8, and confirm Stereo.
At least one non-occupied file data slot must be available. All runs will start from power-on, meaning when the Reset button is hit on the console, timing will begin. From power on, select a new file, create a Hero (default male), and select message speed 8.
The Hero's gender does not matter for a speedrun. In game, the gender of a character only reflects some personalities and gender specific equipment. Message speed 8 is ideal for usage of a turbo controller.
The Hero's gender does not matter for a speedrun. In game, the gender of a character only reflects some personalities and gender specific equipment. Message speed 8 is ideal for usage of a turbo controller.
Walk forward to the waterfall. Complete the personality test.
The game begins with personality test. The player first enters in their name (which the player can put any character the player would like, fastest is "A", the first character, and to hit End as quickly as possible), then select 01 and 01 for month/day. Then, the game will have a few text boxes, then ask the player a series of questions. Based on what questions the player answers and how the player answers them, the player will get an internal score, and that score will dictate which of ~10 scenarios the player gets. The player controls the Hero during these, and based on player actions, the game will decide a personality for the player. Look for the top right "sentence" in the personality text when first given a Y/N dialogue for the test, and find the corresponding phrase in the chart below. Then select Yes or No accordingly:
After getting the scenario in the forest with the old man, simply walk to the left to leave, ignoring the boulder. Progress through the rest of the intro sequence until the players gain control in Aliahan.
By leaving the forest immediately with the scenario in the forest, the game will be awarding the Hero with the "Lazy" personality. Although this sounds bad, it is actually a decent personality for the speedrun, given how fast the player can complete the intro scenario. Personalities all have percentage modifiers from a "base" for that given character's class. The Lazy personality awards growth of 115% for Strength, 120% for Stamina (HP), at the expense of 60% Agility and 65% Wisdom. Although the low agility sounds bad, and it is generally not great, it at least gives consistency for many turns in battle, and is actually quite important in the late game when setting up Bikill (2x attack spell) to ensure the Hero gets his attack with the modifier applied, because the Hero goes last in battle often. There is an alternative intro route that is not covered in this guide that was more popular historically, which is the Valiant personality, which gets 140% Strength/70% Agility/100% Stamina/80% Wisdom/70% Luck. The intro sequence is fairly fast for this personality, and although the strength gains are incredibly good, the 100% Stamina causes fairly large problems for a speedrun compared to the Lazy personality's 120% growth.
| Japanese characters | Translation | Y/N Order |
|---|---|---|
| 勝利は | Victory only achieved | YNNNYYY |
| 太陽は | Sun king nature | YNNNNYYY |
| 人生は | Life boring | NNYNYYY |
| 冒険は | Tired of adventures | NNNYNYYY |
| 冒険に出 | Would you rather | NYNNNNYY |
After getting the scenario in the forest with the old man, simply walk to the left to leave, ignoring the boulder. Progress through the rest of the intro sequence until the players gain control in Aliahan.
By leaving the forest immediately with the scenario in the forest, the game will be awarding the Hero with the "Lazy" personality. Although this sounds bad, it is actually a decent personality for the speedrun, given how fast the player can complete the intro scenario. Personalities all have percentage modifiers from a "base" for that given character's class. The Lazy personality awards growth of 115% for Strength, 120% for Stamina (HP), at the expense of 60% Agility and 65% Wisdom. Although the low agility sounds bad, and it is generally not great, it at least gives consistency for many turns in battle, and is actually quite important in the late game when setting up Bikill (2x attack spell) to ensure the Hero gets his attack with the modifier applied, because the Hero goes last in battle often. There is an alternative intro route that is not covered in this guide that was more popular historically, which is the Valiant personality, which gets 140% Strength/70% Agility/100% Stamina/80% Wisdom/70% Luck. The intro sequence is fairly fast for this personality, and although the strength gains are incredibly good, the 100% Stamina causes fairly large problems for a speedrun compared to the Lazy personality's 120% growth.
Retrieve Strength Seed in the first drawer in the Hero's house. Talk to the King. Retrieve Luck Seed in the bottom left of the castle's 2nd floor. Head to 2nd floor of Ruida's tavern.
The goal of this segment is to progress the story and collect the 2 seeds to sell later.
Talking to the King is required. The King gives the player a bunch of gear - 50G, Traveler's Clothes x1, Club x2, and Cypress Stick x1.
Talking to the King is required. The King gives the player a bunch of gear - 50G, Traveler's Clothes x1, Club x2, and Cypress Stick x1.
Create four characters: Merchant, Mage, Thief and Warrior.
This is the segment where the player creates the characters for the journey. The goal is to create a Merchant first, required for the story (and is not an ally used in battle). Then, the player's allies will be created, in order of Mage, Thief, then Warrior. This order is important for menuing, because when recruiting the characters, the bottom-most option upon adding party members to the party will be, in order, Warrior, Thief, then Mage, which is the party order the player wants to have. During this process, the player will be given stat increasing seeds for each character during creation. It almost always is 5 seeds per character, but very rarely the player is awarded 6 seeds. Using these seeds during character creation both gives higher stats to the new character, but also determines their potential personality. The system is somewhat complex, but the general idea is that the game identifies what the character's "greatest comparative stat" is, then based on some criteria including which class it is, which gender, and the distribution of other stats, the game decides a group of personalities to draw from. This document has this information, on the "Personality - Creation" tab. For example, if a Thief's highest stat is Agility, but Agility is not greater than 11, but is greater than 7, it will choose from a pool of "Foolish", "Agile", "Solitary", "Fearless", all of which have their own stat growths. The notes below per character for the speedrun are relatively straightforward.
After each character is created, the player has to be looking in the Japanese text for the appropriate personality confirmation to appear - this is how the player decides if the character is going to actually join the party. This takes a bit of practice, but the final dialogue with the Y/N selection after rolling stat seeds will show this personality. Look for the following Japanese characters:
Stamina Seeds (スタミナのたね), the third option when using seeds, corresponds to the 3rd stat, Stamina (たいりょく). When rolling stats and seeds per below, primarily look to these words and their values.
| Japanese characters | Translation |
|---|---|
| タフガイ | Tough |
| てつじん | Ironman |
| がんばりや | Eager |
| おおぐらい | Gourmet |
Create a Merchant, any gender. Select the option to manually distribute seeds, then select Strength seeds until fully depleted. Accept the character.
The Merchant's gender does not matter for the Yellow Orb quest, which occurs over halfway through this route. The player is simply creating the character now while they are at Ruida's tavern. The game will ask if the player want to manually select seeds, or to distribute them automatically. Although distributing them automatically may seem smart when the player don't care about the seeds for this character, the automatic dialogue system is fairly slow, and it is much faster to choose to put the seeds into Strength.
Create a Mage, choose female. Identify the Stamina stat, and give all seeds towards Stamina. If Mage's Stamina is >= 16, there is a 33% chance of either Eager, Tough or Ironman. Accept Tough as a priority, and Ironman as a last resort. Reject Eager.
Stamina is by far the most important stat for starting characters, for both Stamina growths early in the game, and for long term Stamina growth via their personality growths. The Tough personality yields 140% Stamina growth and 115% Strength growth, whereas Ironman yields 130% Stamina growth an 105% Strength growth. The player can decide whether or not to take Tough or Ironman, but Tough is easily the most ideal, and most players will try a few times at least for Tough on the Mage, the reason being that the Mage turns into a Warrior later, and high HP all around is extremely helpful on tank characters.
Create a Thief, choose female. Identify the Stamina stat, and give all seeds towards Stamina. If Thief's Stamina is >= 15, there is a 33% chance of either Gourmet, Tough or Ironman. Accept Tough as a priority, and Ironman as a secondary, and Gourmet as a last resort.
The same logic for Mage applies here, with the exception that the Thief has the opportunity to change her personality via a Courage x100 Book that the player can opt to collect while in castle town Isis, which yields the Fearless personality, which is 95% Str/120% Agl/115% Vit/100% Wis/100% Luck. So, the player can opt for slightly less Stamina on the Thief for great Agility gains, which is very nice to have. So the player can make the choice if they'd like to collect the book and take a less desireable personality (this could be the case, for example, if the player rolls extremely high Vitality seed rolls for the Thief, but gets a less desireable personality, and the player wants to keep the high Vitality stat for the early game) However, the benefits of a 140% HP growth Thief probably outweigh a 120% Agility Thief. It is difficult to say for sure.
Create a Warrior, choose male. Identify the Stamina stat, and give all seeds towards Stamina. If Thief's Stamina is >= 19, there is a 50% chance of either Tough or Ironman. Only accept Tough, reject Ironman.
Notice that the character creation for Warrior is very fast - players can hold down Turbo A to create a male warrior with the name "ああああ" ("AAAA") very fast. Although Ironman for other characters is a potential option, it is not for the Warrior. The Warrior will never class change, and needs as much HP as possible, which includes the Tough personality.
Go downstairs and recruit characters. For each character, choose Recruit, then choose the bottom menu option, which will be the proper order to recruit (Warrior, Thief, Mage).
The order the characters were created in was for a purpose - the player should be selecting the bottom option in the Recruit menu every time. So the characters are made in reverse, then added in reverse, yielding the correct order for the party.
Give the Hero's Traveler's Clothes to Warrior and equip, the Hero's Club goes to Warrior and equip, and the Hero's Club goes to Thief and equip.
This is distributing the King's goods to the party. Keep in mind that any characters can receive this (or any) gear from a dead character. The Traveler's Clothes go to the Warrior for now, but if he were to die, another character could temporarily borrow them. This concept is mostly relevant for the upcoming Pyramid segment.
World Map to Reeve
Head north towards Reeve. Ideally fight 1 fight for some EXP and gold.
Over the course of all encounters from this point on throughout the end of Najimi Tower, the player has a few goals. The most important of which is to get to level 2 with the Warrior, Mage and Thief. This often occurs within 2-3 battles. The reason level 2 is so important is that the game will be rewarding the characters that have received massive stamina "injections" via seeds with a large HP correction at level 2. The game attempts to catch up a character that has a relatively low HP value relative to their Stamina, and this results in a huge amount of HP gain for the first level. For example, a Mage created from character creation has 10 HP and 5 Stamina at level 1. This is a relatively normal balance. However, by using 5 Stamina seeds, that Mage could then have 10 HP and 15 Stamina. The game recognizes that 15 Stamina is way more than the "normal" 5, so when level 2 comes, regular stat gains are rewarded for everything but HP and MP, then the game attempts to auto correct HP and MP to their normal levels. The Mage will gain what would be "normal" for a character with 15 Stamina, which often results in 20+ HP awarded at level 2. The Hero is not considered crucially important to get to level 2, because the Hero does not receive stamina seeds at level 2. Further, the Hero takes more experience points to level up compared to the rest of the cast between the levels 1 through about 18, so the Hero will generally be behind in levels for most of the early to mid game.
Encounters:
| Name | Lv | HP | MP | EXP | Gold | Atk | Def | Agl | Resist 1 | Resist 2 | Resist 3 | Drop | Actions |
|---|---|---|---|---|---|---|---|---|---|---|---|---|---|
| Slime スライム |
1 | 8 | 0 | 4 | 2 | 9 | 5 | 4 | FIRE: None ICE: None WIND: None ZAP: None DEATH: None |
SACRIFICE: None SLEEP: None STOPSPELL: Null SAP: None SURROUND: None |
MP_DRAIN: Null CONFUSION:None SLOW: None EXPEL: Low |
Herb やくそう 1/256 (0.39%) |
Attack (6/8) Run (2/8) |
| Raven おおがらす |
1 | 9 | 0 | 6 | 3 | 10 | 6 | 6 | FIRE: None ICE: None WIND: None ZAP: None DEATH: None |
SACRIFICE: None SLEEP: None STOPSPELL: Null SAP: None SURROUND: None |
MP_DRAIN: Null CONFUSION:None SLOW: None EXPEL: High |
Herb やくそう 2/256 (0.78%) |
Attack (8/8) |
| Horny Hare いっかくうさぎ |
2 | 10 | 0 | 8 | 3 | 12 | 8 | 5 | FIRE: None ICE: None WIND: None ZAP: None DEATH: None |
SACRIFICE: None SLEEP: None STOPSPELL: Null SAP: None SURROUND: None |
MP_DRAIN: Null CONFUSION:None SLOW: None EXPEL: High |
Herb やくそう 16/256 (6.25%) |
Attack (6/8) Run (2/8) |
| Anteater おおありくい |
3 | 13 | 0 | 12 | 4 | 13 | 8 | 6 | FIRE: None ICE: None WIND: None ZAP: None DEATH: None |
SACRIFICE: None SLEEP: Low STOPSPELL: Null SAP: None SURROUND: None |
MP_DRAIN: Null CONFUSION:None SLOW: None EXPEL: High |
Leather Hat かわのぼうし 4/256 (1.56%) |
Attack (8/8) |
Right at the start of the game, there are many possibilities for encounters. New players can fight everything, and some advanced players can opt to flee from encounters if they feel particularly dangerous/slow. There are a few guidelines. The Hero, equipped with a Copper Sword, can generally one-shot most enemies or come very close (~8-12 damage). The Warrior deals about ~5-8 damage, and the Thief deals around ~2-4 damage. Finally, the Mage can use Blaze spell for ~8-13 damage, and the player should utilize all of Mage's MP during the beginning segments. So, typically a strategy will have Hero and Mage attack individual enemies, and the Warrior & Thief together can attack the same enemy. Compared to later fights in this game, these fights are trivial, and spending any amount of time in battle deciding actions during runs is definitely not advised. Practice a little in advanced, and generally try to clear them fast, but the player cannot really make a grave error during these fights. The player does not have herbs until the first Reeve visit, so be mindful.
This shop visit is to get enough Chimera Wings to navigate the first ~20 minutes of the game, and to comfortably heal the party during this time. Some players opt to put one set of 9x Herb in the Thief's inventory, but it is not imperative, since for the most part the whole party will either be attacking or running from battle entirely, and healing outside of battle. The player should do some quick math to figure out how many herbs can be bought. The magic number is 316 gold to be able to buy 9x 3 sets of herbs and 4x wings. If slightly less than that, then adjust one set of the herbs downwards. Finally, some players only buy 3x wing, which is the bare minimum - buying 4x implies one extra wing is bought, which either will definitely get used later or can potentially bail the player out of a bad situation in the early segments.
World Map to Najimi Tower
Head south to Najimi Tower entrance
No notes.
Encounters:
Refer to World Map to Reeve. The goal of level 2 still is in effect.
Najimi Tower
Head to the top of the tower and retrieve the Thief's Key. After, walk off the tower to leave, and Wing to Reeve (1,2).
If MP on the Mage is already very low, there is an Inn for which the player can stay on the first floor (bottom left room). This is generally a race option.
After the party gets to level 1/2/2/2 for Hero/Warrior/Thief/Mage, rearrange the party order to Warrior/Thief/Mage/Hero.
Healing the party is now a major task that occurs after battles. Especially after getting level 2 with the non-Hero characters, they must be healed immediately to max out their newly gained HP. The player has to feel out generally safe HP levels. This is true for the entirety of the game, but for now, HP should be around ~10+ to be safe, perhaps slightly more around ~15 on the party lead characters.
Optional: Collect the book from the old man's bookshelf for additional early game money.
Encounters:
| Name | Lv | HP | MP | EXP | Gold | Atk | Def | Agl | Resist 1 | Resist 2 | Resist 3 | Drop | Actions |
|---|---|---|---|---|---|---|---|---|---|---|---|---|---|
| Raven おおがらす |
1 | 9 | 0 | 6 | 3 | 10 | 6 | 6 | FIRE: None ICE: None WIND: None ZAP: None DEATH: None |
SACRIFICE: None SLEEP: None STOPSPELL: Null SAP: None SURROUND: None |
MP_DRAIN: Null CONFUSION:None SLOW: None EXPEL: High |
Herb やくそう 2/256 (0.78%) |
Attack (8/8) |
| Horny Hare いっかくうさぎ |
2 | 10 | 0 | 8 | 3 | 12 | 8 | 5 | FIRE: None ICE: None WIND: None ZAP: None DEATH: None |
SACRIFICE: None SLEEP: None STOPSPELL: Null SAP: None SURROUND: None |
MP_DRAIN: Null CONFUSION:None SLOW: None EXPEL: High |
Herb やくそう 16/256 (6.25%) |
Attack (6/8) Run (2/8) |
| Anteater おおありくい |
3 | 13 | 0 | 12 | 4 | 13 | 8 | 6 | FIRE: None ICE: None WIND: None ZAP: None DEATH: None |
SACRIFICE: None SLEEP: Low STOPSPELL: Null SAP: None SURROUND: None |
MP_DRAIN: Null CONFUSION:None SLOW: None EXPEL: High |
Leather Hat かわのぼうし 4/256 (1.56%) |
Attack (8/8) |
| Trick Moth じんめんちょう |
3 | 12 | 5 | 9 | 4 | 11 | 7 | 8 | FIRE: None ICE: None WIND: None ZAP: None DEATH: None |
SACRIFICE: None SLEEP: Low STOPSPELL: None SAP: None SURROUND: None |
MP_DRAIN: Low CONFUSION:None SLOW: None EXPEL: Low |
Chimera Wing キメラのつばさ 4/256 (1.56%) |
Attack (6/8) Manusa (2/8) |
| Froggore フロッガー |
3 | 15 | 0 | 12 | 5 | 14 | 8 | 7 | FIRE: None ICE: None WIND: None ZAP: None DEATH: None |
SACRIFICE: None SLEEP: None STOPSPELL: Null SAP: None SURROUND: None |
MP_DRAIN: Null CONFUSION:None SLOW: None EXPEL: High |
Herb やくそう 16/256 (6.25%) |
Attack (7/8) Defense (1/8) |
| Babble バブルスライム |
4 | 10 | 0 | 16 | 8 | 16 | 9 | 12 | FIRE: None ICE: None WIND: None ZAP: None DEATH: None |
SACRIFICE: None SLEEP: High STOPSPELL: Null SAP: None SURROUND: None |
MP_DRAIN: Null CONFUSION:None SLOW: None EXPEL: Low |
Antidote どくけしそう 32/256 (12.50%) |
Run (2/8) Attack (4/8) Poison Attack (2/8) |
| Magician まほうつかい |
4 | 23 | 4 | 20 | 10 | 15 | 15 | 13 | FIRE: None ICE: None WIND: None ZAP: None DEATH: None |
SACRIFICE: None SLEEP: None STOPSPELL: None SAP: None SURROUND: None |
MP_DRAIN: None CONFUSION:Low SLOW: None EXPEL: Null |
Holy Water せいすい 4/256 (1.56%) |
Mera (4/8) Attack (3/8) Run (1/8) |
The goal of reaching level 2 is still in place. Often, players will reach level 2 by the time they are in the long downwards hallway at the beginning of the tower, after entering from the world map. The player can opt to fight encounters in Najimi Tower for more experience, getting upwards of level 3. This is entirely situational, and often employed in race settings. This will reward slightly more stats (most importantly HP) which can help with the walk to the Pyramid. The fastest times in this game often do not bother, as running from battle is generally faster. The encounters in Najimi Tower are certainly fightable, with the exception of the Trick Moths, which cast Surround (drastically decrease party accuracy). Unless there are 1-2 Trick Moths which can be cleared quickly, these encounters should be ran from. Otherwise, Froggores are introduced and have slightly more HP, but are otherwise not particularly dangerous.
In the rightmost house, collect the Wisdom Seed (1st floor) and Antidote (2nd floor), then talk with the old man to receive the Magic Ball. Wing to Reeve (1,2) to leave.
If a character died along the way, this is the time to revive.
World Map to Cave of Temptation
Head southeast to the Cave of Temptation.
The player can opt to do an encounter reset in the small shrine to the south of the cave. If the player just got out of a battle and is about ~7 mountain tiles away from the shrine, this is generally a good idea.
Encounters:
| Name | Lv | HP | MP | EXP | Gold | Atk | Def | Agl | Resist 1 | Resist 2 | Resist 3 | Drop | Actions |
|---|---|---|---|---|---|---|---|---|---|---|---|---|---|
| Froggore フロッガー |
3 | 15 | 0 | 12 | 5 | 14 | 8 | 7 | FIRE: None ICE: None WIND: None ZAP: None DEATH: None |
SACRIFICE: None SLEEP: None STOPSPELL: Null SAP: None SURROUND: None |
MP_DRAIN: Null CONFUSION:None SLOW: None EXPEL: High |
Herb やくそう 16/256 (6.25%) |
Attack (7/8) Defense (1/8) |
| Babble バブルスライム |
4 | 10 | 0 | 16 | 8 | 16 | 9 | 12 | FIRE: None ICE: None WIND: None ZAP: None DEATH: None |
SACRIFICE: None SLEEP: High STOPSPELL: Null SAP: None SURROUND: None |
MP_DRAIN: Null CONFUSION:None SLOW: None EXPEL: Low |
Antidote どくけしそう 32/256 (12.50%) |
Run (2/8) Attack (4/8) Poison Attack (2/8) |
| Magician まほうつかい |
4 | 23 | 4 | 20 | 10 | 15 | 15 | 13 | FIRE: None ICE: None WIND: None ZAP: None DEATH: None |
SACRIFICE: None SLEEP: None STOPSPELL: None SAP: None SURROUND: None |
MP_DRAIN: None CONFUSION:Low SLOW: None EXPEL: Null |
Holy Water せいすい 4/256 (1.56%) |
Mera (4/8) Attack (3/8) Run (1/8) |
| Sting Wasp さそりばち |
4 | 12 | 0 | 14 | 6 | 18 | 11 | 10 | FIRE: None ICE: None WIND: None ZAP: None DEATH: None |
SACRIFICE: None SLEEP: None STOPSPELL: Null SAP: None SURROUND: None |
MP_DRAIN: Null CONFUSION:None SLOW: None EXPEL: Low |
Luck Seed ラックのたね 2/256 (0.78%) |
Attack (5/8) Call Same Kind (3/8) |
| Healer ホイミスライム |
4 | 30 | 255 | 24 | 8 | 14 | 10 | 15 | FIRE: High ICE: High WIND: Low ZAP: None DEATH: Low |
SACRIFICE: None SLEEP: High STOPSPELL: Null SAP: None SURROUND: None |
MP_DRAIN: High CONFUSION:Low SLOW: None EXPEL: Null |
Strength Seed ちからのたね 2/256 (0.78%) |
Attack (2/8) Hoimi (6/8) |
The encounters quickly become more dangerous. By now, hopefully the player has reached level 2 on the Warrior/Thief/Mage. If not, this is pretty much the last chance to do so, and is top priority. Otherwise, if trying to go fast, the player should run from these battles.
These encounters can definitely be fought for getting to level 3 (level 2 for the Hero), with some guidelines. Wasps will summon allies, and although they are good for EXP, they deal a lot of damage, and the player can be caught in a trap where Wasps summon allies faster than the player can keep up. Babbles can utilize a poison attack, for which the player has 1 Antidote - any more poisoned characters quickly becomes problematic, as Antidotes will not be purchased for a long time from now.
These encounters can definitely be fought for getting to level 3 (level 2 for the Hero), with some guidelines. Wasps will summon allies, and although they are good for EXP, they deal a lot of damage, and the player can be caught in a trap where Wasps summon allies faster than the player can keep up. Babbles can utilize a poison attack, for which the player has 1 Antidote - any more poisoned characters quickly becomes problematic, as Antidotes will not be purchased for a long time from now.
Cave of Temptation
No items are picked up here. There is a Sacred Knife available near the end of floor B1, but it is generally not retrieved unless the player is completely out of money options for Romaly.
Encounters:
| Name | Lv | HP | MP | EXP | Gold | Atk | Def | Agl | Resist 1 | Resist 2 | Resist 3 | Drop | Actions |
|---|---|---|---|---|---|---|---|---|---|---|---|---|---|
| Trick Moth じんめんちょう |
3 | 12 | 5 | 9 | 4 | 11 | 7 | 8 | FIRE: None ICE: None WIND: None ZAP: None DEATH: None |
SACRIFICE: None SLEEP: Low STOPSPELL: None SAP: None SURROUND: None |
MP_DRAIN: Low CONFUSION:None SLOW: None EXPEL: Low |
Chimera Wing キメラのつばさ 4/256 (1.56%) |
Attack (6/8) Manusa (2/8) |
| Magician まほうつかい |
4 | 23 | 4 | 20 | 10 | 15 | 15 | 13 | FIRE: None ICE: None WIND: None ZAP: None DEATH: None |
SACRIFICE: None SLEEP: None STOPSPELL: None SAP: None SURROUND: None |
MP_DRAIN: None CONFUSION:Low SLOW: None EXPEL: Null |
Holy Water せいすい 4/256 (1.56%) |
Mera (4/8) Attack (3/8) Run (1/8) |
| Sting Wasp さそりばち |
4 | 12 | 0 | 14 | 6 | 18 | 11 | 10 | FIRE: None ICE: None WIND: None ZAP: None DEATH: None |
SACRIFICE: None SLEEP: None STOPSPELL: Null SAP: None SURROUND: None |
MP_DRAIN: Null CONFUSION:None SLOW: None EXPEL: Low |
Luck Seed ラックのたね 2/256 (0.78%) |
Attack (5/8) Call Same Kind (3/8) |
| Antbear おばけありくい |
4 | 21 | 0 | 12 | 7 | 20 | 9 | 10 | FIRE: None ICE: None WIND: None ZAP: None DEATH: None |
SACRIFICE: None SLEEP: Low STOPSPELL: Null SAP: Low SURROUND: None |
MP_DRAIN: Null CONFUSION:Low SLOW: None EXPEL: High |
Herb やくそう 16/256 (6.25%) |
Attack (7/8) Run (1/8) |
| Almiraj アルミラージ |
4 | 20 | 6 | 14 | 8 | 21 | 12 | 9 | FIRE: None ICE: None WIND: None ZAP: None DEATH: None |
SACRIFICE: None SLEEP: Low STOPSPELL: None SAP: None SURROUND: None |
MP_DRAIN: High CONFUSION:Low SLOW: Low EXPEL: High |
Leather Hat かわのぼうし 4/256 (1.56%) |
Run (2/8) Attack (4/8) Rariho (2/8) |
| Catapilla キャタピラー |
6 | 50 | 7 | 35 | 12 | 33 | 25 | 11 | FIRE: None ICE: None WIND: None ZAP: None DEATH: None |
SACRIFICE: None SLEEP: None STOPSPELL: None SAP: None SURROUND: None |
MP_DRAIN: Low CONFUSION:None SLOW: None EXPEL: Null |
Herb やくそう 16/256 (6.25%) |
Sukuruto (3/8) Attack (5/8) |
All encounters should be ran from. In extreme exceptions some players will opt to fight small formations for more EXP. Almiraj will put the party to sleep with Rariho, and Anteaters will all target the same ally. Magicians have relatively high defense and cast Blaze. The general fastest strategy is to run from all encounters and to heal outside of battle. HP levels should be near max at this point, because any group of Anteaters can individually target an ally and mow down their HP.
Use the Inn and leave.
This is the most aggressive strategy. Staying at the inn is not optional - it resets the day/night cycle for the upcoming segments. If short on money, go to the item shop and sell either the Hero's Copper Sword or 1-2 herbs
Optional: Revive dead characters. Retrieve the Hard Stone and Book from the Church, and Leather Hat from the leftmost house, first drawer on the right. Use the shop to buy herbs and safety gear.
Romaly is the point of the first major deviations with respect to safety strategies. The fastest players will use the Inn to heal, which simultaneously resets the day-night cycle, which is important for the upcoming segments. Safer strategies include retrieving the optional items to sell. The player can sell the Hero's Copper Sword at this point. The player can opt to restock on more Herbs, or buy some safety gear from the armor shop. Some of the more popular options are the Wooden Shield for the Warrior, or the Leather Armor for the Thief. It is important, regardless of any strategy chosen, to have about 30G on hand if possible, which can be used to revive any dead characters in Assalam.
World Map to Assalam
Head east/southeast towards Assalam. Optionally encounter reset after leaving the forest area.
The encounter reset concept here is to identify the furthest tile on the map where the fights change from moderate to extreme difficulty, and to opt to get a fight at the end of the moderate area, even if it requires walking back and forth a few tiles to get that fight. Getting into battle will reset the threat level, and thus gives the player the most potential to walk through the most dangerous area with minimal encounters. This encounter reset is not required, but can overall be beneficial if the player has not got into a fight in awhile. In practice, if the player has not gotten into a fight since Romaly (highly unlikely), or got into a fight very early when walking away from Romaly, it's advised to grind out a fight at the edge of the forest, run away, then proceed.
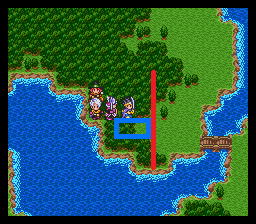
This red line represents the last row of tiles before the enemy formations change and become much more dangerous. So, grind out a fight west of the line on the blue squares, then immediately walk east.
This red line represents the last row of tiles before the enemy formations change and become much more dangerous. So, grind out a fight west of the line on the blue squares, then immediately walk east.
Encounters:
| Name | Lv | HP | MP | EXP | Gold | Atk | Def | Agl | Resist 1 | Resist 2 | Resist 3 | Drop | Actions |
|---|---|---|---|---|---|---|---|---|---|---|---|---|---|
| Magician まほうつかい |
4 | 23 | 4 | 20 | 10 | 15 | 15 | 13 | FIRE: None ICE: None WIND: None ZAP: None DEATH: None |
SACRIFICE: None SLEEP: None STOPSPELL: None SAP: None SURROUND: None |
MP_DRAIN: None CONFUSION:Low SLOW: None EXPEL: Null |
Holy Water せいすい 4/256 (1.56%) |
Mera (4/8) Attack (3/8) Run (1/8) |
| Venom Toad ポイズントード |
5 | 25 | 0 | 20 | 9 | 24 | 12 | 12 | FIRE: None ICE: None WIND: None ZAP: None DEATH: None |
SACRIFICE: None SLEEP: Low STOPSPELL: Null SAP: None SURROUND: Low |
MP_DRAIN: Null CONFUSION:None SLOW: None EXPEL: High |
Antidote どくけしそう 16/256 (6.25%) |
Run (1/8) Poison Attack (3/8) Attack (4/8) |
| Catapilla キャタピラー |
6 | 50 | 7 | 35 | 12 | 33 | 25 | 11 | FIRE: None ICE: None WIND: None ZAP: None DEATH: None |
SACRIFICE: None SLEEP: None STOPSPELL: None SAP: None SURROUND: None |
MP_DRAIN: Low CONFUSION:None SLOW: None EXPEL: Null |
Herb やくそう 16/256 (6.25%) |
Sukuruto (3/8) Attack (5/8) |
| Dead Hound アニマルゾンビ |
7 | 50 | 30 | 29 | 15 | 28 | 4 | 11 | FIRE: None ICE: None WIND: None ZAP: None DEATH: None |
SACRIFICE: None SLEEP: Null STOPSPELL: None SAP: None SURROUND: None |
MP_DRAIN: Low CONFUSION:None SLOW: None EXPEL: Low |
Life Nut いのちのきのみ 2/256 (0.78%) |
Attack (5/8) Bomiosu (3/8) |
| Gas Cloud ギズモ |
8 | 25 | 18 | 35 | 14 | 22 | 14 | 28 | FIRE: None ICE: None WIND: None ZAP: None DEATH: None |
SACRIFICE: None SLEEP: Null STOPSPELL: None SAP: None SURROUND: Null |
MP_DRAIN: None CONFUSION:None SLOW: Low EXPEL: Null |
Stamina Seed スタミナのたね 2/256 (0.78%) |
Attack (3/8) Mera (5/8) |
| Rabidhound バリイドドッグ |
10 | 40 | 4 | 53 | 14 | 42 | 22 | 16 | FIRE: Low ICE: None WIND: None ZAP: None DEATH: None |
SACRIFICE: None SLEEP: High STOPSPELL: None SAP: Low SURROUND: Low |
MP_DRAIN: Null CONFUSION:None SLOW: Low EXPEL: Low |
Wisdom Seed かしこさのたね 2/256 (0.78%) |
Attack (6/8) Rukanan (2/8) |
| Vampire バンパイア |
10 | 35 | 9 | 61 | 25 | 51 | 28 | 19 | FIRE: None ICE: None WIND: None ZAP: None DEATH: None |
SACRIFICE: None SLEEP: Low STOPSPELL: None SAP: None SURROUND: None |
MP_DRAIN: High CONFUSION:Low SLOW: Low EXPEL: Null |
Luck Seed ラックのたね 4/256 (1.56%) |
Hyado (3/8) Attack (5/8) |
| Catpire キャットフライ |
11 | 40 | 4 | 65 | 20 | 48 | 49 | 28 | FIRE: Low ICE: None WIND: None ZAP: None DEATH: Low |
SACRIFICE: None SLEEP: Low STOPSPELL: Low SAP: Low SURROUND: Low |
MP_DRAIN: Low CONFUSION:Low SLOW: Low EXPEL: Null |
Plush Suit ぬいぐるみ 1/256 (0.39%) |
Attack (4/8) Defense (1/8) Critical (1/8) Run (1/8) Mahoton (1/8) |
| Wild Ape あばれザル |
11 | 60 | 0 | 60 | 30 | 55 | 40 | 21 | FIRE: None ICE: High WIND: None ZAP: None DEATH: Low |
SACRIFICE: None SLEEP: Low STOPSPELL: Null SAP: Low SURROUND: High |
MP_DRAIN: Null CONFUSION:Low SLOW: High EXPEL: Null |
Strength Seed ちからのたね 2/256 (0.78%) |
Critical (1/8) Call Same Kind (2/8) Attack (5/8) |
Run from everything. There are no circumstances in which the player fights anything. Everything is dangerous, there is little value in analyzing the differences beyond the fact that some enemies (Wild Apes, Vampires) are more dangerous than others (Catpire, Gas Cloud). The player should never fight these, just run.
Full party death scenario:
The party will likely respawn in Aliahan castle. Leave the castle, head to the right to the Church, revive characters (sell Hero's Copper Sword if completely out of gold), then Wing to Romaly and try again. Unfortunately any deaths at this point result in resetting the day-night cycle, which makes some routing near castle town Isis slower. If the party made it to Assalam (technically applicable to the next segment), warp there immediately and revive.
Revive dead characters. Leave immediately.
This again is the bare minimum, aggressive strategy.
Optional: In the southwest room of the inn, pick up a Poison Moth Powder from the drawer. Sell this at the top right shop and buy a Fur Hood for the Thief.
World Map to Pyramid
Head west/northwest to the Pyramid.
This begins the most treacherous part of the early game. Characters will often die in this segment. When a character dies, the player has the choice of giving a better piece of equipment to a surviving character. For example, if the Warrior dies, the player can take the Warrior's Traveler's Clothes and put them on the Mage, who has just basic Clothes.
If many characters are dead (2+) before reaching the Pyramid, the player can opt to detour to Isis and revive the dead characters. If this is done, there is just barely enough time to make it back to Isis after the Pyramid before day breaks.
There is a not-often used safety strategy where the player reaches Isis instead of the Pyramid as a first destination, forces daytime, then saves the game with the Queen for a safety save before the Pyramid visit. It is slower, but is good for no-reset situations. Still, even the encounters on the way to Isis are scary.
Encounters:
| Name | Lv | HP | MP | EXP | Gold | Atk | Def | Agl | Resist 1 | Resist 2 | Resist 3 | Drop | Actions |
|---|---|---|---|---|---|---|---|---|---|---|---|---|---|
| Evil Moth ひとくいが |
10 | 26 | 4 | 55 | 15 | 49 | 35 | 17 | FIRE: Low ICE: None WIND: None ZAP: None DEATH: None |
SACRIFICE: None SLEEP: Low STOPSPELL: None SAP: None SURROUND: None |
MP_DRAIN: Low CONFUSION:None SLOW: High EXPEL: Null |
Poison Needle どくばり 2/256 (0.78%) |
Run (1/8) Attack (4/8) Call Same Kind (1/8) Poison Attack (1/8) Manusa (1/8) |
| Catpire キャットフライ |
11 | 40 | 4 | 65 | 20 | 48 | 49 | 28 | FIRE: Low ICE: None WIND: None ZAP: None DEATH: Low |
SACRIFICE: None SLEEP: Low STOPSPELL: Low SAP: Low SURROUND: Low |
MP_DRAIN: Low CONFUSION:Low SLOW: Low EXPEL: Null |
Plush Suit ぬいぐるみ 1/256 (0.39%) |
Attack (4/8) Defense (1/8) Critical (1/8) Run (1/8) Mahoton (1/8) |
| Mummy Man ミイラおとこ |
12 | 35 | 0 | 73 | 25 | 55 | 49 | 19 | FIRE: None ICE: None WIND: None ZAP: None DEATH: Null |
SACRIFICE: None SLEEP: Low STOPSPELL: Null SAP: Low SURROUND: Low |
MP_DRAIN: Null CONFUSION:None SLOW: Low EXPEL: Low |
Pachisi Ticket すごろくけん 16/256 (6.25%) |
Attack (7/8) Critical (1/8) |
| Hell Crab じごくのハサミ |
12 | 40 | 30 | 78 | 23 | 50 | 110 | 19 | FIRE: Low ICE: None WIND: None ZAP: None DEATH: Low |
SACRIFICE: None SLEEP: Low STOPSPELL: Low SAP: None SURROUND: High |
MP_DRAIN: Null CONFUSION:Low SLOW: Low EXPEL: Null |
Bronze Shield せいどうのたて 4/256 (1.56%) |
Attack (6/8) Sukuruto (2/8) |
| Flamapede かえんムカデ |
13 | 45 | 0 | 72 | 35 | 45 | 40 | 20 | FIRE: Null ICE: None WIND: None ZAP: None DEATH: Low |
SACRIFICE: None SLEEP: High STOPSPELL: Null SAP: Low SURROUND: Low |
MP_DRAIN: Null CONFUSION:Low SLOW: Low EXPEL: Null |
Wisdom Seed かしこさのたね 2/256 (0.78%) |
Attack (4/8) Flame Breath (Weak) (3/8) Run (1/8) |
Run from everything. There are no circumstances in which the player fights anything.
Full party death scenario:
Pyramid
Proceed to the puzzle room. The order of the buttons is 3 2 1 4.
The puzzle room's buttons will reset if the player leaves the floor or has a full party death. If the player pushes all the buttons, however, the buttons stay pressed and the door remains unlocked. In race scenarios, at least reaching the 4 buttons is a minor accomplishment, and makes the revisit to the Pyramid easier to clear - the player only needs to go north through the door to get the Magic Key.
Retrieve the Magic Key. Rearrange the party to be Hero/Warrior/Thief/Mage. Retrieve the Stamina Seed, then the Flashy Clothes in the final chest on the way out.
Do not take any of the chests in the 10 chest room.
Encounters:
| Name | Lv | HP | MP | EXP | Gold | Atk | Def | Agl | Resist 1 | Resist 2 | Resist 3 | Drop | Actions |
|---|---|---|---|---|---|---|---|---|---|---|---|---|---|
| King Toad だいおうガマ |
11 | 38 | 30 | 70 | 23 | 49 | 37 | 18 | FIRE: Low ICE: Low WIND: None ZAP: None DEATH: Low |
SACRIFICE: None SLEEP: Low STOPSPELL: Low SAP: None SURROUND: Low |
MP_DRAIN: Low CONFUSION:Low SLOW: None EXPEL: Null |
Chain Whip とげのむち 4/256 (1.56%) |
Attack (6/8) Rariho (2/8) |
| Trick Bag わらいぶくろ |
11 | 40 | 255 | 5 | 350 | 15 | 37 | 64 | FIRE: Null ICE: Null WIND: Null ZAP: None DEATH: Null |
SACRIFICE: None SLEEP: Null STOPSPELL: None SAP: Null SURROUND: Low |
MP_DRAIN: Null CONFUSION:High SLOW: High EXPEL: None |
Stamina Seed スタミナのたね 4/256 (1.56%) |
Strange Dance (1/8) Bomiosu (1/8) Sukuruto (1/8) Attack (1/8) Mahoton (1/8) Manusa (1/8) Hoimi (2/8) |
| Mummy Man ミイラおとこ |
12 | 35 | 0 | 73 | 25 | 55 | 49 | 19 | FIRE: None ICE: None WIND: None ZAP: None DEATH: Null |
SACRIFICE: None SLEEP: Low STOPSPELL: Null SAP: Low SURROUND: Low |
MP_DRAIN: Null CONFUSION:None SLOW: Low EXPEL: Low |
Pachisi Ticket すごろくけん 16/256 (6.25%) |
Attack (7/8) Critical (1/8) |
| Flamapede かえんムカデ |
13 | 45 | 0 | 72 | 35 | 45 | 40 | 20 | FIRE: Null ICE: None WIND: None ZAP: None DEATH: Low |
SACRIFICE: None SLEEP: High STOPSPELL: Null SAP: Low SURROUND: Low |
MP_DRAIN: Null CONFUSION:Low SLOW: Low EXPEL: Null |
Wisdom Seed かしこさのたね 2/256 (0.78%) |
Attack (4/8) Flame Breath (Weak) (3/8) Run (1/8) |
| Mummy マミー |
13 | 55 | 30 | 82 | 36 | 60 | 35 | 20 | FIRE: None ICE: None WIND: High ZAP: None DEATH: Null |
SACRIFICE: None SLEEP: High STOPSPELL: Low SAP: Low SURROUND: High |
MP_DRAIN: None CONFUSION:Low SLOW: High EXPEL: Low |
Holy Water せいすい 4/256 (1.56%) |
Critical (1/8) Attack (4/8) Call Hork (3/8) |
Run from everything. There are no circumstances in which the player fights anything.
World Map to Isis
Walk south to Isis.
There is about a 50% chance of getting into an encounter.
It should be night time by the time the party arrives. If it is not, the player needs to advance the day/night cycle until it is, which involves leaving the town landing area, walking a few steps on the world map, then re-entering, slowly advancing the cycle.
It should be night time by the time the party arrives. If it is not, the player needs to advance the day/night cycle until it is, which involves leaving the town landing area, walking a few steps on the world map, then re-entering, slowly advancing the cycle.
Encounters:
| Name | Lv | HP | MP | EXP | Gold | Atk | Def | Agl | Resist 1 | Resist 2 | Resist 3 | Drop | Actions |
|---|---|---|---|---|---|---|---|---|---|---|---|---|---|
| Evil Moth ひとくいが |
10 | 26 | 4 | 55 | 15 | 49 | 35 | 17 | FIRE: Low ICE: None WIND: None ZAP: None DEATH: None |
SACRIFICE: None SLEEP: Low STOPSPELL: None SAP: None SURROUND: None |
MP_DRAIN: Low CONFUSION:None SLOW: High EXPEL: Null |
Poison Needle どくばり 2/256 (0.78%) |
Run (1/8) Attack (4/8) Call Same Kind (1/8) Poison Attack (1/8) Manusa (1/8) |
| Catpire キャットフライ |
11 | 40 | 4 | 65 | 20 | 48 | 49 | 28 | FIRE: Low ICE: None WIND: None ZAP: None DEATH: Low |
SACRIFICE: None SLEEP: Low STOPSPELL: Low SAP: Low SURROUND: Low |
MP_DRAIN: Low CONFUSION:Low SLOW: Low EXPEL: Null |
Plush Suit ぬいぐるみ 1/256 (0.39%) |
Attack (4/8) Defense (1/8) Critical (1/8) Run (1/8) Mahoton (1/8) |
| Mummy Man ミイラおとこ |
12 | 35 | 0 | 73 | 25 | 55 | 49 | 19 | FIRE: None ICE: None WIND: None ZAP: None DEATH: Null |
SACRIFICE: None SLEEP: Low STOPSPELL: Null SAP: Low SURROUND: Low |
MP_DRAIN: Null CONFUSION:None SLOW: Low EXPEL: Low |
Pachisi Ticket すごろくけん 16/256 (6.25%) |
Attack (7/8) Critical (1/8) |
| Hell Crab じごくのハサミ |
12 | 40 | 30 | 78 | 23 | 50 | 110 | 19 | FIRE: Low ICE: None WIND: None ZAP: None DEATH: Low |
SACRIFICE: None SLEEP: Low STOPSPELL: Low SAP: None SURROUND: High |
MP_DRAIN: Null CONFUSION:Low SLOW: Low EXPEL: Null |
Bronze Shield せいどうのたて 4/256 (1.56%) |
Attack (6/8) Sukuruto (2/8) |
| Flamapede かえんムカデ |
13 | 45 | 0 | 72 | 35 | 45 | 40 | 20 | FIRE: Null ICE: None WIND: None ZAP: None DEATH: Low |
SACRIFICE: None SLEEP: High STOPSPELL: Null SAP: Low SURROUND: Low |
MP_DRAIN: Null CONFUSION:Low SLOW: Low EXPEL: Null |
Wisdom Seed かしこさのたね 2/256 (0.78%) |
Attack (4/8) Flame Breath (Weak) (3/8) Run (1/8) |
Run from everything. There are no circumstances in which the player fights anything.
Isis Castle
Raid the vault. Open all chests from the top right room except the bottom left. Open all chests from the top left room.
Some advanced players skip the gold chests here. The bottom left chest in the top right room has a small medal, which is not necessary (and causes unaligned inventory/bag problems).
This vault is one of two major payouts from doing the entire journey for the Magic Key. It gives the player access to a significant amount of money, which allows the party to gear up safely for the upcoming segments.
This vault is one of two major payouts from doing the entire journey for the Magic Key. It gives the player access to a significant amount of money, which allows the party to gear up safely for the upcoming segments.
Head to the top floor and speak to the Queen. Search behind the bed for the Prayer Ring. Wing to Isis (1,5).
This segment can only be done at nighttime.
Isis Town
Proceed to the weapon shop. Sell the Hero's Copper Sword (75G), Flashy Clothes (975G), Golden Tiara (3750G), and the Prayer Ring (1875G).
Some players will sell the Ruby Bracelet here to save a small amount of menuing time, but this is not advised for newer players - a party death with 7350G on hand will result in an unrecoverable situation.
Equip all of the following when purchased. Purchase a Iron Helmet (1000G, last option) for Warrior, then Hero. Purchase a Iron Shield (1200G) for Hero. Purchase a Iron Armor (1100G) for Hero, then Warrior.
This gear is enough to survive the majority of the early and mid-game defensively. It is the reason the Magic Key journey is crucial to success.
The herb count here is not a precise number, and more herbs can be purchased easily later. The player will absolutely need herbs for a long time, so they're hardly a waste to buy in bulk now.
The player can opt to buy 36x Wings if they can afford it, but likely they will be just short, especially if any dead characters need to be revived. The order of the item purchases may seem odd, but it allows the preservation of the bag order with consistency per run.
The player can opt to buy 36x Wings if they can afford it, but likely they will be just short, especially if any dead characters need to be revived. The order of the item purchases may seem odd, but it allows the preservation of the bag order with consistency per run.
Revive any dead characters. Retrive the Agility Seed outside the well (to the left). Walk north to Isis Castle.
Reviving dead characters cost only 10G each now.
Optional: Go into the well and retrieve the Courage x100 Book. Use immediately on the Thief, and wing to Isis (1,5).
This strategy is used for when the Thief is not the Tough personality. It will change her personality to be “Fearless”, which as described earlier in this guide in the personality section, will change her growth rates per level. It is entirely preference.
Isis Castle
Proceed left, then to the secret vault downstairs. Retrieve the Meteorite Armband, and say no to the dialogue. Use the Wisdom Seed on the Mage, give the Silk Robe to the Mage and equip, use the Agility Seed on the Thief, and equip the Hero with the Meteorite Armband. Wing to Aliahan (1,1).
Nothing bad happens if the player says yes here, just longer text.
Some players will equip the Meteorite Armband in the first battle using the in-battle menu to save some time.
Some players will equip the Meteorite Armband in the first battle using the in-battle menu to save some time.
Proceed to the castle. Retrieve all of the chests from the northwest room. Give the Rune Staff to the Mage & equip. Use the Strength Seed on the Hero. Give the Hero's Armband to the Thief and equip. Wing to Romaly (1,3).
No notes.
World Map to Portoga
This segment uses an encounter reset tactfully in the trees before walking towards Portoga. The goal is to give the player the highest chance to make it to Portoga without getting into a fight where the encounters are most dangerous. By getting into a fight in the lower row of trees, the player is as close as possible to the border where dangerous fights begin, but not yet there.
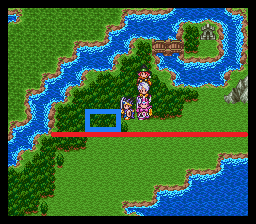
This red line represents the last row of tiles before the enemy formations change and become much more dangerous. So, grind out a fight above the line on the blue squares, then immediately walk south.
This red line represents the last row of tiles before the enemy formations change and become much more dangerous. So, grind out a fight above the line on the blue squares, then immediately walk south.
Encounters:
| Name | Lv | HP | MP | EXP | Gold | Atk | Def | Agl | Resist 1 | Resist 2 | Resist 3 | Drop | Actions |
|---|---|---|---|---|---|---|---|---|---|---|---|---|---|
| Ravenger デスフラッター |
9 | 25 | 20 | 45 | 22 | 36 | 18 | 14 | FIRE: None ICE: None WIND: None ZAP: None DEATH: None |
SACRIFICE: None SLEEP: Low STOPSPELL: None SAP: None SURROUND: Low |
MP_DRAIN: Null CONFUSION:None SLOW: Low EXPEL: Null |
Agility Seed すばやさのたね 4/256 (1.56%) |
Run (1/8) Attack (7/8) |
| Rabidhound バリイドドッグ |
10 | 40 | 4 | 53 | 14 | 42 | 22 | 16 | FIRE: Low ICE: None WIND: None ZAP: None DEATH: None |
SACRIFICE: None SLEEP: High STOPSPELL: None SAP: Low SURROUND: Low |
MP_DRAIN: Null CONFUSION:None SLOW: Low EXPEL: Low |
Wisdom Seed かしこさのたね 2/256 (0.78%) |
Attack (6/8) Rukanan (2/8) |
| Rogue Nite さまようよろい |
11 | 55 | 0 | 68 | 30 | 47 | 50 | 10 | FIRE: Low ICE: None WIND: None ZAP: None DEATH: Null |
SACRIFICE: None SLEEP: High STOPSPELL: Null SAP: None SURROUND: Low |
MP_DRAIN: Null CONFUSION:Null SLOW: None EXPEL: High |
Copper Sword どうのつるぎ 4/256 (1.56%) |
Critical (1/8) Attack (5/8) Call Hoimi Slime (2/8) |
| Druid ドルイド |
13 | 35 | 10 | 82 | 35 | 55 | 47 | 29 | FIRE: Low ICE: Low WIND: Low ZAP: None DEATH: Low |
SACRIFICE: None SLEEP: High STOPSPELL: Low SAP: Low SURROUND: Low |
MP_DRAIN: High CONFUSION:High SLOW: High EXPEL: Null |
Luck Seed ラックのたね 4/256 (1.56%) |
Attack (4/8) Bagi (4/8) |
| Magestool マージマタンゴ |
14 | 40 | 10 | 92 | 40 | 43 | 52 | 20 | FIRE: Low ICE: High WIND: None ZAP: None DEATH: None |
SACRIFICE: None SLEEP: Low STOPSPELL: Low SAP: None SURROUND: None |
MP_DRAIN: Low CONFUSION:Low SLOW: None EXPEL: Null |
Chimera Wing キメラのつばさ 4/256 (1.56%) |
Run (1/8) Attack (3/8) Hyado (2/8) Hoimi (2/8) |
Run from everything. This is the last segment the player will be forced to always run from. The druids are extremely dangerous, as their Bagi spell can do massive damage. Ravengers act twice. This walk is why selling the Ruby Bracelet early is a bad idea for beginner strategy, as a death here results in losing half the player's gold, and is unrecoverable.
Proceed to the bottom weapon shop. Sell the Ruby Bracelet (7350G). Buy a Steel Broadsword for the Warrior. Buy 2x Steel Whips for the Hero and Thief.
This is the final payoff of the Magic Key loop, which is to properly give the party weapons. The Steel Whips are incredibly good and will be used for the next hour or so during the speedrun.
Sort all items to bag. From the top item shop, buy 9x Wyvern Wing for the bag, then 9x Herb for the Thief, 9x Herb for the Mage.
This is the first instance of sorting items to the bag. This will move each character's unequipped items to the bag, with some exceptions for key items and usable items in battle. It is very important to keep track of when these occur. In this case, the sorting is important because it clears the Thief and Mage's inventory, which they'll need for the herbs purchased here.
There is an optional Strength Seed in the 2nd floor of the northern house, on the bottom left wall
There is an optional Strength Seed in the 2nd floor of the northern house, on the bottom left wall
Enter the castle. Talk to the King on the left side. Proceed to the vault room and collect the Stamina Seed, Anchor Tattoo and Mist Staff. Use the Stamina Seed on the Hero. Use herbs in the bag to heal the party. Wing to Romaly (1,3).
No notes.
Equipment check:
| Hero | Warrior | Thief | Mage |
|---|---|---|---|
| Steel Whip | Steel Broadsword | Steel Whip | Rune Staff |
| Iron Armor | Iron Armor | Traveler's Clothes | Silk Robe |
| Iron Shield | Iron Helmet | Hero's Armband | Fur Hood (optional) |
| Iron Helmet | Fur Hood (optional) | ||
| Meteorite Armband |
World Map to Kazave
Head north to Kazave. Encounter cancel at the shrine.
The encounter cancel at the shrine should be used if ~8+ steps have passed since the last battle. Otherwise ignore and keep moving north.
Encounters:
| Name | Lv | HP | MP | EXP | Gold | Atk | Def | Agl | Resist 1 | Resist 2 | Resist 3 | Drop | Actions |
|---|---|---|---|---|---|---|---|---|---|---|---|---|---|
| Magician まほうつかい |
4 | 23 | 4 | 20 | 10 | 15 | 15 | 13 | FIRE: None ICE: None WIND: None ZAP: None DEATH: None |
SACRIFICE: None SLEEP: None STOPSPELL: None SAP: None SURROUND: None |
MP_DRAIN: None CONFUSION:Low SLOW: None EXPEL: Null |
Holy Water せいすい 4/256 (1.56%) |
Mera (4/8) Attack (3/8) Run (1/8) |
| Almiraj アルミラージ |
4 | 20 | 6 | 14 | 8 | 21 | 12 | 9 | FIRE: None ICE: None WIND: None ZAP: None DEATH: None |
SACRIFICE: None SLEEP: Low STOPSPELL: None SAP: None SURROUND: None |
MP_DRAIN: High CONFUSION:Low SLOW: Low EXPEL: High |
Leather Hat かわのぼうし 4/256 (1.56%) |
Run (2/8) Attack (4/8) Rariho (2/8) |
| Venom Toad ポイズントード |
5 | 25 | 0 | 20 | 9 | 24 | 12 | 12 | FIRE: None ICE: None WIND: None ZAP: None DEATH: None |
SACRIFICE: None SLEEP: Low STOPSPELL: Null SAP: None SURROUND: Low |
MP_DRAIN: Null CONFUSION:None SLOW: None EXPEL: High |
Antidote どくけしそう 16/256 (6.25%) |
Run (1/8) Poison Attack (3/8) Attack (4/8) |
| Catapilla キャタピラー |
6 | 50 | 7 | 35 | 12 | 33 | 25 | 11 | FIRE: None ICE: None WIND: None ZAP: None DEATH: None |
SACRIFICE: None SLEEP: None STOPSPELL: None SAP: None SURROUND: None |
MP_DRAIN: Low CONFUSION:None SLOW: None EXPEL: Null |
Herb やくそう 16/256 (6.25%) |
Sukuruto (3/8) Attack (5/8) |
| Dead Hound アニマルゾンビ |
7 | 50 | 30 | 29 | 15 | 28 | 4 | 11 | FIRE: None ICE: None WIND: None ZAP: None DEATH: None |
SACRIFICE: None SLEEP: Null STOPSPELL: None SAP: None SURROUND: None |
MP_DRAIN: Low CONFUSION:None SLOW: None EXPEL: Low |
Life Nut いのちのきのみ 2/256 (0.78%) |
Attack (5/8) Bomiosu (3/8) |
| Killer Bee キラービー |
6 | 25 | 0 | 26 | 13 | 32 | 15 | 13 | FIRE: Low ICE: None WIND: None ZAP: None DEATH: None |
SACRIFICE: None SLEEP: Low STOPSPELL: Null SAP: None SURROUND: None |
MP_DRAIN: Null CONFUSION:None SLOW: Low EXPEL: Null |
Full Moon Herb まんげつそう 32/256 (12.50%) |
Run (1/8) Attack (4/8) Paralysis Attack (3/8) |
| Army Crab ぐんたいガニ |
8 | 28 | 0 | 35 | 12 | 32 | 60 | 12 | FIRE: None ICE: None WIND: None ZAP: None DEATH: None |
SACRIFICE: None SLEEP: Low STOPSPELL: Null SAP: None SURROUND: Low |
MP_DRAIN: Null CONFUSION:Low SLOW: High EXPEL: Null |
Traveler's Clothes たびびとのふく 4/256 (1.56%) |
Attack (5/8) Call Same Kind (3/8) |
With the Thief and Hero having Steel Whips and the Warrior having a Steel Broadsword, and defensive equipment all around, now enemies can start being cleared out and not immediately ran from. A general concept for the rest of the game is to try to priorize fighting monsters where there's efficiency in the ability to defeat them quickly. In this case, because the player has 2 whips, encounters with either 1 or 2 groups of multiple enemies are the best.
The player must decide which encounters to fight or to flee from. The general goalpost is hitting Lv4/5/6/5 with Hero/Warrior/Thief/Mage by the time the player reaches Kandar. These early encounters before Champagne Tower are definitely worth fighting, but some of the slower ones with more than 2 groups of enemies can be avoided. Some enemies such as the Army Crabs have higher defense, so a lower level party might opt to flee. The difference of 1 or 2 extra rounds in battle can add up to lost time quickly. Further, the enemies in Champagne Tower are not that much more difficult, so even if a Lv2 party made it all the way there, they could reasonably survive, though this is a largely unnecessary scenario unless going for absolute fastest times.
Importantly, the Hero has the Meteorite Armband equipped, and the Thief has the Hero's Armband equipped. The reason behind this is to allow the Hero to potentially outspeed enemies (even though the Hero is slow), and the Hero's Armband allows the Thief to get a sizeable increase in damage output. This is used for all random fights for the next few segments. This setup overall allows for random encounters to be cleared faster - sacrificing a bit of attack on the Hero for the Thief to power up normalizes their attack power with 2 whips, and the Thief is still naturally fast enough without the Armband to outspeed most enemies, and the Hero can utilize the increased speed. Notably, when in boss battles, these accessories will switch. There will be notes later about this concept in Kandar 1's fight notes.
Leave immediately.
This again is the aggressive strategy.
Whenever the player leaves a town immediately, they're doing two things. One, they're setting a warp point for later. Two, they are resetting the encounter threat. So it is not pointless and not optional.
The Fur Hood is a nice option here, and would get equipped on the Mage. It allows for a much safer Kandar 1 and 2 experience. Life Nuts are always important - as an aside, Life Nuts should always be saved for the very end of the game and never used before then.
The Fur Hood is a nice option here, and would get equipped on the Mage. It allows for a much safer Kandar 1 and 2 experience. Life Nuts are always important - as an aside, Life Nuts should always be saved for the very end of the game and never used before then.
World Map to Champagne Tower
Head west to Champagne Tower.
No notes.
Encounters:
| Name | Lv | HP | MP | EXP | Gold | Atk | Def | Agl | Resist 1 | Resist 2 | Resist 3 | Drop | Actions |
|---|---|---|---|---|---|---|---|---|---|---|---|---|---|
| Trick Moth じんめんちょう |
3 | 12 | 5 | 9 | 4 | 11 | 7 | 8 | FIRE: None ICE: None WIND: None ZAP: None DEATH: None |
SACRIFICE: None SLEEP: Low STOPSPELL: None SAP: None SURROUND: None |
MP_DRAIN: Low CONFUSION:None SLOW: None EXPEL: Low |
Chimera Wing キメラのつばさ 4/256 (1.56%) |
Attack (6/8) Manusa (2/8) |
| Catapilla キャタピラー |
6 | 50 | 7 | 35 | 12 | 33 | 25 | 11 | FIRE: None ICE: None WIND: None ZAP: None DEATH: None |
SACRIFICE: None SLEEP: None STOPSPELL: None SAP: None SURROUND: None |
MP_DRAIN: Low CONFUSION:None SLOW: None EXPEL: Null |
Herb やくそう 16/256 (6.25%) |
Sukuruto (3/8) Attack (5/8) |
| Dead Hound アニマルゾンビ |
7 | 50 | 30 | 29 | 15 | 28 | 4 | 11 | FIRE: None ICE: None WIND: None ZAP: None DEATH: None |
SACRIFICE: None SLEEP: Null STOPSPELL: None SAP: None SURROUND: None |
MP_DRAIN: Low CONFUSION:None SLOW: None EXPEL: Low |
Life Nut いのちのきのみ 2/256 (0.78%) |
Attack (5/8) Bomiosu (3/8) |
| Killer Bee キラービー |
6 | 25 | 0 | 26 | 13 | 32 | 15 | 13 | FIRE: Low ICE: None WIND: None ZAP: None DEATH: None |
SACRIFICE: None SLEEP: Low STOPSPELL: Null SAP: None SURROUND: None |
MP_DRAIN: Null CONFUSION:None SLOW: Low EXPEL: Null |
Full Moon Herb まんげつそう 32/256 (12.50%) |
Run (1/8) Attack (4/8) Paralysis Attack (3/8) |
| Army Crab ぐんたいガニ |
8 | 28 | 0 | 35 | 12 | 32 | 60 | 12 | FIRE: None ICE: None WIND: None ZAP: None DEATH: None |
SACRIFICE: None SLEEP: Low STOPSPELL: Null SAP: None SURROUND: Low |
MP_DRAIN: Null CONFUSION:Low SLOW: High EXPEL: Null |
Traveler's Clothes たびびとのふく 4/256 (1.56%) |
Attack (5/8) Call Same Kind (3/8) |
| Rogue Nite さまようよろい |
11 | 55 | 0 | 68 | 30 | 47 | 50 | 10 | FIRE: Low ICE: None WIND: None ZAP: None DEATH: Null |
SACRIFICE: None SLEEP: High STOPSPELL: Null SAP: None SURROUND: Low |
MP_DRAIN: Null CONFUSION:Null SLOW: None EXPEL: High |
Copper Sword どうのつるぎ 4/256 (1.56%) |
Critical (1/8) Attack (5/8) Call Hoimi Slime (2/8) |
Refer to the notes above for World Map to Kazave. Generally these encounters should still be fought when there are 1-2 groups of enemies, otherwise fled from.
Champagne Tower
Climb the tower. Swap Hero and Thief bracelets on the top floor before Kandar 1. Fight Kandar 1.
Be careful while climbing to make sure the party is well healed. Before Kandar, ensure Thief and Mage have herbs.
Encounters:
| Name | Lv | HP | MP | EXP | Gold | Atk | Def | Agl | Resist 1 | Resist 2 | Resist 3 | Drop | Actions |
|---|---|---|---|---|---|---|---|---|---|---|---|---|---|
| Bat Man こうもりおとこ |
6 | 28 | 5 | 29 | 18 | 30 | 24 | 15 | FIRE: None ICE: None WIND: None ZAP: None DEATH: None |
SACRIFICE: None SLEEP: Low STOPSPELL: Low SAP: Low SURROUND: Low |
MP_DRAIN: Low CONFUSION:None SLOW: None EXPEL: Low |
Holy Knife せいなるナイフ 4/256 (1.56%) |
Attack (6/8) Mahoton (2/8) |
| Killer Bee キラービー |
6 | 25 | 0 | 26 | 13 | 32 | 15 | 13 | FIRE: Low ICE: None WIND: None ZAP: None DEATH: None |
SACRIFICE: None SLEEP: Low STOPSPELL: Null SAP: None SURROUND: None |
MP_DRAIN: Null CONFUSION:None SLOW: Low EXPEL: Null |
Full Moon Herb まんげつそう 32/256 (12.50%) |
Run (1/8) Attack (4/8) Paralysis Attack (3/8) |
| Army Crab ぐんたいガニ |
8 | 28 | 0 | 35 | 12 | 32 | 60 | 12 | FIRE: None ICE: None WIND: None ZAP: None DEATH: None |
SACRIFICE: None SLEEP: Low STOPSPELL: Null SAP: None SURROUND: Low |
MP_DRAIN: Null CONFUSION:Low SLOW: High EXPEL: Null |
Traveler's Clothes たびびとのふく 4/256 (1.56%) |
Attack (5/8) Call Same Kind (3/8) |
| Gas Cloud ギズモ |
8 | 25 | 18 | 35 | 14 | 22 | 14 | 28 | FIRE: None ICE: None WIND: None ZAP: None DEATH: None |
SACRIFICE: None SLEEP: Null STOPSPELL: None SAP: None SURROUND: Null |
MP_DRAIN: None CONFUSION:None SLOW: Low EXPEL: Null |
Stamina Seed スタミナのたね 2/256 (0.78%) |
Attack (3/8) Mera (5/8) |
| Demonstool おばけキノコ |
9 | 24 | 0 | 39 | 18 | 30 | 12 | 8 | FIRE: None ICE: None WIND: None ZAP: None DEATH: None |
SACRIFICE: None SLEEP: Low STOPSPELL: Null SAP: Low SURROUND: High |
MP_DRAIN: Null CONFUSION:Null SLOW: None EXPEL: High |
Holy Water せいすい 8/256 (3.13%) |
Attack (5/8) Run (1/8) Sleep Breath (2/8) |
| Venom Worm どくイモムシ |
9 | 35 | 0 | 47 | 20 | 40 | 16 | 14 | FIRE: Low ICE: None WIND: None ZAP: None DEATH: None |
SACRIFICE: None SLEEP: Low STOPSPELL: Null SAP: None SURROUND: None |
MP_DRAIN: Null CONFUSION:None SLOW: None EXPEL: Null |
Antidote どくけしそう 32/256 (12.50%) |
Run (1/8) Attack (5/8) Poison Breath (2/8) |
| Rogue Nite さまようよろい |
11 | 55 | 0 | 68 | 30 | 47 | 50 | 10 | FIRE: Low ICE: None WIND: None ZAP: None DEATH: Null |
SACRIFICE: None SLEEP: High STOPSPELL: Null SAP: None SURROUND: Low |
MP_DRAIN: Null CONFUSION:Null SLOW: None EXPEL: High |
Copper Sword どうのつるぎ 4/256 (1.56%) |
Critical (1/8) Attack (5/8) Call Hoimi Slime (2/8) |
The goal is still Lv4/5/6/5. Players can choose to be short or further than that goal, but generally this is a safe and normal level amount. The encounters here are fairly straightforward - target groups with whip users like usual. On the upper floors, the Venom Worms and Demonstools can inflict poison & sleep, so try to target them as a priority.
At Lv4, Mage has a 50% chance upon every level up of learning Sukara (Upper).
At Lv5, Mage has a 50% chance upon every level up of learning Hyado (Icebolt).
Therefore, reaching Lv5 allows for 2 chances of learning Sukara and 1 chance of Hyado. This arguably is the most important part of the leveling goal. The player should be checking the party spells upon level up for this. None of these spells are required, but they absolutely help with the next boss fight.
Boss: Kandar 1
Strategy:
| Name | Lv | HP | MP | EXP | Gold | Atk | Def | Agl | Resist 1 | Resist 2 | Resist 3 | Drop | Actions |
|---|---|---|---|---|---|---|---|---|---|---|---|---|---|
| Kandar 1 カンダタ |
63 | 300 | 0 | 2,200 | 0 | 70 | 54 | 10 | FIRE: Low ICE: None WIND: None ZAP: None DEATH: Null |
SACRIFICE: Null SLEEP: Null STOPSPELL: Null SAP: Low SURROUND: Null |
MP_DRAIN: Null CONFUSION:Null SLOW: Null EXPEL: Null |
------------------ ------------------ 0/256 (0.10%) |
Attack (6/8) Defense (1/8) Critical (1/8) |
| Henchman カンダタこぶん |
63 | 60 | 0 | 80 | 0 | 45 | 31 | 20 | FIRE: None ICE: None WIND: None ZAP: None DEATH: Null |
SACRIFICE: Null SLEEP: None STOPSPELL: Null SAP: None SURROUND: Low |
MP_DRAIN: Null CONFUSION:Null SLOW: Null EXPEL: Null |
------------------ ------------------ 0/256 (0.10%) |
Attack (8/8) |
Party order: Hero, Warrior, Thief, Mage.
For all boss fights like this, the format for actions will be in order of the party separated by slashes. Example: Attack / Attack / Defend / Attack means Hero, Warrior and Mage attack, and Thief defends.
This guide has referred to “swapping bracelets” prior to this point. The Hero should have the Hero's Armband on, and the Thief has the Meteorite Armband. For boss fights, this is the preferred setup. Even though the Thief is fast without the Armband, having it on basically guarantees the Thief to outspeed everyone in battle, which is critically important when trying to heal the party with Herbs. For the Hero, Hero's speed is basically unimportant for non-random encounters, and because in this battle the Hero is solely attacking the boss, the extra attack from the Hero's Armband greatly helps.
Both Kandar and Kandar's Henchmen have a special AI flag that causes them to not follow standard attack targeting. Standard attack targeting is 40% first character, 30% second, 20% third, and 10% fourth for chances of being hit relative to party order. However, Kandar's Henchmen have a flat 25% chance. This means Thief and Mage have comparatively higher chance to be hit than usual. The Mage getting hit twice is extremely dangerous, and if one of those hits is from Kandar, Mage could easily die.
First, the player needs to know what spells the Mage has. Sukara will yield a safer fight for increased party defense, and Hyado will yield a faster fight for increased offense. Most players will play out turn 1 with the same actions based on what spells the Mage has.
In this fight, the Henchmen will be taken out first, then Kandar will be dealt with. The Hero and Warrior will only do physical attacks, Thief and Mage will heal the party with Herbs, the Thief will attack when no one needs to be healed, and the Mage will pivot to using spells as much as possible or defending. The below are some sample turn 1 actions - every player can change based on their preferences and character stats.
Turn 1, if Mage has nothing:
Attack Henchman A / Attack Henchman A / Attack Henchman A / Def
The reasoning here is that the Mage can't really contribute, and is definitely at risk of dying on turn 1
Turn 1, if Mage has Sukara:
Attack Henchman A / Attack Henchman A / Attack Henchman A / Sukara Mage
Mage should cast Sukara on herself. Players can choose a different ally to use Sukara on, but it's largely preference and willingness to be risky
Turn 1, if Mage has Hyado:
Attack Henchman A / Attack Henchman B / Attack Henchman B / Hyado Henchman A
This setup has the Hero (again, with increased attack power from Hero's Armband) and the Mage's Hyado attack the same Henchman, almost guaranteed defeating one of them.
After turn 1, the player has to decide who to heal and what to do:
If the Mage dies on turn 1, the fight is still winnable, but it will not be easy. The Thief will be on pretty much constant healing duty, and the player must carefully use herbs due to their limited number. It is important to consider how much damage Kandar can do, and if spending an herb to restore ~20HP instead of a full ~30+HP to be safe is worth it.
If Thief dies on turn 1, the fight is borderline unwinnable without Sukara on the Mage. Mage will need to immediately Sukara the rest of the party. Even with Sukara, the fight is extremely slow this way.
If Hero or Warrior die on turn 1, which is unlikely, the fight is still winnable but quite slow.
The flow of the fight after is somewhat set by turn 1. If everyone's alive, then Thief (with doubled speed from Meteorite Armband) is the primary healer. Mage can continue casting spells, and Hero/Warrior attack. The player must be cognizant of how much HP the henchmen have, and to target them wisely with attacks, because the game will redirect attacks randomly. For example, if a henchman has 15 HP left, the player should be aware of this and only have 1 ally attack them, and not be lazy on menuing and have 2+ allies attack that henchman. The first ally attack will defeat them, and the next attacks will randomly target other enemies. A goal is to efficiently direct attacks towards the henchmen.
Kandar has a chance of critically attacking an ally, and a chance to defend. A critical hit often kills an ally. Otherwise, the player needs to keep up with single target attacks and healing. Increased defense via Sukara on the whole party is the best action economy, because of less turns the Thief and Mage have to spend healing. The Mage can utilize all MP in this fight and should cast Hyado when everyone has Sukara.
Champagne Tower to Norud the Dwarf
Immediately swap bracelets for the Hero and Thief. Wing to Assalam (1,5). Give the King's Letter to Norud. Proceed through the cave.
Swapping bracelets sets the party up for fighting random encounters.
If any character dies during Kandar 1, immediately revive here in Assalam. The next segment will be fighting random encounters for experience
If any character dies during Kandar 1, immediately revive here in Assalam. The next segment will be fighting random encounters for experience
World map to Baharata
Head south/southeast to Baharata.
Be sure to keep the party healed, as noted below. It is easy to not pay attention when characters are around 30-40HP, then the next encounter they get killed.
Encounters:
| Name | Lv | HP | MP | EXP | Gold | Atk | Def | Agl | Resist 1 | Resist 2 | Resist 3 | Drop | Actions |
|---|---|---|---|---|---|---|---|---|---|---|---|---|---|
| Catpire キャットフライ |
11 | 40 | 4 | 65 | 20 | 48 | 49 | 28 | FIRE: Low ICE: None WIND: None ZAP: None DEATH: Low |
SACRIFICE: None SLEEP: Low STOPSPELL: Low SAP: Low SURROUND: Low |
MP_DRAIN: Low CONFUSION:Low SLOW: Low EXPEL: Null |
Plush Suit ぬいぐるみ 1/256 (0.39%) |
Attack (4/8) Defense (1/8) Critical (1/8) Run (1/8) Mahoton (1/8) |
| Hell Crab じごくのハサミ |
12 | 40 | 30 | 78 | 23 | 50 | 110 | 19 | FIRE: Low ICE: None WIND: None ZAP: None DEATH: Low |
SACRIFICE: None SLEEP: Low STOPSPELL: Low SAP: None SURROUND: High |
MP_DRAIN: Null CONFUSION:Low SLOW: Low EXPEL: Null |
Bronze Shield せいどうのたて 4/256 (1.56%) |
Attack (6/8) Sukuruto (2/8) |
| Magestool マージマタンゴ |
14 | 40 | 10 | 92 | 40 | 43 | 52 | 20 | FIRE: Low ICE: High WIND: None ZAP: None DEATH: None |
SACRIFICE: None SLEEP: Low STOPSPELL: Low SAP: None SURROUND: None |
MP_DRAIN: Low CONFUSION:Low SLOW: None EXPEL: Null |
Chimera Wing キメラのつばさ 4/256 (1.56%) |
Run (1/8) Attack (3/8) Hyado (2/8) Hoimi (2/8) |
| Hunter Fly ハンターフライ |
14 | 30 | 10 | 98 | 25 | 50 | 30 | 18 | FIRE: Low ICE: None WIND: None ZAP: None DEATH: Low |
SACRIFICE: None SLEEP: High STOPSPELL: Low SAP: None SURROUND: None |
MP_DRAIN: None CONFUSION:Low SLOW: None EXPEL: High |
Cloak of Evasion みかわしのふく 2/256 (0.78%) |
Run (1/8) Attack (3/8) Gira (4/8) |
| Mad Jackal デスジャッカル |
14 | 42 | 5 | 95 | 20 | 67 | 45 | 20 | FIRE: None ICE: None WIND: None ZAP: None DEATH: Low |
SACRIFICE: None SLEEP: Low STOPSPELL: Low SAP: None SURROUND: Low |
MP_DRAIN: Low CONFUSION:Low SLOW: None EXPEL: Low |
Life Nut いのちのきのみ 2/256 (0.78%) |
Call Same Kind (1/8) Attack (5/8) Manusa (2/8) |
| Heat Cloud ヒートギズモ |
15 | 37 | 0 | 105 | 28 | 50 | 60 | 24 | FIRE: Null ICE: None WIND: None ZAP: None DEATH: Low |
SACRIFICE: None SLEEP: Low STOPSPELL: Null SAP: Low SURROUND: None |
MP_DRAIN: Null CONFUSION:Low SLOW: Low EXPEL: Null |
Luck Seed ラックのたね 2/256 (0.78%) |
Flame Breath (Weak) (5/8) Attack (3/8) |
| Tonguebear アントべア |
15 | 50 | 0 | 110 | 25 | 75 | 45 | 10 | FIRE: Low ICE: None WIND: None ZAP: None DEATH: Low |
SACRIFICE: None SLEEP: High STOPSPELL: Null SAP: Low SURROUND: Low |
MP_DRAIN: Null CONFUSION:Low SLOW: None EXPEL: Null |
Iron Spear てつのやり 1/256 (0.39%) |
Attack (7/8) Run (1/8) |
This next wave of encounters are mildly dangerous, but important to clear out for experience. It is very rare players run from encounters here. The party has the tools to defeat these enemies. The hunter flies are the most dangerous with their Gira spell, which is area all ~12-16 damage. They are top priority for whip users to take out, and they don't have much health. Heat clouds are more annoying than dangerous, and have a weaker area all breath attack for ~10 damage. The red zombie dogs have Manusa which will decrease accuracy, and they are susceptible to Nifuramu, so the Hero can opt not to attack and instead try to remove them from battle. They have a decent attack stat, so be careful. As the player gets closer to Baharata, the blue antbears have very high attack, so it's recommended to have the Mage on defense while the others hopefully clear them quickly. The player should keep the party's HP at around 40 or greater, so healing after battle is worthwhile. There isn't an experience goal here perse - it's more about clearing encounters quickly and reaping the benefits. Usually each character levels up once around here, somewhere around a party average of 8-9, depending all on previous choices and who survived Kandar 1. A final piece of advice for the player is to remember splitting up their whip users appropriately - the ability for the party to clear groups of enemies with multi hit attacks is very beneficial. As was true earlier, generally the Hero and Thief attack different groups, and the Warrior and Mage join either of them independently to stagger attacks and attempt to clear as many as possible. One small caveat is that if there are especially dangerous enemies, i.e. the hunter flies, the player can just have all allies attack them as a priority. It is worth spending time understanding how to clear these encounters, as healing, spell animations from enemies, and inefficient turns can very quickly add up time.
The player should be keeping track of which spells the Mage learns. The Mage can continue her 50/50 rolls of learning Sukara and Hyado if they haven't been learned yet, and can learn Gira (Lv7) and Sukuruto (Lv9). Players should try to catch what spells are learned, because they will dictate strategy for the upcoming boss formations.
The player should be keeping track of which spells the Mage learns. The Mage can continue her 50/50 rolls of learning Sukara and Hyado if they haven't been learned yet, and can learn Gira (Lv7) and Sukuruto (Lv9). Players should try to catch what spells are learned, because they will dictate strategy for the upcoming boss formations.
Sell Anchor Tattoo and Mage's equipped Rune Staff. Buy 3x Magic Shield (6000g) for the Hero, Thief and Mage. Optionally restock on herbs for the Thief and Mage. Talk to the old man next to Gupta in the south part of town. Use the Inn. Give the Hero's Iron Shield to the Warrior. Optionally give the Mist Staff to the Mage to equip, or give to the Warrior. Wing to Baharata (L,B).
Magic Shields are incredibly good midgame shields, and the Thief/Sage will keep one for the rest of the game.
The Thief and Mage will once again need the max amount of herbs in their inventory. The player can choose to buy 9x herb for the Thief and Mage from the store here, or can manually distribute herbs from the bag to them. It is player preference, and mostly depends on how many herbs were used during the Kandar 1 fight.
The Mist Staff allows a free cast of Mahoton every turn. The player can choose to give it to the Warrior for the upcoming Henchman x4 fight, or can give it to the Mage to equip. More discussion on this later, but typically this decision happens here.
Some players choose to take the inn at Assalam (before the journey down to Baharata, after Kandar 1), but most players take it here. Either way, the player needs to have sufficient MP on the Mage for the Kandar 2 stretch, which implies needing close to max MP.
World Map to Kandar Cave
Head northeast to Kandar Cave.
No notes.
Encounters:
| Name | Lv | HP | MP | EXP | Gold | Atk | Def | Agl | Resist 1 | Resist 2 | Resist 3 | Drop | Actions |
|---|---|---|---|---|---|---|---|---|---|---|---|---|---|
| Magestool マージマタンゴ |
14 | 40 | 10 | 92 | 40 | 43 | 52 | 20 | FIRE: Low ICE: High WIND: None ZAP: None DEATH: None |
SACRIFICE: None SLEEP: Low STOPSPELL: Low SAP: None SURROUND: None |
MP_DRAIN: Low CONFUSION:Low SLOW: None EXPEL: Null |
Chimera Wing キメラのつばさ 4/256 (1.56%) |
Run (1/8) Attack (3/8) Hyado (2/8) Hoimi (2/8) |
| Hunter Fly ハンターフライ |
14 | 30 | 10 | 98 | 25 | 50 | 30 | 18 | FIRE: Low ICE: None WIND: None ZAP: None DEATH: Low |
SACRIFICE: None SLEEP: High STOPSPELL: Low SAP: None SURROUND: None |
MP_DRAIN: None CONFUSION:Low SLOW: None EXPEL: High |
Cloak of Evasion みかわしのふく 2/256 (0.78%) |
Run (1/8) Attack (3/8) Gira (4/8) |
| Mad Jackal デスジャッカル |
14 | 42 | 5 | 95 | 20 | 67 | 45 | 20 | FIRE: None ICE: None WIND: None ZAP: None DEATH: Low |
SACRIFICE: None SLEEP: Low STOPSPELL: Low SAP: None SURROUND: Low |
MP_DRAIN: Low CONFUSION:Low SLOW: None EXPEL: Low |
Life Nut いのちのきのみ 2/256 (0.78%) |
Call Same Kind (1/8) Attack (5/8) Manusa (2/8) |
| Nev げんじゅつし |
16 | 42 | 10 | 128 | 55 | 60 | 46 | 25 | FIRE: Low ICE: None WIND: None ZAP: None DEATH: Low |
SACRIFICE: None SLEEP: Low STOPSPELL: High SAP: Low SURROUND: Low |
MP_DRAIN: High CONFUSION:High SLOW: None EXPEL: Null |
Pachisi Ticket すごろくけん 16/256 (6.25%) |
Attack (3/8) Run (1/8) Manusa (2/8) Medapani (2/8) |
| Tonguebear アントべア |
15 | 50 | 0 | 110 | 25 | 75 | 45 | 10 | FIRE: Low ICE: None WIND: None ZAP: None DEATH: Low |
SACRIFICE: None SLEEP: High STOPSPELL: Null SAP: Low SURROUND: Low |
MP_DRAIN: Null CONFUSION:Low SLOW: None EXPEL: Null |
Iron Spear てつのやり 1/256 (0.39%) |
Attack (7/8) Run (1/8) |
The player should fight encounters here. The Hunter flies and Tonguebears are still around, and deal the most damage. The Magestools cast single target Hyado, but aren't very threatening. Nevs, the green lumps, are generally a pain to fight. They cast Medipani to confuse the party, Manusa to surround the party. Players usually encounter 1-2 formations here. The notes from the walk to Baharata above apply here for handling encounters with whips.
Kandar Cave
Descend into Kandar Cave. Optionally pick up 4 stat seeds, and use agility seeds on the Thief, wisdom seeds on the Mage, and strength seeds on the Hero. Very importantly swap bracelets on the Thief and Hero (Thief gets Meteorite Armband, Hero gets Hero's Armband). Heal and ensure Thief & Mage have herbs. Choose a party order. Walk up to the Henchmen and select “No” for the dialogue choice. Fight Henchman x4.
Save all HP seeds for the end of the game. Save 8 MP during the fights for the end.
Many players pick up the seeds here. It is slightly time costly, but these seeds are nice, and the strength boost to the Hero can really be helpful for the Henchman x4 fight.
For party order, typically players will rearrange to Warrior, Thief, Hero, Mage. This is entirely player preference and depends somewhat on if characters survived Kandar 1 and their HP stats.
If any characters are defeated during the Henchman fight, the player pretty much is required to leave and revive. All characters are helpful for Kandar 2, and the experience is non trivial.
Miniboss: Henchman x4
Strategy:
| Name | Lv | HP | MP | EXP | Gold | Atk | Def | Agl | Resist 1 | Resist 2 | Resist 3 | Drop | Actions |
|---|---|---|---|---|---|---|---|---|---|---|---|---|---|
| Henchman カンダタこぶん |
63 | 120 | 20 | 100 | 0 | 65 | 60 | 37 | FIRE: None ICE: None WIND: None ZAP: None DEATH: Null |
SACRIFICE: Null SLEEP: High STOPSPELL: High SAP: Low SURROUND: High |
MP_DRAIN: Null CONFUSION:Null SLOW: High EXPEL: Null |
------------------ ------------------ 0/256 (0.10%) |
Attack (5/8) Rukanan (2/8) Behoimi (1/8) |
This is the first standard use the player makes of the Defense reset “bug”, which is more of a programming oversight that is allowed for this category. The Henchman here will cast Rukanan, which has a chance of reducing an ally's defense for all allies. The player can simply go into the equip menu in battle and re-equip any piece of equipment, which forces the game to recalculate equipment bonuses, and importantly resets any buffs and debuffs. During this fight, the player needs to keep track of which allies need to reset their debuffs to neutral.
This is a difficult battle, arguably moreso than Kandar 2. The Henchman have 3 main actions - single target physicals, cast Rukanan spell, and cast Behoimi when either them or one of their allies is at less than 50% HP. Behoimi is the major problem here, and the player simply has to deal with a longer fight if it happens. The fight quickly becomes dangerous when the Henchman decide to use Rukanan once or twice at the beginning of the turn, then their allies get large attacks in. If the other way around occurs, where they perform a few physicals and then use Rukanan later in the turn, the player can easily reset defense during the next turn to undo the effects before major damage is done.
Once again, the player must reset defense when their allies are hit by Rukanan. Every turn the player should be paying attention and keeping track of which ally was affected. Newer players can reset everyone's defense if they are unsure - there is no downside besides time loss.
Use of the Mist Staff is an optional strategy for this fight. The Henchman are susceptible to Mahoton, although not particularly likely. Not all players use the wand, but those who do typically use it on the first turn of this battle. Depending on which character the player gave the wand to:
Warrior - Because the Warrior can only single target physical attack, he is a decent candidate for using the wand
Mage - The Mage can opt to use the wand if she has not learned any spells.
Each character has a specific role in this fight:
Warrior - Primarily attack, rarely defend. Use the Mist Staff on turn 1 if desired.
Thief - Primarily heal the party with Meteorite Armband and herbs. Otherwise use whip attacks.
Hero - Primarily attack, rarely defend
Mage - Mage is the most complex ally to issue commands. She can emergency heal with herbs at any time alongside the Thief. Because she's in the back of the party, she has the lowest likelihood to get attacked, but if she does she can be in trouble quickly. Otherwise, what actions she takes primarily depens on her spells. Gira is the best option for ~15-20 damage to each Henchman. Hyado can be used slightly later in the fight to attempt to “snipe” a Henchman before they begin healing when under 50% HP. If the Mage is higher level, she may have Sukuruto, for increasing all allies' defense. Very, very importantly - Sukuruto is a great spell, but remember the Henchmen are simultaneously casting Rukanan. The defense reset bug will remove all buffs and debuffs, so the player should optimally keep track of relative defense levels and be careful not to debuff their own ally on accident. Finally, the Mage can use Mist Staff, usually on turn 1 but can be later as well. Mist Staff usage primarily occurs when the Mage has very few spells to work with, as a result of unlucky spell learning on level ups. Finally, the Mage needs to have 8 MP at the end of the next upcoming fight. She should use MP fairly liberally to clear this battle, but it is important to keep track of how much MP was used and how much to save for the next fight and post-fight
The first few turns typically dictate the fight. Turn 1 typically is Warrior, Hero, and Thief all attack physically, and Mage pivots with spells or Mist Staff. The player resets defense if necessary, then usually the Thief (and maybe Mage) use herbs. The Thief can sneak in attacks when HP levels are relatively safe.
Because Henchmen have a chance of healing under 50% HP, the player can choose to prioritize damage over healing/defending, which generally is the faster strategy anyhow. The idea is that the fight will go on longer if the Henchman is about to heal, so the player can choose not to heal their own party in hopes of defeating a Henchman who would have otherwise stalled the battle. This is perhaps the most difficult part of this fight - identifying risk levels and attempting to swiftly “snipe” Henchman who are about to heal.
Kandar Cave
Pull left lever in the southwest of the room. Heal party, then fight Kandar 2.
No notes
Boss: Kandar 2
Strategy:
| Name | Lv | HP | MP | EXP | Gold | Atk | Def | Agl | Resist 1 | Resist 2 | Resist 3 | Drop | Actions |
|---|---|---|---|---|---|---|---|---|---|---|---|---|---|
| Kandar 2 カンダタ |
63 | 700 | 0 | 4,800 | 0 | 95 | 70 | 23 | FIRE: Low ICE: Low WIND: None ZAP: None DEATH: Null |
SACRIFICE: Null SLEEP: Null STOPSPELL: Null SAP: Low SURROUND: Null |
MP_DRAIN: Null CONFUSION:Null SLOW: Null EXPEL: Null |
------------------ ------------------ 0/256 (0.10%) |
Attack (6/8) Critical (2/8) |
| Henchman カンダタこぶん |
63 | 120 | 20 | 100 | 0 | 65 | 60 | 37 | FIRE: None ICE: None WIND: None ZAP: None DEATH: Null |
SACRIFICE: Null SLEEP: High STOPSPELL: High SAP: Low SURROUND: High |
MP_DRAIN: Null CONFUSION:Null SLOW: High EXPEL: Null |
------------------ ------------------ 0/256 (0.10%) |
Attack (5/8) Rukanan (2/8) Behoimi (1/8) |
Kandar 2's AI is similar to Kandar 1's. Kandar is joined by 2x Henchman, which are exactly the same enemies as the prior 4x Henchman battle.
The player should immediately target the 2x Henchmen. The general strategy is the same as the previous encounter, and the “sniping” factor is important here.
A typical turn 1 involves the Thief, Hero and Warrior all attacking, an the Mage should either cast Hyado (to single target 1 enemy and attempt to maximize ability to snipe a Henchman) or Sukuruto (to safely set up defense).
Mage is again a pivot character. Hopefully the Mage has Sukara by now, and ideally Sukuruto. After turn 1, the Mage should be prioritizing setting up defense on the party. Who she buffs first, when using Sukara, is up to the player, but a generally safe strategy is to buff herself first, and buff characters with low current HP on turns theyre attempting to heal.
Once again - the Mage needs to have 8 MP after this fight, so do not misuse extra spells.
Once the Henchmen are defeated, and the party is hopefully stable with some defense increases, the fight is rather simple, and plays similarly to the Kandar 1 fight. Kandar here has a chance to critical an ally, but otherwise just physically attacks. Attack, heal, and save 8 MP on the Mage.
Kandar Cave to Baharata
Say no to Kandar after battle. Cast Riremito. Wing to Baharata (L,B). Retrieve Pepper from Gupta. Swap bracelets (Thief gets Hero's Armband). Wing to Portoga (2,2).
Revive any dead characters in Baharata.
Stay at the inn. Talk to the King, then leave (do not warp) and sail south.
The ship will not be registered to the party unless it is specifically taken from the harbor here.
World Map to Sioux
Sail east and north to Sioux.
At this point, the game is very much open to the player to explore the world with the ship. The player's general goal is to prepare for the grind segment, to properly power up the characters to be able to defeat the next set of bosses, particularly Baramos. The player will visit Sioux for the Invisibility Herb, access Edinburgh for the Drought Vase and a lot of money, collect the Red Orb, set a few warp points, and then start the grind.
Encounters:
| Name | Lv | HP | MP | EXP | Gold | Atk | Def | Agl | Resist 1 | Resist 2 | Resist 3 | Drop | Actions |
|---|---|---|---|---|---|---|---|---|---|---|---|---|---|
| Sea Slime マリンスライム |
18 | 38 | 4 | 197 | 35 | 47 | 100 | 28 | FIRE: Low ICE: High WIND: Low ZAP: None DEATH: Low |
SACRIFICE: None SLEEP: Low STOPSPELL: Low SAP: Low SURROUND: Low |
MP_DRAIN: Low CONFUSION:Low SLOW: Low EXPEL: Null |
Chimera Wing キメラのつばさ 4/256 (1.56%) |
Sukuruto (4/8) Attack (3/8) Run (1/8) |
| Man O' War しびれくらげ |
18 | 40 | 0 | 180 | 38 | 55 | 50 | 35 | FIRE: Low ICE: Low WIND: Low ZAP: Low DEATH: Low |
SACRIFICE: None SLEEP: Low STOPSPELL: Null SAP: None SURROUND: Low |
MP_DRAIN: Null CONFUSION:High SLOW: Low EXPEL: Null |
Full Moon Herb まんげつそう 4/256 (1.56%) |
Call Same Kind (2/8) Attack (3/8) Paralysis Attack (3/8) |
| Merman マーマン |
20 | 54 | 5 | 240 | 48 | 65 | 45 | 30 | FIRE: Low ICE: High WIND: None ZAP: None DEATH: High |
SACRIFICE: None SLEEP: High STOPSPELL: Low SAP: Low SURROUND: Low |
MP_DRAIN: Low CONFUSION:Low SLOW: None EXPEL: Null |
Strength Seed ちからのたね 2/256 (0.78%) |
Rukanan (3/8) Attack (5/8) |
| King Squid だいおうイカ |
22 | 135 | 0 | 355 | 90 | 85 | 40 | 32 | FIRE: None ICE: High WIND: None ZAP: None DEATH: Low |
SACRIFICE: None SLEEP: Low STOPSPELL: Null SAP: None SURROUND: High |
MP_DRAIN: Null CONFUSION:Low SLOW: None EXPEL: Null |
Life Nut いのちのきのみ 2/256 (0.78%) |
Attack (8/8) |
| Crabus ガニラス |
21 | 50 | 0 | 290 | 45 | 68 | 150 | 25 | FIRE: None ICE: Low WIND: None ZAP: None DEATH: Low |
SACRIFICE: None SLEEP: Low STOPSPELL: Null SAP: None SURROUND: Low |
MP_DRAIN: Null CONFUSION:Low SLOW: None EXPEL: Null |
Scale Armor こうらのよろい 2/256 (0.78%) |
Critical (2/8) Attack (6/8) |
Most encounters should be fled from here on while sailing. The only exceptions would be single target groups of either mermen or man o' wars. The sea slimes will cast Sukuruto, so definitely avoid them. Blue crabs can rarely use critical attacks. From here until Garuna Tower, experience from these encounters is not valuable, and fights should only be cleared or fled from to be as fast as possible.
Find the Thunder Staff. Buy the Invisibility Herb (300). Give the Thunder Staff to the Mage over the Mist Staff and equip. Wing to Portoga (2,2).
The Thunder Staff is a free cast of Begirama per turn. It is incredibly useful for the upcoming segment.
The Invisibility Herb will grant access to Edinbear. Do not get this purchase confused with the poison moth powder (310 gold).
There is an optional Agility Seed in the first house on the right upon entering, right pot.
The Invisibility Herb will grant access to Edinbear. Do not get this purchase confused with the poison moth powder (310 gold).
There is an optional Agility Seed in the first house on the right upon entering, right pot.
World Map to Edinbear
Sail north to Edinbear.
No notes.
Encounters:
| Name | Lv | HP | MP | EXP | Gold | Atk | Def | Agl | Resist 1 | Resist 2 | Resist 3 | Drop | Actions |
|---|---|---|---|---|---|---|---|---|---|---|---|---|---|
| Sea Slime マリンスライム |
18 | 38 | 4 | 197 | 35 | 47 | 100 | 28 | FIRE: Low ICE: High WIND: Low ZAP: None DEATH: Low |
SACRIFICE: None SLEEP: Low STOPSPELL: Low SAP: Low SURROUND: Low |
MP_DRAIN: Low CONFUSION:Low SLOW: Low EXPEL: Null |
Chimera Wing キメラのつばさ 4/256 (1.56%) |
Sukuruto (4/8) Attack (3/8) Run (1/8) |
| Man O' War しびれくらげ |
18 | 40 | 0 | 180 | 38 | 55 | 50 | 35 | FIRE: Low ICE: Low WIND: Low ZAP: Low DEATH: Low |
SACRIFICE: None SLEEP: Low STOPSPELL: Null SAP: None SURROUND: Low |
MP_DRAIN: Null CONFUSION:High SLOW: Low EXPEL: Null |
Full Moon Herb まんげつそう 4/256 (1.56%) |
Call Same Kind (2/8) Attack (3/8) Paralysis Attack (3/8) |
| Merzon マーマン |
20 | 54 | 5 | 240 | 48 | 65 | 45 | 30 | FIRE: Low ICE: High WIND: None ZAP: None DEATH: High |
SACRIFICE: None SLEEP: High STOPSPELL: Low SAP: Low SURROUND: Low |
MP_DRAIN: Low CONFUSION:Low SLOW: None EXPEL: Null |
Strength Seed ちからのたね 2/256 (0.78%) |
Rukanan (3/8) Attack (5/8) |
| King Squid だいおうイカ |
22 | 135 | 0 | 355 | 90 | 85 | 40 | 32 | FIRE: None ICE: High WIND: None ZAP: None DEATH: Low |
SACRIFICE: None SLEEP: Low STOPSPELL: Null SAP: None SURROUND: High |
MP_DRAIN: Null CONFUSION:Low SLOW: None EXPEL: Null |
Life Nut いのちのきのみ 2/256 (0.78%) |
Attack (8/8) |
| Crabus ガニラス |
21 | 50 | 0 | 290 | 45 | 68 | 150 | 25 | FIRE: None ICE: Low WIND: None ZAP: None DEATH: Low |
SACRIFICE: None SLEEP: Low STOPSPELL: Null SAP: None SURROUND: Low |
MP_DRAIN: Null CONFUSION:Low SLOW: None EXPEL: Null |
Scale Armor こうらのよろい 2/256 (0.78%) |
Critical (2/8) Attack (6/8) |
| Curer べホマスライム |
14 | 50 | 255 | 278 | 38 | 45 | 50 | 18 | FIRE: Low ICE: Low WIND: Low ZAP: None DEATH: Low |
SACRIFICE: None SLEEP: Low STOPSPELL: Low SAP: Low SURROUND: None |
MP_DRAIN: Null CONFUSION:Low SLOW: Low EXPEL: Null |
Stamina Seed スタミナのたね 2/256 (0.78%) |
Behoma (4/8) Attack (4/8) |
| Barnabas バーナバス |
20 | 58 | 12 | 235 | 52 | 79 | 67 | 28 | FIRE: Low ICE: None WIND: None ZAP: None DEATH: Low |
SACRIFICE: None SLEEP: High STOPSPELL: High SAP: Low SURROUND: High |
MP_DRAIN: High CONFUSION:Low SLOW: None EXPEL: Low |
Traveler's Clothes たびびとのふく 4/256 (1.56%) |
Attack (5/8) Mahoton (2/8) Behoimi (1/8) |
| Witch まじょ |
21 | 54 | 24 | 305 | 52 | 51 | 50 | 30 | FIRE: High ICE: None WIND: None ZAP: None DEATH: Low |
SACRIFICE: None SLEEP: High STOPSPELL: Low SAP: Low SURROUND: Low |
MP_DRAIN: High CONFUSION:High SLOW: None EXPEL: Null |
Invisibility Herb きえさりそう 1/256 (0.39%) |
Attack (3/8) Begirama (3/8) Behoimi (2/8) |
| Aero Nite じごくのよろい |
21 | 60 | 0 | 315 | 57 | 90 | 100 | 23 | FIRE: High ICE: None WIND: None ZAP: None DEATH: Low |
SACRIFICE: None SLEEP: Low STOPSPELL: Null SAP: Low SURROUND: Low |
MP_DRAIN: Null CONFUSION:Low SLOW: None EXPEL: Null |
Iron Armor てつのよろい 4/256 (1.56%) |
Critical (3/8) Attack (5/8) |
Refer to World Map to Sioux for ocean encounters. There is a very small possibility of getting into an encounter while on land, which can be very dangerous. Flee immediately and hope for the best.
Use the Invisibility Herb upon entering. Retrieve the Slick Suit and Party Dress from the northeast room's drawers. Go to the southwest basement, solve the puzzle, and retrieve the Thirsty Pitcher. Use a Holy Water, Wing to Aliahan (1,1).
Be careful not to waste the Invisibility Herb. Simply use it and walk past the guard, but don't take extra steps or leave the area.
If the puzzle is failed, leave and try again.
If the puzzle is failed, leave and try again.
World Map to Pirate's Hideout
Sail east to Pirate's Hideout, encounter cancelling at the Cave of Temptation.
Watch a video for the movement when landing near the Pirate's Hideout. The world map is split into a 16x16 tile grid, and the movement in players' runs is specifically walking through one of these 16x16 array of tiles where there are no encounters. In short, do exactly what runners do here when landing.
Holy Water works by comparing the lead party members level to enemies in the area. It guarantees the first few steps near Aliahan and the steps when entering Cave of Temptation to not get encounters, but more importantly the use of Holy Water here does not deplete the encounter step threshold.
This segment is one of the earliest examples of where the player must make a call if they want to reset an encounter if (and only if) they get an early fight in the sea before landing to cancel the encounter at the Cave of Temptation (or shrine). If a fight occurs before landing, the player can opt to skip the landing process entirely and keep going - the idea being that getting into the fight effectively reset the encounter anyways, so there's little value of landing and resetting the encounter once more.
Encounters:
| Name | Lv | HP | MP | EXP | Gold | Atk | Def | Agl | Resist 1 | Resist 2 | Resist 3 | Drop | Actions |
|---|---|---|---|---|---|---|---|---|---|---|---|---|---|
| Blue Beak アカイライ |
23 | 60 | 16 | 372 | 32 | 60 | 52 | 33 | FIRE: None ICE: None WIND: Low ZAP: None DEATH: Low |
SACRIFICE: None SLEEP: Low STOPSPELL: Low SAP: Low SURROUND: Low |
MP_DRAIN: None CONFUSION:None SLOW: None EXPEL: Null |
------------------ ------------------ 0/256 (0.10%) |
Attack (5/8) Bagi (3/8) |
| Magic Hag まほうおばば |
12 | 70 | 100 | 463 | 63 | 65 | 50 | 85 | FIRE: High ICE: High WIND: None ZAP: None DEATH: High |
SACRIFICE: None SLEEP: Low STOPSPELL: Low SAP: Low SURROUND: Low |
MP_DRAIN: High CONFUSION:Low SLOW: Low EXPEL: Null |
Invisibility Herb きえさりそう 4/256 (1.56%) |
Begirama (2/8) Behoimi (3/8) Bashirura (2/8) Run (1/8) |
| Kong コング |
25 | 95 | 0 | 432 | 68 | 105 | 58 | 40 | FIRE: Low ICE: Low WIND: None ZAP: None DEATH: Low |
SACRIFICE: None SLEEP: Low STOPSPELL: Null SAP: Low SURROUND: Low |
MP_DRAIN: Null CONFUSION:Low SLOW: Low EXPEL: Null |
Life Nut いのちのきのみ 4/256 (1.56%) |
Call Garuda (3/8) Attack (5/8) |
Same as above sail to Sioux for ocean encounters, except that some more can be fought with the Thunder Staff. The Mage can significantly damage pretty much every enemy group, including sea slimes, but often the best thing for the player to do is run. The player should just realize its a viable option to clear out single groups with the Thunder Staff.
All formations on land south of the Pirate's Hideout are very dangerous. Do not fight and immediately run. Most enemies can be put to sleep somewhat reliably, but most players will run.
All formations on land south of the Pirate's Hideout are very dangerous. Do not fight and immediately run. Most enemies can be put to sleep somewhat reliably, but most players will run.
Uncover secret area. Collect Heavy Metal Ring, Strength Seed and Red Orb. Distribute Party Dress to Thief and equip, Heavy Metal Ring to Mage and equip (optional), use Strength Seed on Hero. Warp to Reeve (1,2).
The Party Dress will be equipped by the Thief as a great piece of armor until she turns into a Sage (and no longer can equip). Heavy Metal Ring goes to the Mage - if the Mage has Tough personality, the player can opt not to do this, as the ring influences HP and speed growths by changing personality, but the player may prefer to keep Tough as the personality. All Strength Seeds go to Hero.
World Map to Jipang and Dharma
This part of the route unlocks these locations as warp points. There is some minor optimization here with the active Holy Water, as it does not run out until the player reaches the ocean, meaning the steps from Reeve, north on land to the ship, do not deplete the encounter threshold.
Encounters:
| Name | Lv | HP | MP | EXP | Gold | Atk | Def | Agl | Resist 1 | Resist 2 | Resist 3 | Drop | Actions |
|---|---|---|---|---|---|---|---|---|---|---|---|---|---|
| Nev げんじゅつし |
16 | 42 | 10 | 128 | 55 | 60 | 46 | 25 | FIRE: Low ICE: None WIND: None ZAP: None DEATH: Low |
SACRIFICE: None SLEEP: Low STOPSPELL: High SAP: Low SURROUND: Low |
MP_DRAIN: High CONFUSION:High SLOW: None EXPEL: Null |
Pachisi Ticket すごろくけん 16/256 (6.25%) |
Attack (3/8) Run (1/8) Manusa (2/8) Medapani (2/8) |
| Tonguebear アントべア |
15 | 50 | 0 | 110 | 25 | 75 | 45 | 10 | FIRE: Low ICE: None WIND: None ZAP: None DEATH: Low |
SACRIFICE: None SLEEP: High STOPSPELL: Null SAP: Low SURROUND: Low |
MP_DRAIN: Null CONFUSION:Low SLOW: None EXPEL: Null |
Iron Spear てつのやり 1/256 (0.39%) |
Attack (7/8) Run (1/8) |
| Catula キャットバット |
16 | 35 | 0 | 135 | 35 | 63 | 50 | 20 | FIRE: None ICE: None WIND: None ZAP: None DEATH: Low |
SACRIFICE: None SLEEP: Low STOPSPELL: Null SAP: Low SURROUND: Low |
MP_DRAIN: Null CONFUSION:Low SLOW: None EXPEL: Low |
Plush Suit ぬいぐるみ 2/256 (0.78%) |
Run (2/8) Strange Dance (2/8) Attack (2/8) Call Same Kind (2/8) |
| Killer Ape キラーエイプ |
18 | 40 | 6 | 170 | 45 | 80 | 52 | 26 | FIRE: Low ICE: None WIND: None ZAP: None DEATH: Low |
SACRIFICE: None SLEEP: High STOPSPELL: Low SAP: Low SURROUND: High |
MP_DRAIN: High CONFUSION:None SLOW: None EXPEL: Null |
Chimera Wing キメラのつばさ 4/256 (1.56%) |
Attack (6/8) Call Same Kind (2/8) |
| Goategon ゴートドン |
21 | 70 | 3 | 297 | 50 | 72 | 45 | 25 | FIRE: Low ICE: None WIND: None ZAP: None DEATH: Low |
SACRIFICE: None SLEEP: Low STOPSPELL: None SAP: None SURROUND: Low |
MP_DRAIN: None CONFUSION:Low SLOW: Low EXPEL: Null |
Strength Seed ちからのたね 4/256 (1.56%) |
Attack (6/8) Run (1/8) Bomiosu (1/8) |
Refer to World Map to Sioux for ocean encounters. These are the same ocean encounters as above, with the Thunder Staff.
It is common for the player to experience a battle outside of Dharma - this is because the sea's encounter depletion is much lower than the forest, but the player has sailed a decent amount since leaving Jipang, which ultimately means when the player lands they will be likely low enough on the threshold to get a fight. The formations around here are similarly not worth fighting in most cases, except for single group enemies. The player should flee most of the time.
It is common for the player to experience a battle outside of Dharma - this is because the sea's encounter depletion is much lower than the forest, but the player has sailed a decent amount since leaving Jipang, which ultimately means when the player lands they will be likely low enough on the threshold to get a fight. The formations around here are similarly not worth fighting in most cases, except for single group enemies. The player should flee most of the time.
Sort items to bag. From the right item shop, buy a Poison Needle for the Thief, do not equip. Poison Needle for the Mage and equip.
Importantly, the Thief should not be equipping the Poison Needle, because she'll keep her Steel Whip equipped to clear encounters before fighting metal slimes. The Poison Needle will be there for later in the grind. However, the Mage does equip this Poison Needle, and never takes it off. In her item inventory, upon equipping the needle, the previously equipped Thunder Staff will now be in her first non-equipped item slot, so the player can reliably and quickly use her first item (the Thunder Staff) in battle.
From the top left shop, optionally sell the Warrior's Iron Shield and Iron Armor. Sell any Fur Hoods on the Thief and Mage. Sell the bag's Slick Suit (9900). Buy a Silver Barette for the Mage and equip. Buy as close to 36x Poison Moth Powders for all characters. Restock on herbs if necessary. Wing to Dharma (2,4).
The player has the choice to sell the Warrior's Iron equipment. Both will be replaced later. The reason this is viable is that the Warrior will not be alive long during the grind, and often the player actually wants to inflict damage to the Warrior to reliably kill him off (which will be explained later). Selling the equipment gives the player more money for Moth Powders. If the player wants to be safe, either don't sell this equipment, or just sell the shield. More aggressive players will sell both.
Moth Powders are used to confuse enemy groups, and are critical for the grind segment. The player must fill the party's inventory with these now- do not put them in the bag, otherwise the player will have to distribute them one at a time to each character.
Moth Powders are used to confuse enemy groups, and are critical for the grind segment. The player must fill the party's inventory with these now- do not put them in the bag, otherwise the player will have to distribute them one at a time to each character.
Equipment check:
World Map to Garuna Tower
Head north to Garuna Tower.
Encounters:
| Name | Lv | HP | MP | EXP | Gold | Atk | Def | Agl | Resist 1 | Resist 2 | Resist 3 | Drop | Actions |
|---|---|---|---|---|---|---|---|---|---|---|---|---|---|
| Bruin ごうけつぐま |
23 | 90 | 0 | 440 | 55 | 95 | 40 | 30 | FIRE: None ICE: None WIND: None ZAP: None DEATH: Low |
SACRIFICE: None SLEEP: Low STOPSPELL: Null SAP: Low SURROUND: Null |
MP_DRAIN: Null CONFUSION:High SLOW: None EXPEL: Null |
Strength Seed ちからのたね 4/256 (1.56%) |
Attack (8/8) |
| Nev げんじゅつし |
16 | 42 | 10 | 128 | 55 | 60 | 46 | 25 | FIRE: Low ICE: None WIND: None ZAP: None DEATH: Low |
SACRIFICE: None SLEEP: Low STOPSPELL: High SAP: Low SURROUND: Low |
MP_DRAIN: High CONFUSION:High SLOW: None EXPEL: Null |
Pachisi Ticket すごろくけん 16/256 (6.25%) |
Attack (3/8) Run (1/8) Manusa (2/8) Medapani (2/8) |
| Catula キャットバット |
16 | 35 | 0 | 135 | 35 | 63 | 50 | 20 | FIRE: None ICE: None WIND: None ZAP: None DEATH: Low |
SACRIFICE: None SLEEP: Low STOPSPELL: Null SAP: Low SURROUND: Low |
MP_DRAIN: Null CONFUSION:Low SLOW: None EXPEL: Low |
Plush Suit ぬいぐるみ 2/256 (0.78%) |
Run (2/8) Strange Dance (2/8) Attack (2/8) Call Same Kind (2/8) |
| Killer Ape キラーエイプ |
18 | 40 | 6 | 170 | 45 | 80 | 52 | 26 | FIRE: Low ICE: None WIND: None ZAP: None DEATH: Low |
SACRIFICE: None SLEEP: High STOPSPELL: Low SAP: Low SURROUND: High |
MP_DRAIN: High CONFUSION:None SLOW: None EXPEL: Null |
Chimera Wing キメラのつばさ 4/256 (1.56%) |
Attack (6/8) Call Same Kind (2/8) |
| Metal Slime メタルスライム |
23 | 4 | 12 | 4,140 | 5 | 40 | 1,023 | 47 | FIRE: Null ICE: Null WIND: Null ZAP: Null DEATH: Null |
SACRIFICE: Null SLEEP: Null STOPSPELL: Null SAP: Null SURROUND: Null |
MP_DRAIN: Null CONFUSION:Low SLOW: Null EXPEL: Null |
Agility Seed すばやさのたね 8/256 (3.13%) |
Attack (2/8) Run (3/8) Mera (3/8) |
| Rammore マッドオックス |
17 | 60 | 12 | 162 | 45 | 65 | 49 | 28 | FIRE: None ICE: None WIND: None ZAP: None DEATH: Low |
SACRIFICE: None SLEEP: Low STOPSPELL: Low SAP: Low SURROUND: Low |
MP_DRAIN: None CONFUSION:High SLOW: None EXPEL: Null |
Leather Shield かわのたて 2/256 (0.78%) |
Run (2/8) Attack (4/8) Gira (2/8) |
The player is almost guaranteed to get into an encounter along the way, and sometimes two encounters. The fights outside are typically not experience efficient, but usually are cleared out and not fled from. With two whip users, the Mage using the Thunder Staff, and the Warrior's single attack, the same strategies as before generally apply - optimize group attacks. Nevs resist magic damage, so the Thunder Staff is not very effective on them. Killer Apes do a lot of damage, but do not have much health. The Catulas can drain MP, which can be very dangerous for the Hero - if the Hero's MP gets drained, some players might want to visit an Inn and retry, because the Hero really needs his MP in order to cast Expel on Sky Dragons in the tower.
Metal slimes can appear on this trip north. Typically these encounters aren't great for farming metal slimes, but if the player sees a metal slime with another group of enemies and wants to try to defeat it, they can & should. The metal slime hunting strategy will be explained in the next segment, but in short, the Thief/Mage (faster party members) can throw a powder on either the metal slime or a Killer Ape (who can target the metal slime). If metal slimes appear with Nevs, the party priority should be to clear out the Nevs and then try to get lucky with metal slimes - leaving Nevs around (who can cast Manusa and blind the party) make for extremely slow and inefficient fights, and Nevs resist moth powders more than other enemies.
Metal slimes can appear on this trip north. Typically these encounters aren't great for farming metal slimes, but if the player sees a metal slime with another group of enemies and wants to try to defeat it, they can & should. The metal slime hunting strategy will be explained in the next segment, but in short, the Thief/Mage (faster party members) can throw a powder on either the metal slime or a Killer Ape (who can target the metal slime). If metal slimes appear with Nevs, the party priority should be to clear out the Nevs and then try to get lucky with metal slimes - leaving Nevs around (who can cast Manusa and blind the party) make for extremely slow and inefficient fights, and Nevs resist moth powders more than other enemies.
Garuna Tower, part 1
Ascend the tower to the metal slime floors. Retrieve the Silver Barette and equip on the Thief. After the Warrior reaches ~Lv12-13 (~130 HP), kill him off. After the Hero reaches Lv18, optionally kill him off. Level the Thief to 20. Collect the Zen Book, cast Riremito with the Mage, then Wing to Dharma (2,4).
This segment is the first part of the grind in this game. It is a very complicated process, and has many tenants the player must learn to understand and follow, which will be described here.
The first and foremost goal is the power level the Thief to Lv20, so that she can use the Zen Book to class change into a Sage. This is “part 1”.
If the Hero dies early, the player will likely need to revive, unless late into the first grind with Lv16+. Some players kill off the Hero intentionally early, which speeds up EXP for the Thief and Mage. If the Warrior dies early, the player can choose to not revive him, depending on his HP. The goal is to have the Warrior with a sufficient amount of HP for Boss Troll, which usually hovers somewhere around 130HP+. If the Warrior dies with this much hp, it's likely okay to not leave and revive. But if it's significantly less than this, likely he needs the level up or two before being killed off. If the Thief or Mage die, the player must leave and revive immediately.
The player must keep the party well healed throughout this segment. The numerous herbs bought earlier in the run (from Isis, Portoga, Baharata and Sioux) are primarily used here. A safe level to keep everyone's HP over is ~65HP, which will protect from the 2 most dangerous area all attacks from 2 enemies. New players should regularly max out HP frequently.
Flow of Garuna Tower Part 1:
The flow of this section will be described in multiple phases here. This level grind is complex as the party's strategy to clear enemies technically changes over time, but there are some general ideas that persist.
Phase 1: “level the Warrior a level or two to get to ~130 HP, then kill him off” - The very beginning of this grind will have the Warrior alive, but not for very long. Enemies should be cleared out normally, and any metal slimes should be attempted to be defeated with the Warrior alive. Ideally, the player gets 1 or 2 metal slimes while the Warrior is alive. As soon as a formation appears with a significant amount of metal slimes, the idea is that the Warrior should be helping out on turn 1 by throwing a powder, then should begin targeting himself with physical attacks to be killed off before that battle is over.
For example, a Lv13 Warrior with 130HP is ready to be killed off. The party enters the 1x Sky Dragon 7x Metal slime formation. On turn 1, all party members should throw powders on the metal slimes, except the Hero who casts Nifuramu on the Sky Dragon. Then on turn 2, the Warrior should attack himself, and the Hero attacks the Warrior, while the Thief & Mage attack the metal slimes with Poison Needles (or throw extra powders). Once the Warrior is dead, any EXP that would have been distributed to him will be distributed moreso to remaining allies. If the player's Warrior dies early and doesn't help contribute in a fight this way, it's not a problem, just less efficient. As a separate example, in the event the player has just entered the grind area, then gets a fight like this immediately where they have to decide if they want the EXP to go to the Warrior or not, the player has to see what the Warrior's current and max HP is, and asses what their player risk level is to gamble. Follow the ~130HP guideline to play safer if desired. But the Warrior will get at least some EXP later before Baramos, so it's not the end of all EXP for him.
Phase 2: “Rearrange the party, collect the Silver Barette, equip on the Thief in battle, and fight a few more metal slime battles” - Rearranging the party involves putting the Thief and Hero in the first and second party slots. Then, collect the Silver Barette - ideally the Thief has used at least 1 powder, so that the barette goes to her inventory instead of somewhere else (another character/bag). While in battle, equip the barette like any other in battle item to be equipped. “A few more metal slime battles” is vague, but the idea here is that all players should have used about ~8 total powders the end of this little grind, because the player will be able to open the Warrior's inventory, as described next.
Phase 3: “Redistribute Warrior's inventory, then continue to grinding levels until Lv20 Thief” - At this point, after using ~8 powders across the team, the player can open the Warrior's inventory and redistribute his remaining powders to the rest of the team. The player should also give the Warrior's Steel Broadsword to the Hero, and do not equip yet. If there are any inventory slots left on other characters and there are powders in the bag, now is a good time to distribute them. The overall idea is to put off this menu until it's efficient to distribute the powders all at once.
The remaining part of the time in part 1 of Garuna Tower is geared towards gaining levels. The player should still be utilizing powders, but saving roughly ~6-8 for part 2 of the grind. Unfortunately, even a guide like this cannot tell the player how to optimize throwing moth powders and how much to save for later - the reality is that it's a soft science and many players feel out where they throw powders and how they control battles. It's just important for a new player to not use all powders during this segment, or if they do, understand they'll need a backup plan for part 2 (which is feasible and described later).
As soon as the Thief reaches Lv20 (32202 EXP), fall down on the tightrope. Roughly ~6 character widths inwards from either side of the rope is enough distance to be able to fall down into the correct spot. Then, head left and down the stairs, and the first treasure chest will yield a Zen Book. Cast Riremito with the Mage and wing to Dharma (2,4).
Battle Mechanics:
The chief strategy of this segment is using moth powders to confuse enemies. There are a few rules about how these powders work:
Every enemy has a resistance level to being confused via powder. Metal slimes have a ~70% chance of being confused per powder. Garudas and Stingwings have a 100% chance. Sky Dragons have a 30% chance.
Confused enemies will not attack the party when there are any other enemies left.
When there are two or more enemy groups, if one member of a group is confused, they will never run away, and will only target the other remaining groups. This is very important - metal slimes that are confused will never flee.
When there is only one enemy group left, any confused enemies will still not run away, provided there are still other enemies left in their group. Confused enemies will continue to attack their group allies, and will not flee.
When there is only one enemy left, and they are confused, it is as if nothing has changed - they follow their regular AI at thath point. Metal slimes that are by themselves, confused or not, can run away.
Confused enemies that target their allies have a slightly different damage formula for damage to their allies. There's no need to discuss the specifics, but simply what happens is that their physical damage does anywhere from 0 to ~7 in the tower, which can often defeat metal slimes in one blow.
The player will be using moth powders at groups of enemies. Unfortunately, although the party AI is smart in some regards, they will throw powders on metals that are already confused, wasting them. This is particularly why the strategy of throwing one powder to a unique group is safer.
Whip attacks only have a chance of actually damaging the first metal slime in a group. The rest will auto miss. Because of this, described in the next bullet, a single target attack can be more beneficial than a group attack.
The player's party AI will redirect attacks to non-confused enemies. This is particularly important for characters with the option to single target or group attack. During part 1 of the grind, the Hero will have the Steel Whip and the Steel Broadsword. For example, if there are 3 metal slimes, A, B and C, and A is confused, all single target attacks will either go to B or C, and once one ally has done some damage to one, the rest of the party will target the same enemy. Let's say this is metal slime C who has been hit once by an ally party member, the Thief. If the player has the Steel Whip on the Hero, he will only be able to target A, due to the bullet point described above. But if he were to switch to the Steel Broadsword, his AI will recognize that C has been damage and is non-confused, so he will attack C. This is important, as generally the player does not want to target a confused enemy as long as possible, because the idea is that confused enemies are working in the player's favor. Finally, it is important to note that between the Thief and Mage having Poison Needles and the Hero taking the Warrior's Steel Broadsword, the three important characters alive during this grind all have single target attacking options.
The Poison Needle has a 1 in 16 chance of landing an instant kill on any enemy without instant death resistance - including metal slimes.
Steel Whips are the primary means of damaging groups of enemies. The Thief will be often switching between using her whip and her Poison Needle depending on the situation. Being one of the two Poison Needle users, she can prioritize defeating metal slimes when they're present. But otherwise, her ability to clear out groups of enemies alongside the Hero is invaluable.
The Steel Broadsword begins on the Warrior, then is transferred to the Hero. As described above, it allows the Hero to single target attack. It also has a particularly fast attacking animation.
The Mage has the Thunder Staff, which is her bread & butter attack for non-metal slime damage. If she ever needs to do damage, it's primarily using this as an item, and occasionally using Hyado.
Moth powder strategy:
Moth powders thrown by the player can hit the same enemy in a group. The party's AI chooses purely randomly, so unfortunately powders can be wasted this way. Commonly, runners spread powders among different groups on a given turn to avoid this, or accept the gamble of throwing powders as a group of small enemies - for example, throwing 3 powders on a group of 3 metal slimes, it is possible one or two of those powders hit the same target.
Thief will be the fastest character. Because she can even outspeed metal slimes, the player generally gets to choose where she throws a powder, and hopefully she goes before the enemy does, thus the enemy will take its first action while confused. Sometimes it makes sense to confuse a metal slime, sometimes it makes sense to confuse an ally (e.g., confusing a moth on turn 1 immediately so that moth will attack a metal slime as soon as it takes its first action). The player has to be micromanaging the Thief's weapon, switching between the Poison Needle and Steel Whip for the entirety of this grind.
Hero's primary goal is to clear out groups of enemies with his high attack powder. But he can throw powders any time. He typically is the second best user of powders, but it cannot be understated how slow some battles can be if the Hero is not clearing groups of enemies and instead throwing moth powders.
Mage is faster than the Hero significantly, but Mage's ability to reliably deal Poison Needle damage or use the Thunder Staff allows her to not micromanage inventory and efficiently do one or the other. In other words, she can primarily focus on dealing damage while her allies throw powders. Only in cases where there are a lot of metal slimes is it worth it for her to throw powders as well. Some players may prefer to have Mage throw powders more aggressively while Hero deals group damage, again a matter of preference.
The player needs to come up with a gameplan for how to throw powders. Again, this is an area of the game where many intermediate and expert players handle things very differently. However, here are a few methodologies and things to think about:
If the formation has 2 groups of enemies, and one group has metal slimes, it's almost never a bad idea to throw one powder for each group of enemy. The powder to the metal slime may fail, but the other group (usually Garudas or Stingwings) will always get confused.
If there are only 2 enemies total and one is a metal slime, some players only throw a powder on the metal slime, or none at all. These fights do not warrant two powders.
If a large formation of metal slimes appear (4+), it's generally best to have all characters throw powders. Further, if round 1 does not go well and multiple powders fail, and multiple metal slimes are still around, the player should stomach the loss quickly and reattempt powders if many of the metals haven't yet fled. It may feel bad, but positionally the player is in a similar position as to starting the fight and should reattempt. However if metals become confused, simply switch to single target attacks (Poison Needle and Steel Broadsword (Hero)) and reap the benefits.
Save somewhere between 6-8 powders during this whole process for part 2 of the grind.
Other misc. notes:
The Stingwings can paralyze any ally. This is unfortunate when in the battle this occurs, as that party member won't get any turns until the battle is over. Outside of the battle, that character will be stunned for a very short amount of time - the player needs to walk around just a little amount of time before paralysis wears off. If all allies are paralyzed, it counts as a full party death. But otherwise, the player should not be overly concerned with an ally being paralyzed, unless it happens very early in a fight and the player is otherwise not very well healed.
Alluded to above, this game will redistribute experience based on number of allies alive. For example, a metal slime gives 4,140 experience. This will be divided by how many allies are alive. This is critically important and why characters get “killed off” purposefully. The Warrior will not be alive most of this grind, and some players kill off the Hero later so that even more experience goes to the Thief and Mage.
Alluded to above, this game will redistribute experience based on number of allies alive. For example, a metal slime gives 4,140 experience. This will be divided by how many allies are alive. This is critically important and why characters get “killed off” purposefully. The Warrior will not be alive most of this grind, and some players kill off the Hero later so that even more experience goes to the Thief and Mage.
Encounters:
| Name | Lv | HP | MP | EXP | Gold | Atk | Def | Agl | Resist 1 | Resist 2 | Resist 3 | Drop | Actions |
|---|---|---|---|---|---|---|---|---|---|---|---|---|---|
| Shadower あやしいかげ |
10 | 28 | 0 | 33 | 12 | 32 | 60 | 12 | FIRE: None ICE: None WIND: None ZAP: None DEATH: None |
SACRIFICE: None SLEEP: Low STOPSPELL: Null SAP: None SURROUND: Low |
MP_DRAIN: Null CONFUSION:Low SLOW: High EXPEL: Null |
Traveler's Clothes たびびとのふく 4/256 (1.56%) |
Attack (5/8) Call Same Kind (3/8) |
| Rammore マッドオックス |
17 | 60 | 12 | 162 | 45 | 65 | 49 | 28 | FIRE: None ICE: None WIND: None ZAP: None DEATH: Low |
SACRIFICE: None SLEEP: Low STOPSPELL: Low SAP: Low SURROUND: Low |
MP_DRAIN: None CONFUSION:High SLOW: None EXPEL: Null |
Leather Shield かわのたて 2/256 (0.78%) |
Run (2/8) Attack (4/8) Gira (2/8) |
| Killer Ape キラーエイプ |
18 | 40 | 6 | 170 | 45 | 80 | 52 | 26 | FIRE: Low ICE: None WIND: None ZAP: None DEATH: Low |
SACRIFICE: None SLEEP: High STOPSPELL: Low SAP: Low SURROUND: High |
MP_DRAIN: High CONFUSION:None SLOW: None EXPEL: Null |
Chimera Wing キメラのつばさ 4/256 (1.56%) |
Attack (6/8) Call Same Kind (2/8) |
| Garuda ガルーダ |
19 | 60 | 12 | 220 | 71 | 65 | 60 | 30 | FIRE: None ICE: None WIND: None ZAP: None DEATH: None |
SACRIFICE: None SLEEP: High STOPSPELL: Low SAP: None SURROUND: High |
MP_DRAIN: None CONFUSION:None SLOW: None EXPEL: Null |
Pachisi Ticket すごろくけん 16/256 (6.25%) |
Attack (6/8) Begirama (2/8) |
| Metal Slime メタルスライム |
23 | 4 | 12 | 4,140 | 5 | 40 | 1,023 | 47 | FIRE: Null ICE: Null WIND: Null ZAP: Null DEATH: Null |
SACRIFICE: Null SLEEP: Null STOPSPELL: Null SAP: Null SURROUND: Null |
MP_DRAIN: Null CONFUSION:Low SLOW: Null EXPEL: Null |
Agility Seed すばやさのたね 8/256 (3.13%) |
Attack (2/8) Run (3/8) Mera (3/8) |
| Great Beak おおくちばし |
18 | 43 | 0 | 175 | 44 | 55 | 43 | 24 | FIRE: None ICE: None WIND: None ZAP: None DEATH: Low |
SACRIFICE: None SLEEP: Low STOPSPELL: Null SAP: Low SURROUND: Low |
MP_DRAIN: Null CONFUSION:None SLOW: Low EXPEL: Null |
Wisdom Seed かしこさのたね 4/256 (1.56%) |
Attack (8/8) |
| Sky Dragon スカイドラゴン |
25 | 80 | 0 | 800 | 180 | 80 | 60 | 40 | FIRE: Null ICE: None WIND: None ZAP: None DEATH: Low |
SACRIFICE: None SLEEP: High STOPSPELL: Null SAP: Low SURROUND: Low |
MP_DRAIN: Null CONFUSION:High SLOW: None EXPEL: None |
Life Nut いのちのきのみ 4/256 (1.56%) |
Flame Breath (Medium) (4/8) Attack (4/8) |
| Stingwing しびれあげは |
18 | 40 | 0 | 165 | 35 | 62 | 10 | 30 | FIRE: Low ICE: None WIND: None ZAP: None DEATH: None |
SACRIFICE: None SLEEP: Low STOPSPELL: Null SAP: None SURROUND: Low |
MP_DRAIN: Null CONFUSION:None SLOW: None EXPEL: Null |
Full Moon Herb まんげつそう 8/256 (3.13%) |
Paralysis Attack (4/8) Attack (4/8) |
Each enemy deserves its own brief write-up. However, there are some other enemies on the way up to the grind floor, where the player is guaranteed one encounter on floor 1. These enemies are Killer Apes, Shadows, Rammores and Great Beaks. All of them are susceptible to whips and the Thunder Staff. The only major strategy here is to clear out the Great Beaks as soon as possible, because of them going twice in one turn.
Sky Dragon - certainly the most dangerous enemy in Garuna. They have 80 max HP, and can use medium fire breath for ~30-40 damage to all party members. They are immune to fire damage, but 100% susceptible to ice (Hyado / Hyadaruko). Importantly, the Hero's Nifuramu spell will 100% remove them from the battlefield. Typically when a Sky Dragon is faced alone, the player will attack with all allies except Mage and use Hyado. Otherwise, the player can justify using Nifuramu when there are other enemies around. A great example is the 1x Sky Dragon 7x Metal slime encounter - the player wants to remove the Sky Dragon immediately, so that confused metal slimes start attacking each other, rather than the Sky Dragon. A particularly dangerous fight is the 1x Sky Dragon 2x Garuda fight, where all enemies can use area all attacks and can put the party in serious danger. Do not ever use moth powders on a Sky Dragon.
Garuda - Garuda's have max 60 HP. They are 100% susceptible to being moth powdered, and are 100% susceptible to fire and ice spells. They are mildly dangerous, as they have Begirama. Unfortunately because they know this spell, when confused they have a chance of using it against their allies, and against metal slimes it is a complete waste. For this reason alone they are not the prime target for moth powders, but they certainly can be moth powdered as they are really only one of three recipients of powders. For example, there's no reason the player wouldn't moth powder a Garuda in a 2x Garuda 3x Metal slime fight, even if the Garuda has a chance of using Begirama against the metals. Garudas will physically hit metal slimes harder than Stingwings.
Stingwings - These enemies have 40 max HP. They are 70% susceptible to fire damage, which unfortunately means the Mage's Thunder Staff will not always hit them. They are 100% susceptible to ice damage and to moth powders. They only use physical attacks, but some of them have a chance of paralysis. Either way, because these are only physical attacks, moths are the prime target for moth powders, because they will only use physical attacks against metal slimes (unlike the Garudas using Begirama).
Great Beaks - These birds do not show up with any other enemies, only as groups by themselves. They can easily be cleared with whips and the Thunder Staff. They take two actions per turn.
Metal slimes - Metal slimes, or metals, have between 3 to 4 HP (50% chance for either). They have a ⅜ chance to run away, 2/8 chance to physical and ⅜ chance to use Mera. They are not susceptible to any spell damage, and only have a 70% chance to be moth powdered. This is unfortunate, as it is not entirely reliable to throw powders on metals, although many players will do so and hope for the best. Metals are confused not because they help significantly with damaging their own allies, but primarily to keep them from running away and to redirect party AI attacks. For example, if a formation is 2x Stingwing 2x Metal slime, a common strategy is to throw a powder on each group. If a metal slime is properly confused, all single target attacks from the party to the metal slime group will go to the other non-confused metal slime, which is beneficial because according to the rules above, the confused metal slime will not be running away as long as it's not the last enemy remaining.
Change Thief's class to Sage. SF, wing to Jipang (2,5)
The Thief will have the Zen Book in her inventory - the only way this possibly doesn't happen is if the Thief is either not in the front of the party, or she somehow has a full inventory. Otherwise, when class changing, the last option in the class choice menu will be Sage.
This is the first use of SF in the game. As described at the beginning of this guide, SF will often be used. Players should learn from VODs and experiment to learn specifically where to use it.
This is the first use of SF in the game. As described at the beginning of this guide, SF will often be used. Players should learn from VODs and experiment to learn specifically where to use it.
World Map to Muor
Sail north to Muor. In Muor, stay at the inn. Find a Leather Loincloth in the top dresser of the inn. SF and leave town.
This town visit to stay at the inn to recover MP for the Mage for the upcoming grind segment and to collect a leather loincloth for the Mage Warrior (do not equip now).
Optional: Life Nuts can be found in the northern church, in the center tile on the ground's cross-like image.
Optional: The player has access to a significant ~5100G via the Ortega Helmet in this town. By walking north, east then south on the edge of town, the player can access a brief cutscene to obtain the Ortega Helmet. Also in this town is an item shop that sells poison moth powders, so if the player is desperate for moth powders, this is an option. Generally players do not do this, but for either races or beginner players, it can be a vital safety net. One might think that the Ortega Helmet is equipment worth keeping - although it is a decent helmet for the Hero, the Hero will be equipping the Misery Helmet later in the game, so the Ortega Helmet's usage is very limited
Encounters:
Refer to World Map to Sioux for ocean encounters. There are some unique land encounters here, but they are incredibly rare in occurrence.
World Map to Final Key
Sail north to Final Key. Use Thirsty Pitcher to open the cave.
No notes.
Encounters:
| Name | Lv | HP | MP | EXP | Gold | Atk | Def | Agl | Resist 1 | Resist 2 | Resist 3 | Drop | Actions |
|---|---|---|---|---|---|---|---|---|---|---|---|---|---|
| Bighorn ビッグホーン |
23 | 75 | 0 | 353 | 68 | 75 | 55 | 24 | FIRE: Low ICE: Low WIND: None ZAP: None DEATH: Low |
SACRIFICE: None SLEEP: Low STOPSPELL: Null SAP: None SURROUND: Low |
MP_DRAIN: Null CONFUSION:Low SLOW: None EXPEL: Null |
Holy Water せいすい 4/256 (1.56%) |
Attack (5/8) Sleep Breath (3/8) |
| Stingwing しびれあげは |
18 | 40 | 0 | 165 | 35 | 62 | 10 | 30 | FIRE: Low ICE: None WIND: None ZAP: None DEATH: None |
SACRIFICE: None SLEEP: Low STOPSPELL: Null SAP: None SURROUND: Low |
MP_DRAIN: Null CONFUSION:None SLOW: None EXPEL: Null |
Full Moon Herb まんげつそう 8/256 (3.13%) |
Paralysis Attack (4/8) Attack (4/8) |
| Blue Beak アカイライ |
23 | 60 | 16 | 372 | 32 | 60 | 52 | 33 | FIRE: None ICE: None WIND: Low ZAP: None DEATH: Low |
SACRIFICE: None SLEEP: Low STOPSPELL: Low SAP: Low SURROUND: Low |
MP_DRAIN: None CONFUSION:None SLOW: None EXPEL: Null |
------------------ ------------------ 0/256 (0.10%) |
Attack (5/8) Bagi (3/8) |
| Shaman シャーマン |
22 | 93 | 18 | 358 | 50 | 65 | 52 | 37 | FIRE: Low ICE: Low WIND: Low ZAP: None DEATH: High |
SACRIFICE: None SLEEP: Low STOPSPELL: Low SAP: Low SURROUND: High |
MP_DRAIN: High CONFUSION:Low SLOW: Low EXPEL: Null |
Luck Seed ラックのたね 8/256 (3.13%) |
Run (1/8) Attack (4/8) Call Hork (2/8) Behoimi (1/8) |
| Metal Slime メタルスライム |
23 | 4 | 12 | 4,140 | 5 | 40 | 1,023 | 47 | FIRE: Null ICE: Null WIND: Null ZAP: Null DEATH: Null |
SACRIFICE: Null SLEEP: Null STOPSPELL: Null SAP: Null SURROUND: Null |
MP_DRAIN: Null CONFUSION:Low SLOW: Null EXPEL: Null |
Agility Seed すばやさのたね 8/256 (3.13%) |
Attack (2/8) Run (3/8) Mera (3/8) |
Refer to World Map to Sioux for ocean encounters. The land tile before entering the Final Key Shrine, although incredibly rare to get a fight, does have unique encounters. There's a ~10% chance of getting the 8x Metaly formation. Be prepared.
Final Key Shrine
Obtain the Final Key. Swap the Sage's unequipped Hero's Armband for the Hero's Meteorite Bracer and equip (Hero equips Armband). Swap the Meteorite Bracer for the Mage's Heavy Metal Ring (“HMR”) and equip (Mage equips Meteorite Bracer). Equip the HMR on the Sage. Sort the Sage's inventory. Allocate any/all moth powders to the Sage, then the Mage, then the Hero (if alive). Ensure the Hero has the Steel Whip equipped and give the Steel Broadsword to the Sage and do not equip. Take the last chance to check Warrior's inventory. SF, wing to Dharma (2,4).
This segment is an opportunity for menuing refreshment. The accessory setup ends up such that the Sage gets the Heavy Metal Ring for personality adjustment for boosted HP growth during early levels, the Hero gets the Hero's Armband again for more attack power (which he keeps for the rest of the game), and the Mage gets the Meteorite Armband for speed. This is the only segment the Mage wears this accessory, but given her level she can outspeed much of the enemies in the second part of the grind.
"Sort the Sage's inventory" means to use the sort to bag command on the Sage only. Other character should keep their inventories as the Hero & Mage should have some powders on them. The Sage, however, just class changed, and has some extra equipment inventory that should be sorted. This frees up her inventory to receive powders and the Steel Broadsword.
The Steel Broadsword going to the Sage will help her isolate single targets, which is arguably more important in the upcoming segment than it was before.
World Map to Garuna Tower
Walk north to Garuna Tower.
Encounters:
Refer to World Map to Garuna Tower for encounter data.
Although not much changes for this walk, the party will have SF active, so the walk north will have less encounters.
Getting past Lv2 as a Sage is very important. Often once the player gets to Lv2 with the Sage, the player has full reign to kill off the Hero. The reason Lv2 is so important is simply because of the Nifuramu spell, which she will have access to. At level 1, the Sage is not only vulnerable with low stats, but also that a Sky Dragon poses a serious threat to the Sage/Mage team without Nifuramu. Often, hitting Lv2 either happens during this segment or the very beginning of the next segment.
Garuna Tower Part 2
This grind is somewhat simpler than the previous one, but also comes with its own set of challenges. The goal is to get to Lv21 with the Mage, learn Baikiruto, and leave immediately. Another purpose of this segment is to get the Sage to Lv14, where she learns Behoimi.
As noted above, getting Lv2 Sage (which will happen after any first fight) is very important. Players do not want to be in a situation with a Sky Dragon wishing they had Nifuramu.
Depending on how the previous segment was played, Hero may or may not be alive. If he's alive, the same idea for Warrior contributing to a battle then being killed off, is applicable for the Hero here.
During this grind, both Sage and Mage should have moth powders, usually ~4 each. Sage will be responsible for switching between the Steel Whip and the Steel Broadsword. The Mage will have the Meteorite Armband on, to likely outspeed everything. Mage is arguably the better powder thrower of the two, where Sage is better at clearing out enemies. However, Mage gets two very good spells during this segment. She will learn Merami (Blazemore) at Lv18, which is an excellent tool for clearing out single target garudas and madpeckers (do not use on poison moths). Merami is especially good for clearing battles quickly - be sure to incorporate in random encounter strategy late into the grind. Hyadaruko is a 50% learn spell starting at Lv20. If learned in time during this grind, it is immensely helpful for dealing consistent 100% of poison moths/madpecker health, and doing ~80-100% of garuda health. The player should use these spells as much as possible, as Mage's MP is rarely fully utilized during this segment and there's no reason to hold back.
The Baikiruto spell is a 50% chance to be learned at Lv21 for the Mage. If it is not learned, every level past Lv21 will have a 50% chance to learn. Many players going for PBs will reset over this. It is an unfortunate part of the speedrun, as it is a pure 50/50 that is very much not in the player's favor. This spell is necessary & required for this route - there is no avoiding this endeavor.
The amount of EXP required for Lv21 is 45676. Newer players can opt to watch this value and get close to it, then opt to leave Garuna Tower, warp to Dharma and save the game, then grind a few fights either outside of Dharma (~300 EXP per fight, and a small chance of metal slimes) or warp to Edinbear and Jipangu (slightly more risky, but a good option with Hyadaruko for ~600 EXP per fight).
Behoimi is learned by the Sage at Lv14, at a 100% rate. There is an aspect of this part of the grind where the Sage will either achieve Lv14 before or after the Mage achieves Lv21. This is all dependent on how much more EXP did the Mage receive than the bare minimum required for the Thief to level to 20.
Two scenarios illustrating the above point- consider during Garuna Tower part 1, the Thief has 31500 EXP, roughly ~700 EXP away:
- Scenario 1: The party battles and defeats two regular battles, giving the team ~1000 EXP. The Thief just barely meets the Lv20 requirement, and the party can leave. The Mage's EXP is effectively ‘baseline'. During Garuna Tower part 2, the Sage has a normal amount of EXP, because the Mage is baseline for her starting point. In this scenario, Sage reaches Lv14 before Mage reaches Lv21.
- Scenario 2: The party battles and defeats a few metal slimes, giving the team ~6000 EXP. The Thief greatly surpasses Lv20 requirement, and the party can leave. Now the Mage also has ~5300 EXP more than is ‘baseline'. Because of this, during Garuna Tower part 2, the Sage has comparatively “less” EXP, because the Mage has a 5300 EXP lead. In this scenario, Mage will reach Lv21 before Sage reaches Lv14.
The above problem of Mage reaching Lv21 before Sage reaches Lv14 is important to identify. The Sage desperately needs to learn Behoimi - it is a critical spell for keeping the party healed. Importantly the Sage will not have many opportunities to get EXP before the next boss fight, Boss Troll. So if the player is in this scenario, they should consider if they should continue grinding in Garuna Tower, or if they can fight battles during the Gaia's Navel segment coming soon.
Encounters:
Refer to Garuna Tower Part 1 for encounter data.
Change the Mage's class into a Warrior, becoming Mage Warrior. SF, wing to Baharata (2,3). Exchange the Mage Warrior's Meteorite Armband for the Sage's Heavy Metal Ring and equip both. Sail south to Lancel.
At level 21, Mage needs to have learned Baikiruto. If this is the case, she can freely change into a Warrior. The Mage Warrior's role will largely to be casting Baikiruto in every major fight for the rest of the game, and simultaneously tank damage. She'll also cast a few other spells routinely, such as Sukuruto.
At this point, the player will be expected to generally always have SF active. Part of reviewing VODs is taking note of when and where to use SF, to avoid the message that displays when SF runs out. If the player can use SF right before it wears out, they'll avoid this message. The places that players use SF is typically very consistent per run.
When switching the Meteorite Armband for the Heavy Metal Ring (“HMR”), both can equip. The Meteorite Armband is required to be equipped. However the HMR (for the Mage Warrior) is an optional equip - generally the rule of thumb is that a Tough personality Mage Warrior does not need to equip the HMR now. The reason is that HMR changes character personality, which is generally beneficial but not nearly as good as the Tough personality's HP growths. HMR will be used much later in the game to give an agility boost to the Mage Warrior if it is not equipped here.
It is normal and expected for the Warrior and Hero to be dead during this section. They will be revived soon.
Encounters:
Refer to World Map to Sioux for ocean encounters.
For many upcoming segments, there is no necessity to fight random encounters. Encounters are only fought for the sake of clearing them quickly.
For many upcoming segments, there is no necessity to fight random encounters. Encounters are only fought for the sake of clearing them quickly.
Lancel to Gaia's Navel
There is nothing important in Lancel besides the access to Gaia's Navel. As an aside, Lancel sells Invisibility Herbs, but the player already purchased one in Sioux, so there is no value.
Gaia's Navel is relatively straightforward. Follow a VOD's path, taking note of where SF occurs.
Very importantly, make sure the Sage has enough MP to cast Riremito after collecting the Blue Orb. It is a very slow and painful process to leave manually. Also, be mindful of memory cursor with the Sage when using Riremito from Gaia's Navel, then using Rura. Players will get into the habit of turboing SF with the Sage, and this section leaves the memory cursor on Rura.
Encounters:
| Name | Lv | HP | MP | EXP | Gold | Atk | Def | Agl | Resist 1 | Resist 2 | Resist 3 | Drop | Actions |
|---|---|---|---|---|---|---|---|---|---|---|---|---|---|
| Flamapede かえんムカデ |
13 | 45 | 0 | 72 | 35 | 45 | 40 | 20 | FIRE: Null ICE: None WIND: None ZAP: None DEATH: Low |
SACRIFICE: None SLEEP: High STOPSPELL: Null SAP: Low SURROUND: Low |
MP_DRAIN: Null CONFUSION:Low SLOW: Low EXPEL: Null |
Wisdom Seed かしこさのたね 2/256 (0.78%) |
Attack (4/8) Flame Breath (Weak) (3/8) Run (1/8) |
| Mummy マミー |
13 | 55 | 30 | 82 | 36 | 60 | 35 | 20 | FIRE: None ICE: None WIND: High ZAP: None DEATH: Null |
SACRIFICE: None SLEEP: High STOPSPELL: Low SAP: Low SURROUND: High |
MP_DRAIN: None CONFUSION:Low SLOW: High EXPEL: Low |
Holy Water せいすい 4/256 (1.56%) |
Critical (1/8) Attack (4/8) Call Hork (3/8) |
| Hunter Fly ハンターフライ |
14 | 30 | 10 | 98 | 25 | 50 | 30 | 18 | FIRE: Low ICE: None WIND: None ZAP: None DEATH: Low |
SACRIFICE: None SLEEP: High STOPSPELL: Low SAP: None SURROUND: None |
MP_DRAIN: None CONFUSION:Low SLOW: None EXPEL: High |
Cloak of Evasion みかわしのふく 2/256 (0.78%) |
Run (1/8) Attack (3/8) Gira (4/8) |
| Tonguebear アントべア |
15 | 50 | 0 | 110 | 25 | 75 | 45 | 10 | FIRE: Low ICE: None WIND: None ZAP: None DEATH: Low |
SACRIFICE: None SLEEP: High STOPSPELL: Null SAP: Low SURROUND: Low |
MP_DRAIN: Null CONFUSION:Low SLOW: None EXPEL: Null |
Iron Spear てつのやり 1/256 (0.39%) |
Attack (7/8) Run (1/8) |
| Killer Ape キラーエイプ |
18 | 40 | 6 | 170 | 45 | 80 | 52 | 26 | FIRE: Low ICE: None WIND: None ZAP: None DEATH: Low |
SACRIFICE: None SLEEP: High STOPSPELL: Low SAP: Low SURROUND: High |
MP_DRAIN: High CONFUSION:None SLOW: None EXPEL: Null |
Chimera Wing キメラのつばさ 4/256 (1.56%) |
Attack (6/8) Call Same Kind (2/8) |
| Metal Slime メタルスライム |
23 | 4 | 12 | 4,140 | 5 | 40 | 1,023 | 47 | FIRE: Null ICE: Null WIND: Null ZAP: Null DEATH: Null |
SACRIFICE: Null SLEEP: Null STOPSPELL: Null SAP: Null SURROUND: Null |
MP_DRAIN: Null CONFUSION:Low SLOW: Null EXPEL: Null |
Agility Seed すばやさのたね 8/256 (3.13%) |
Attack (2/8) Run (3/8) Mera (3/8) |
| Goategon ゴートドン |
21 | 70 | 3 | 297 | 50 | 72 | 45 | 25 | FIRE: Low ICE: None WIND: None ZAP: None DEATH: Low |
SACRIFICE: None SLEEP: Low STOPSPELL: None SAP: None SURROUND: Low |
MP_DRAIN: None CONFUSION:Low SLOW: Low EXPEL: Null |
Strength Seed ちからのたね 4/256 (1.56%) |
Attack (6/8) Run (1/8) Bomiosu (1/8) |
| Executer さつじんき |
17 | 45 | 0 | 150 | 35 | 77 | 55 | 24 | FIRE: None ICE: None WIND: None ZAP: None DEATH: Low |
SACRIFICE: None SLEEP: Low STOPSPELL: Null SAP: Low SURROUND: Low |
MP_DRAIN: Null CONFUSION:Low SLOW: None EXPEL: Null |
Poison Needle どくばり 4/256 (1.56%) |
Attack (6/8) Critical (2/8) |
| Demonite べビーサタン |
19 | 70 | 0 | 100 | 45 | 55 | 33 | 23 | FIRE: High ICE: High WIND: Low ZAP: None DEATH: High |
SACRIFICE: None SLEEP: Null STOPSPELL: None SAP: None SURROUND: None |
MP_DRAIN: Null CONFUSION:None SLOW: None EXPEL: Null |
Prayer Ring いのりのゆびわ 0/256 (0.10%) |
Run (1/8) Frost Breath (Weak) (2/8) Ionazun (2/8) Zaraki (2/8) Megante (1/8) |
| Sky Dragon スカイドラゴン |
25 | 80 | 0 | 800 | 180 | 80 | 60 | 40 | FIRE: Null ICE: None WIND: None ZAP: None DEATH: Low |
SACRIFICE: None SLEEP: High STOPSPELL: Null SAP: Low SURROUND: Low |
MP_DRAIN: Null CONFUSION:High SLOW: None EXPEL: None |
Life Nut いのちのきのみ 4/256 (1.56%) |
Flame Breath (Medium) (4/8) Attack (4/8) |
| Rogue Nite さまようよろい |
11 | 55 | 0 | 68 | 30 | 47 | 50 | 10 | FIRE: Low ICE: None WIND: None ZAP: None DEATH: Null |
SACRIFICE: None SLEEP: High STOPSPELL: Null SAP: None SURROUND: Low |
MP_DRAIN: Null CONFUSION:Null SLOW: None EXPEL: High |
Copper Sword どうのつるぎ 4/256 (1.56%) |
Critical (1/8) Attack (5/8) Call Hoimi Slime (2/8) |
| Witch まじょ |
21 | 54 | 24 | 305 | 52 | 51 | 50 | 30 | FIRE: High ICE: None WIND: None ZAP: None DEATH: Low |
SACRIFICE: None SLEEP: High STOPSPELL: Low SAP: Low SURROUND: Low |
MP_DRAIN: High CONFUSION:High SLOW: None EXPEL: Null |
Invisibility Herb きえさりそう 1/256 (0.39%) |
Attack (3/8) Begirama (3/8) Behoimi (2/8) |
Refer to the Garuna Tower part 2 section regarding discussion on the Lv13 vs Lv14 Sage problem. If the Sage is Lv13, the player should clear out as many battles on the Sage to get to Lv14 to learn Behoimi.
Encounters here are fairly straightforward. Most formations are fine to run from, and some warrant being cleared out, mostly 1 group formations. The 3x executioner formation is worth being cleared out via steel wheep, as these enemies can cause criticals. There is relatively little danger in this dungeon, even alone as one character.
The player must keep the Sage's HP high, and should not be afraid to spend a turn in battle to cast Behoimi to recover. But once again, leave enough MP to cast Riremito.
World Map to Tedon
SF, sail south. Encounter cancel and revive characters at shrine. Give the Sage's Terra Armor to the Warrior and equip. Sail to Tedon (arriving at night time).
Encounters:
| Name | Lv | HP | MP | EXP | Gold | Atk | Def | Agl | Resist 1 | Resist 2 | Resist 3 | Drop | Actions |
|---|---|---|---|---|---|---|---|---|---|---|---|---|---|
| Hork くさったしたい |
16 | 98 | 0 | 120 | 15 | 67 | 16 | 20 | FIRE: None ICE: None WIND: None ZAP: None DEATH: Low |
SACRIFICE: None SLEEP: Null STOPSPELL: Null SAP: Low SURROUND: Null |
MP_DRAIN: Null CONFUSION:Null SLOW: None EXPEL: Low |
Clothes ぬののふく 4/256 (1.56%) |
Waste a turn (1/8) Attack (6/8) Defense (1/8) |
| Shaman シャーマン |
22 | 93 | 18 | 358 | 50 | 65 | 52 | 37 | FIRE: Low ICE: Low WIND: Low ZAP: None DEATH: High |
SACRIFICE: None SLEEP: Low STOPSPELL: Low SAP: Low SURROUND: High |
MP_DRAIN: High CONFUSION:Low SLOW: Low EXPEL: Null |
Luck Seed ラックのたね 8/256 (3.13%) |
Run (1/8) Attack (4/8) Call Hork (2/8) Behoimi (1/8) |
| Goategon ゴートドン |
21 | 70 | 3 | 297 | 50 | 72 | 45 | 25 | FIRE: Low ICE: None WIND: None ZAP: None DEATH: Low |
SACRIFICE: None SLEEP: Low STOPSPELL: None SAP: None SURROUND: Low |
MP_DRAIN: None CONFUSION:Low SLOW: Low EXPEL: Null |
Strength Seed ちからのたね 4/256 (1.56%) |
Attack (6/8) Run (1/8) Bomiosu (1/8) |
| Witch まじょ |
21 | 54 | 24 | 305 | 52 | 51 | 50 | 30 | FIRE: High ICE: None WIND: None ZAP: None DEATH: Low |
SACRIFICE: None SLEEP: High STOPSPELL: Low SAP: Low SURROUND: Low |
MP_DRAIN: High CONFUSION:High SLOW: None EXPEL: Null |
Invisibility Herb きえさりそう 1/256 (0.39%) |
Attack (3/8) Begirama (3/8) Behoimi (2/8) |
| Aero Nite じごくのよろい |
21 | 60 | 0 | 315 | 57 | 90 | 100 | 23 | FIRE: High ICE: None WIND: None ZAP: None DEATH: Low |
SACRIFICE: None SLEEP: Low STOPSPELL: Null SAP: Low SURROUND: Low |
MP_DRAIN: Null CONFUSION:Low SLOW: None EXPEL: Null |
Iron Armor てつのよろい 4/256 (1.56%) |
Critical (3/8) Attack (5/8) |
Talk to the northern prisoner for the Green Orb. Walk down to stay at the inn. Enter the bottom left's house second floor. Check the drawer for the Black Hood. Sort all items to the bag. Collect the Lamp of Darkness (“the Lamp”). SF, wing to Edinbear (L,2).
The Lamp of Darkness is an incredible tool used for the rest of this run while walking on the world map. As described above, “encounter cancelling” is the idea of resetting the step threshold towards getting into a new battle. The Lamp does exactly that when it changes the time from day to night. As is the case with when to cast the SF spell, so too are Lamp uses tightly routed, and most players do the same thing when using the Lamp.
Note that the Lamp can only be used during the day.
It's importantly to realize that if the player was about to use the Lamp, but gets into an encounter somewhere around ~1-10 steps before using it, the “value” of using the Lamp to reset the encounter is largely lost, as getting into the battle already reset the threshold. This causes some oddities with routing the Lamp. Newer players can either ignore by not using the Lamp, or use it in the same place they were going to, but intermediate players should give thought as to how to adjust where their next possible Lamp usage should be to maximize distance covered without encounters.
There is a Magical Skirt available for purchase at the bottom left shop for 1500G. If the player decides to get some extra money via the Romaly vault, this can be a great magic damage mitigating option for the Mage Warrior. It will replace her Leather Loincloth until she gets the Swordedge Armor, and late in the game there are some fights (Baramos, Baramos Bomus) where keeping the Magical Skirt to swap can greatly reduce her damage.
There is a Life Nut available in the eastern graveyard area underground (past the swamp). Inspect the middle/left side of the top coffin from below.
World Map to Samanosa
Encounters:
| Name | Lv | HP | MP | EXP | Gold | Atk | Def | Agl | Resist 1 | Resist 2 | Resist 3 | Drop | Actions |
|---|---|---|---|---|---|---|---|---|---|---|---|---|---|
| Bighorn ビッグホーン |
23 | 75 | 0 | 353 | 68 | 75 | 55 | 24 | FIRE: Low ICE: Low WIND: None ZAP: None DEATH: Low |
SACRIFICE: None SLEEP: Low STOPSPELL: Null SAP: None SURROUND: Low |
MP_DRAIN: Null CONFUSION:Low SLOW: None EXPEL: Null |
Holy Water せいすい 4/256 (1.56%) |
Attack (5/8) Sleep Breath (3/8) |
| Zombie どくどくゾンビ |
23 | 80 | 0 | 368 | 25 | 65 | 50 | 23 | FIRE: None ICE: None WIND: None ZAP: None DEATH: Low |
SACRIFICE: None SLEEP: Null STOPSPELL: Null SAP: Low SURROUND: Low |
MP_DRAIN: Null CONFUSION:High SLOW: Low EXPEL: Low |
Antidote どくけしそう 4/256 (1.56%) |
Defense (1/8) Call Witch Doctor (1/8) Poison Attack (3/8) Poison Breath (2/8) Attack (1/8) |
| Blue Beak アカイライ |
23 | 60 | 16 | 372 | 32 | 60 | 52 | 33 | FIRE: None ICE: None WIND: Low ZAP: None DEATH: Low |
SACRIFICE: None SLEEP: Low STOPSPELL: Low SAP: Low SURROUND: Low |
MP_DRAIN: None CONFUSION:None SLOW: None EXPEL: Null |
------------------ ------------------ 0/256 (0.10%) |
Attack (5/8) Bagi (3/8) |
| Death Nite キラーアーマー |
25 | 70 | 5 | 418 | 80 | 92 | 150 | 35 | FIRE: High ICE: None WIND: Low ZAP: None DEATH: Low |
SACRIFICE: None SLEEP: High STOPSPELL: Low SAP: High SURROUND: Low |
MP_DRAIN: Low CONFUSION:Low SLOW: Low EXPEL: Null |
Iron Armor はがねのよろい 2/256 (0.78%) |
Attack (5/8) Rukanan (3/8) |
| Metabble はぐれメタル |
24 | 6 | 255 | 40,200 | 10 | 55 | 1,023 | 150 | FIRE: Null ICE: Null WIND: Null ZAP: Null DEATH: Null |
SACRIFICE: Null SLEEP: Null STOPSPELL: Null SAP: Null SURROUND: Null |
MP_DRAIN: Null CONFUSION:Null SLOW: Null EXPEL: Null |
Happiness Shoes しあわせのくつ 4/256 (1.56%) |
Run (5/8) Attack (1/8) Gira (2/8) |
| Shaman シャーマン |
22 | 93 | 18 | 358 | 50 | 65 | 52 | 37 | FIRE: Low ICE: Low WIND: Low ZAP: None DEATH: High |
SACRIFICE: None SLEEP: Low STOPSPELL: Low SAP: Low SURROUND: High |
MP_DRAIN: High CONFUSION:Low SLOW: Low EXPEL: Null |
Luck Seed ラックのたね 8/256 (3.13%) |
Run (1/8) Attack (4/8) Call Hork (2/8) Behoimi (1/8) |
| Magic Hag まほうおばば |
12 | 70 | 100 | 463 | 63 | 65 | 50 | 85 | FIRE: High ICE: High WIND: None ZAP: None DEATH: High |
SACRIFICE: None SLEEP: Low STOPSPELL: Low SAP: Low SURROUND: Low |
MP_DRAIN: High CONFUSION:Low SLOW: Low EXPEL: Null |
Invisibility Herb きえさりそう 4/256 (1.56%) |
Begirama (2/8) Behoimi (3/8) Bashirura (2/8) Run (1/8) |
| Kong コング |
25 | 95 | 0 | 432 | 68 | 105 | 58 | 40 | FIRE: Low ICE: Low WIND: None ZAP: None DEATH: Low |
SACRIFICE: None SLEEP: Low STOPSPELL: Null SAP: Low SURROUND: Low |
MP_DRAIN: Null CONFUSION:Low SLOW: Low EXPEL: Null |
Life Nut いのちのきのみ 4/256 (1.56%) |
Call Garuda (3/8) Attack (5/8) |
While walking on the land tiles to the Shrine with a Traveler's Gate, there is a ~2% chance of fighting a lone Metabble. Be prepared!
Encounters when walking towards Samanosa are quite dangerous. Kongs hit hard, and Witches can cast Begirama for significant damage. Red rogueknights also hit hard. Generally the player should run from these fights. The green kongs are very susceptible to sleep, so the player can opt to spend one turn defending with the Warriors and casting Rariho with Hero/Sage, then flee afterwards.
Encounters when walking towards Samanosa are quite dangerous. Kongs hit hard, and Witches can cast Begirama for significant damage. Red rogueknights also hit hard. Generally the player should run from these fights. The green kongs are very susceptible to sleep, so the player can opt to spend one turn defending with the Warriors and casting Rariho with Hero/Sage, then flee afterwards.
There is a significant strategy that players can utilize at this point for funds. Many older players used to do this as a staple. Although it is not required, the additional funds help with buying Prayer Rings later, and can potentially help the player by allowing the Hero to keep his Steel Whip equipped for the Necrogond.
The strategy is upon arriving in Samanosa, immediately wing to Romaly (1,3). Walk to the left item shop and buy 7x herbs for the Mage Warrior (instead of distributing manually like above). Then walk north to the castle, take the first left, then down to the vault, and collect the Expel Shield and Assassin's Dagger. Wing to Samanosa (L, 3) and continue towards Ra Mirror Cave as the above does.
These two sell for roughly 5000 gold. It is entirely preference to use this strategy. Maru, the former world record holder for this game & category, used this in his 2:39 from long ago, but most modern runners including morisot do not.
Ra Mirror Cave
The topmost chest in the 1st basement floor has a strength seed, as an optional collectible.
Encounters:
| Name | Lv | HP | MP | EXP | Gold | Atk | Def | Agl | Resist 1 | Resist 2 | Resist 3 | Drop | Actions |
|---|---|---|---|---|---|---|---|---|---|---|---|---|---|
| Skeleton がいこつけんし |
31 | 75 | 18 | 843 | 68 | 95 | 58 | 75 | FIRE: Low ICE: Low WIND: Low ZAP: Low DEATH: High |
SACRIFICE: None SLEEP: Low STOPSPELL: Low SAP: Low SURROUND: High |
MP_DRAIN: High CONFUSION:High SLOW: None EXPEL: Low |
Steel Broadsword はがねのつるぎ 2/256 (0.78%) |
Rukanan (4/8) Attack (4/8) |
| Curer べホマスライム |
14 | 50 | 255 | 278 | 38 | 45 | 50 | 18 | FIRE: Low ICE: Low WIND: Low ZAP: None DEATH: Low |
SACRIFICE: None SLEEP: Low STOPSPELL: Low SAP: Low SURROUND: None |
MP_DRAIN: Null CONFUSION:Low SLOW: Low EXPEL: Null |
Stamina Seed スタミナのたね 2/256 (0.78%) |
Behoma (4/8) Attack (4/8) |
| Death Nite キラーアーマー |
25 | 70 | 5 | 418 | 80 | 92 | 150 | 35 | FIRE: High ICE: None WIND: Low ZAP: None DEATH: Low |
SACRIFICE: None SLEEP: High STOPSPELL: Low SAP: High SURROUND: Low |
MP_DRAIN: Low CONFUSION:Low SLOW: Low EXPEL: Null |
Iron Armor はがねのよろい 2/256 (0.78%) |
Attack (5/8) Rukanan (3/8) |
| Shadow シャドー |
30 | 70 | 18 | 743 | 31 | 63 | 65 | 50 | FIRE: Low ICE: Low WIND: Low ZAP: Low DEATH: High |
SACRIFICE: None SLEEP: High STOPSPELL: Low SAP: Low SURROUND: High |
MP_DRAIN: Low CONFUSION:Low SLOW: None EXPEL: High |
Chain Whip とげのむち 2/256 (0.78%) |
Attack (5/8) Hyadaruko (3/8) |
| Tortagon ガメゴン |
29 | 68 | 0 | 652 | 88 | 89 | 200 | 25 | FIRE: High ICE: High WIND: High ZAP: Low DEATH: Low |
SACRIFICE: None SLEEP: Low STOPSPELL: Null SAP: High SURROUND: High |
MP_DRAIN: Null CONFUSION:High SLOW: Low EXPEL: Null |
Iron Helmet てつかぶと 4/256 (1.56%) |
Attack (5/8) Sleep Breath (3/8) |
| Voodoo Man ゾンビマスター |
29 | 120 | 20 | 673 | 95 | 68 | 60 | 67 | FIRE: Low ICE: High WIND: High ZAP: None DEATH: High |
SACRIFICE: None SLEEP: High STOPSPELL: High SAP: Low SURROUND: None |
MP_DRAIN: Low CONFUSION:Low SLOW: Low EXPEL: High |
Yggdrasil Leaf せかいじゅのは 1/256 (0.39%) |
Run (1/8) Mahotora (2/8) Call Hork (1/8) Behoimi (2/8) Zaoraru (2/8) |
It is rather unlikely the player gets into an encounter while in Ra Mirror Cave. Skeletons are susceptible to Nifuramu. Witch Doctors can cast Mahotora, which robs MP from the party, and can be particularly problematic for the Sage and Mage for the upcoming boss fight. Generally run from encounters, except for skeletor formations and use Nifuramu instead.
Samanosa to Boss Troll
Walk to the southeast of town to the weapon shop. Sell the Hero's magic shield, the Mage Warrior's magic shield, the bag's party dress (8850) & silk robe (1125) & black hood (900). Get to 20300G, selling optional items. Buy 3x dragon shield for the Warrior, Mage Warrior and Hero and equip. Buy a zombie killer for the Warrior and equip. Use the Lamp to reset to nighttime. Walk towards the castle. Change the party order to Hero, Warrior, Sage, Mage Warrior. Use the Ra Mirror when next to the King. Defeat Boss Troll.
During the shopping segment, the goal is to get to 20300G. Selling the two Magic Shields (Hero, Mage Warrior) is required, as they are immediately getting replaced by dragon shields. The party dress, silk robe and black hood are also never used again. From there, the player can sell whatever they need to get to 20300G. Other items include the Sage's former Steel Whip (either on her or in the bag), moth powders, and possibly the Sage's Steel Broadsword. The reason this is a soft science is that depending on how much excess gold the player has, they may be able to afford another Prayer Ring in the upcoming segment. Further, if the player wipes out fighting Boss Troll, being able to sell something after the fight as opposed to before the fight can more safely help navigate money problems for reviving dead characters, which is a significant ~600+ gold expense. In short, the player should try to aim towards getting to 20300G as close as possible.
In the castle's courtyard is an optional Life Nuts collectible, in the right flowerbed.
Before fighting Boss Troll, the Warrior should have the Mist Staff on and the Mage Warrior has herbs in her inventory. Make sure the party is healed and in the right order.
There is an Agility Seed in the graveyard, second row from the top, second grave (inspect to the north). There is also a Strength Seed in the house below the graveyard, in the left pot.
Equipment check:
Boss: Boss Troll
Strategy:
| Name | Lv | HP | MP | EXP | Gold | Atk | Def | Agl | Resist 1 | Resist 2 | Resist 3 | Drop | Actions |
|---|---|---|---|---|---|---|---|---|---|---|---|---|---|
| Boss Troll ボストロール |
38 | 1,500 | 255 | 2,500 | 105 | 180 | 120 | 80 | FIRE: High ICE: None WIND: None ZAP: None DEATH: Null |
SACRIFICE: Null SLEEP: Null STOPSPELL: Low SAP: High SURROUND: Null |
MP_DRAIN: High CONFUSION:Null SLOW: Null EXPEL: Null |
Strength Seed ちからのたね 4/256 (1.56%) |
Attack (4/8) Rukanan (2/8) Critical (2/8) |
Boss Troll is the first real boss since Kandar 2. Boss Troll has 1500HP, with large attack power. It hits for ~50-70 damage while the party is unbuffed. Its AI is such that it can easily score critical hits, and has access to Rukanan to reduce party wide defense. It is 75% susceptible to Mahoton (Stopspell) and 30% susceptible to Rukani (Sap). It will always attack twice per turn.
Boss Troll will always perform the same action on turn 1; physical attack into Rukanan. After, it will take random actions for either regular physicals or overhead swings. “Overhead swings” refers to the same pattern Kandar 1 and 2 has, where the large swing animation has a 1 in 8 chance of being a critical hit, which is extremely dangerous in this fight.
The crux of winning the Boss Troll fight is to take advantage of using Baikiruto on the boss, which is a programming exploit of sorts to disable the boss' ability to land critical hits, even if it does the overhead swing animation. However, of course increasing the boss' attack power sounds like a bad idea. The idea is that the player safely can cast Sukuruto 6+ times to bolster defenses as much as possible to a very high amount, Baikiruto the boss, then safely begin dealing damage.
Phase 1: the beginning flow of the battle is as follows:
- Cast Mahoton with Hero and use the Warrior's Mist Staff on turn 1, hopefully landing. As soon as Mahoton lands, these characters defend until Boss Troll has Baikiruto status.
- For the first ~3-4 turns, the Sage and Mage Warrior both using Sukuruto. Sage can opt to heal using Behoimi at any time.
- After defenses are nearly maxed out (~6 uses, not including any defense down from turn 1 Rukanan), Mage Warrior uses Baikiruto on Boss Troll
- Landing Mahoton is incredibly important. It is likely it will land on turn 1. But if it doesn't, the player can decide to either try with both Hero/Warrior or just one of them afterwards. Boss Troll can begin critical hits on turn 2, and any non-defending character is likely immediately dead if hit by a critical hit. Even regular attacks to non-defending characters can be devastating.
- Sage's role is to Sukuruto, but first and foremost is to keep the party alive with Behoimi. Recall the rule of 40/30/20/10 percentage for physical hit targeting - the first two characters defending theoretically helps with this distribution in mind. If someone needs to be healed, the Sage can switch off of using Sukuruto. Similarly, the Mage has been stocked with herbs to help with healing. However, during this phase, arguably her better served role is continuing to cast Sukuruto.
Phase 2:
- The Mage Warrior casts Baikiruto on the Warrior, then the Hero. She then largely defends for safety, uses herbs to heal the party, and possibly support spells, explained below.
- The Hero and Warrior begin attacking, only defending when their HP is below ~50.
- The Sage's foremost responsibility is healing the team. When it is safe to not heal, her secondary goal is to land Rukani (30%). Any chance the Sage has to cast Rukani, she must. After landing Rukani, she can switch to attacking (if she has the Steel Broadsword still on) or cast Sukuruto or Piorimu (SpeedUp).
- Boss Troll's attacks will start dealing between 0 to 40 damage. The damage range is high, due to the somewhat buggy (?) nature of the Baikuruto status. Often attacks in this game have a tightly defined range of damage, especially when that damage is close to single digits, but for whatever reason the variance for Boss Troll's attacks is large. The player should be aware that Boss Troll's damage output can still be decently sizeable and a single target can take up to ~80 damage on one turn from two attacks, although unlikely.
- After the Mage Warrior has landed both team Baikiruto spells, she has options to use remaining MP to cast Baikiruto on the Sage or to use Hyadaruko on Boss Troll. Spending all remaining MP is permissible.
Fights that land Rukani early on tend to be quick & easy. But some fights may never land Rukani, and naturally are much longer and slower fights.
Any character being killed is highly problematic. If either the Hero or Warrior die, the fight is still technically winnable, but very slow and much more dangerous with less targets to spread incoming physical attacks. If the Sage dies, especially early on, the fight is usually unwinnable. If the Mage Warrior dies before casting Baikiruto on Boss Troll (and by extension the rest of the team), the fight may be winnable, but it will be such a slow endeavor that realistically the Sage may run out of MP healing. If the Mage Warrior somehow gets killed after casting Baikiruto on the team, it's less of a concern. However, the Mage Warrior needs as much EXP as possible, which is why keeping her alive during this fight is highly beneficial. In short, if someone dies to a critical hit early on, likely the player should full party wipe and try again. But if it's later in the fight, depending the character killed, the fight may still be won.
If any characters are dead after Boss Troll, make sure to revive them before using the Change Rod - clerics will not interact with certain Change Rod forms.
World Map to Noaniels
Walk to Noaniels and leave immediately.
The Hero should be the lead character with Holy Water in effect, which will avoid all battles. Importantly the Hero needs to be in the lead, as his level is the highest and the party lead dictates Holy Water's effectiveness.
This will set a warp point for a later segment. Some older routes used to not visit Noaniels at all, but it's a common modern strategy.
There is an optional Strength Seed in the northeastern home in the pot. There is also a Leather Loincloth on the second floor of the Inn in the top left room's drawer.
World Map to Elves' Village
Walk west to Elves' Village. Use the Hero's Change Rod while in the village to turn into either a slime or a dwarf. Sell the Hero's Steel Whip, Iron Helmet, Warrior's Terra Armor, Sage's Steel Broadsword. Buy 2+ Prayer Rings for the bag. Buy 2x Sleep Staves for the bag. Sort all party items to bag. Exchange 1 Sleep Staff from the bag for the Sage's Lamp and equip. Exchange 1 Sleep Staff from the bag for the Mage Warrior's top weapon slot (in most cases, the club). Give the bag's Lamp to the Hero. SF, wing to Edinbear (L,3).
There is a 2 in 7 chance of getting the correct form when using the Change Rod. If the result is not a slime or dwarf, then simply retry. The NPCs in the village will not care if the party is in alternate form, but the correct form is needed for shopping.
The base amount necessary here is 5000 (2x Prayer Ring) + 8400 (2x Sleep Staff) = 13400G. The player has the ability to sell more optional things to get to an additional 2500G for another Prayer Ring. There's no reason to hold back at this point, as this is one of the last main purchases with variability.
If the player is out of money for the full purchase, cut down on 2x Prayer Rings, but this should not be the case unless very desperate.
After all the menuing, the Sage and Mage Warrior should have Sleep Staves in their inventory, Sage has it equipped, Mage Warrior has it in her first slot. This allows for them to quickly menu to them in battle - Sage will not have any items in her inventory, so the cursor defaults to Sleep Staff when using an item in battle. The Mage Warrior will have a Sleep Staff as her first item, so the in-battle item cursor will default to it as well.
The Hero will have the Lamp on his second slot, soon to be first slot once the Change Rod is exchanged.
World Map to Sailor Bone
Sail west to Shrine Island, then north/northwest to sole grass tile. Walk right for ~3 seconds, then north to old man's hut. SF, exchange Change Rod for Sailor Bone with old man, use Holy Water and wing to Romaly (1,3).
Once the Change Rod is handed in, it is a permanent loss of the Transform ability outside of a Mage/Sage learning the spell via level up. So, there's only one chance to visit the Elven Village in this route.
Encounters:
| Name | Lv | HP | MP | EXP | Gold | Atk | Def | Agl | Resist 1 | Resist 2 | Resist 3 | Drop | Actions |
|---|---|---|---|---|---|---|---|---|---|---|---|---|---|
| Bighorn ビッグホーン |
23 | 75 | 0 | 353 | 68 | 75 | 55 | 24 | FIRE: Low ICE: Low WIND: None ZAP: None DEATH: Low |
SACRIFICE: None SLEEP: Low STOPSPELL: Null SAP: None SURROUND: Low |
MP_DRAIN: Null CONFUSION:Low SLOW: None EXPEL: Null |
Holy Water せいすい 4/256 (1.56%) |
Attack (5/8) Sleep Breath (3/8) |
| Ice Man ひょうがまじん |
24 | 140 | 0 | 405 | 74 | 93 | 54 | 23 | FIRE: None ICE: Null WIND: Low ZAP: None DEATH: High |
SACRIFICE: None SLEEP: High STOPSPELL: Null SAP: Low SURROUND: Low |
MP_DRAIN: Null CONFUSION:Low SLOW: Low EXPEL: Null |
Magic Hat ふしぎなぼうし 2/256 (0.78%) |
Frost Breath (Weak) (4/8) Attack (3/8) Sleep Breath (1/8) |
| Ice Dragon スノードラゴン |
25 | 110 | 0 | 440 | 90 | 93 | 60 | 50 | FIRE: None ICE: Null WIND: None ZAP: None DEATH: High |
SACRIFICE: None SLEEP: Low STOPSPELL: Null SAP: Low SURROUND: Low |
MP_DRAIN: Null CONFUSION:Low SLOW: Low EXPEL: Null |
Life Nut いのちのきのみ 2/256 (0.78%) |
Frost Breath (Medium) (1/8) Attack (4/8) Frost Breath (Weak) (3/8) |
Refer to World Map to Sioux for ocean encounters. On land, these encounters are mostly harmless and infrequent, but some are troublesome. Mostly it is safe to run from them, and even if some character dies, there's ample time to revive. Notably, an upcoming segment will have proximity to infinite World Leaves, so if any character except the Sage dies, it is okay to leave them dead. If the Sage dies however, the party loses access to SF, and her revival should be a priority.
World Map to Ghost Ship
Sail south to find wandering Ghost Ship. Descend ship, retrieve the Lovely Memories. Wing to Noaniels (1,5).
There is an optional Strength Seed in the pots above the Lovely Memories chest.
Encounters:
| Name | Lv | HP | MP | EXP | Gold | Atk | Def | Agl | Resist 1 | Resist 2 | Resist 3 | Drop | Actions |
|---|---|---|---|---|---|---|---|---|---|---|---|---|---|
| Man O' War しびれくらげ |
18 | 40 | 0 | 180 | 38 | 55 | 50 | 35 | FIRE: Low ICE: Low WIND: Low ZAP: Low DEATH: Low |
SACRIFICE: None SLEEP: Low STOPSPELL: Null SAP: None SURROUND: Low |
MP_DRAIN: Null CONFUSION:High SLOW: Low EXPEL: Null |
Full Moon Herb まんげつそう 4/256 (1.56%) |
Call Same Kind (2/8) Attack (3/8) Paralysis Attack (3/8) |
| Skeleton がいこつけんし |
31 | 75 | 18 | 843 | 68 | 95 | 58 | 75 | FIRE: Low ICE: Low WIND: Low ZAP: Low DEATH: High |
SACRIFICE: None SLEEP: Low STOPSPELL: Low SAP: Low SURROUND: High |
MP_DRAIN: High CONFUSION:High SLOW: None EXPEL: Low |
Steel Broadsword はがねのつるぎ 2/256 (0.78%) |
Rukanan (4/8) Attack (4/8) |
| Crabus ガニラス |
21 | 50 | 0 | 290 | 45 | 68 | 150 | 25 | FIRE: None ICE: Low WIND: None ZAP: None DEATH: Low |
SACRIFICE: None SLEEP: Low STOPSPELL: Null SAP: None SURROUND: Low |
MP_DRAIN: Null CONFUSION:Low SLOW: None EXPEL: Null |
Scale Armor こうらのよろい 2/256 (0.78%) |
Critical (2/8) Attack (6/8) |
| Merzoncian マーマンダイン |
21 | 60 | 12 | 263 | 58 | 72 | 50 | 32 | FIRE: Low ICE: High WIND: None ZAP: None DEATH: High |
SACRIFICE: None SLEEP: High STOPSPELL: Low SAP: Low SURROUND: Low |
MP_DRAIN: Low CONFUSION:Low SLOW: None EXPEL: Null |
Leather Hat かわのぼうし 1/256 (0.39%) |
Hyado (3/8) Attack (4/8) Behoimi (1/8) |
| Hork くさったしたい |
16 | 98 | 0 | 120 | 15 | 67 | 16 | 20 | FIRE: None ICE: None WIND: None ZAP: None DEATH: Low |
SACRIFICE: None SLEEP: Null STOPSPELL: Null SAP: Low SURROUND: Null |
MP_DRAIN: Null CONFUSION:Null SLOW: None EXPEL: Low |
Clothes ぬののふく 4/256 (1.56%) |
Waste a turn (1/8) Attack (6/8) Defense (1/8) |
Encounters in the Ghost Ship are extremely infrequent. The player can just run or Nifuramu.
World Map to Simon's Cell
Sail east, southeast and west into Olivia's Cape. Use the Lovely Memories. Enter the shrine and inspect the right cell's bed for the Gaia Sword. SF, wing to Assalam (2,1).
It is very important to watch a VOD for this segment and identify where the re-uses of SF and Lamp are. This area's ocean has a higher encounter rate from a bit east of Noaniels in through the cape. Also pay attention to where the encounter cancel in the shrine takes place.
As mentioned above, if any characters are dead, walking south of the first shrine along the river gives access to infinite World Leaves, provided the player does not have one in their inventory. Inspect the title in the middle of the four mountains in the forest, reviving a character each time, then secure one more. This Leaf will be retrieved later if not retrieved up during this segment. Be careful- do not use the Leaf in the inventory outside of battle on someone when they are not actually dead- doing so will remove the Leaf from the player's inventory.
A safety strat for the Merchant town segment coming up is to grab a Yggdrasil Leaf during this segment (which is earlier than when it is usually retrieved, before Baramos but after the Merchant town walk).
Encounters:
| Name | Lv | HP | MP | EXP | Gold | Atk | Def | Agl | Resist 1 | Resist 2 | Resist 3 | Drop | Actions |
|---|---|---|---|---|---|---|---|---|---|---|---|---|---|
| Death Nite キラーアーマー |
25 | 70 | 5 | 418 | 80 | 92 | 150 | 35 | FIRE: High ICE: None WIND: Low ZAP: None DEATH: Low |
SACRIFICE: None SLEEP: High STOPSPELL: Low SAP: High SURROUND: Low |
MP_DRAIN: Low CONFUSION:Low SLOW: Low EXPEL: Null |
Iron Armor はがねのよろい 2/256 (0.78%) |
Attack (5/8) Rukanan (3/8) |
| Magic Hag まほうおばば |
12 | 70 | 100 | 463 | 63 | 65 | 50 | 85 | FIRE: High ICE: High WIND: None ZAP: None DEATH: High |
SACRIFICE: None SLEEP: Low STOPSPELL: Low SAP: Low SURROUND: Low |
MP_DRAIN: High CONFUSION:Low SLOW: Low EXPEL: Null |
Invisibility Herb きえさりそう 4/256 (1.56%) |
Begirama (2/8) Behoimi (3/8) Bashirura (2/8) Run (1/8) |
| Bomb Crag ばくだんいわ |
26 | 500 | 4 | 660 | 105 | 0 | 0 | 0 | FIRE: None ICE: None WIND: None ZAP: None DEATH: Null |
SACRIFICE: None SLEEP: Null STOPSPELL: Null SAP: None SURROUND: None |
MP_DRAIN: Null CONFUSION:Null SLOW: Null EXPEL: High |
Life Stone いのちのいし 2/256 (0.78%) |
Waste a turn (5/8) Megante (3/8) |
| Grizzly グリズリー |
27 | 110 | 0 | 523 | 65 | 140 | 90 | 33 | FIRE: Low ICE: High WIND: None ZAP: None DEATH: Low |
SACRIFICE: None SLEEP: Low STOPSPELL: Null SAP: Low SURROUND: Low |
MP_DRAIN: Null CONFUSION:Low SLOW: Low EXPEL: Null |
Strength Seed ちからのたね 4/256 (1.56%) |
Attack (7/8) Critical (1/8) |
| Barnabas バーナバス |
20 | 58 | 12 | 235 | 52 | 79 | 67 | 28 | FIRE: Low ICE: None WIND: None ZAP: None DEATH: Low |
SACRIFICE: None SLEEP: High STOPSPELL: High SAP: Low SURROUND: High |
MP_DRAIN: High CONFUSION:Low SLOW: None EXPEL: Low |
Traveler's Clothes たびびとのふく 4/256 (1.56%) |
Attack (5/8) Mahoton (2/8) Behoimi (1/8) |
The land encounters are mostly to be fled from, but some enemies can be put to sleep, such as Grizzly.
World Map to Necrogond Cave
Sail west/south to the volcano. Use the Lamp before landing, then use Gaia's Sword on the volcano. Change party order to Sage/Warrior/Hero/Mage Warrior. Sort Sage's items. Use mantan (Heal all in options, first entry), then proceed south, west and north into the Necrogond Cave.
If any optional seeds were retrieved before, they can be used in the Gaia's Sword menu.
As noted above, the Mage Warrior's first non-equipped item in inventory should be a Sleep Staff. The Sage now should have no non-equipped items in her inventory. Both imply that quickly menuing to the item menu in battles will yield the Sleep Staff.
As noted above, the Mage Warrior's first non-equipped item in inventory should be a Sleep Staff. The Sage now should have no non-equipped items in her inventory. Both imply that quickly menuing to the item menu in battles will yield the Sleep Staff.
Encounters:
| Name | Lv | HP | MP | EXP | Gold | Atk | Def | Agl | Resist 1 | Resist 2 | Resist 3 | Drop | Actions |
|---|---|---|---|---|---|---|---|---|---|---|---|---|---|
| Minidemon ミニデーモン |
28 | 80 | 24 | 587 | 89 | 85 | 45 | 55 | FIRE: Low ICE: None WIND: None ZAP: None DEATH: High |
SACRIFICE: None SLEEP: High STOPSPELL: High SAP: Low SURROUND: Low |
MP_DRAIN: Low CONFUSION:High SLOW: Low EXPEL: Null |
Misery Helmet ふこうのかぶと 2/256 (0.78%) |
Frost Breath (Weak) (2/8) Merami (4/8) Attack (2/8) |
| Curer べホマスライム |
14 | 50 | 255 | 278 | 38 | 45 | 50 | 18 | FIRE: Low ICE: Low WIND: Low ZAP: None DEATH: Low |
SACRIFICE: None SLEEP: Low STOPSPELL: Low SAP: Low SURROUND: None |
MP_DRAIN: Null CONFUSION:Low SLOW: Low EXPEL: Null |
Stamina Seed スタミナのたね 2/256 (0.78%) |
Behoma (4/8) Attack (4/8) |
| Troll King トロル |
33 | 250 | 0 | 1,030 | 105 | 155 | 32 | 42 | FIRE: None ICE: None WIND: None ZAP: None DEATH: High |
SACRIFICE: None SLEEP: Low STOPSPELL: Null SAP: None SURROUND: Low |
MP_DRAIN: Null CONFUSION:Low SLOW: None EXPEL: High |
Club こんぼう 4/256 (1.56%) |
Critical (2/8) Attack (6/8) |
| Ice Cloud フロストギズモ |
33 | 80 | 18 | 1,070 | 68 | 72 | 47 | 51 | FIRE: None ICE: Null WIND: Low ZAP: None DEATH: Low |
SACRIFICE: None SLEEP: Low STOPSPELL: High SAP: Low SURROUND: None |
MP_DRAIN: Low CONFUSION:Low SLOW: None EXPEL: Null |
Pachisi Ticket すごろくけん 8/256 (3.13%) |
Frost Breath (Weak) (3/8) Attack (2/8) Hyadaruko (3/8) |
All encounters before crossing the volcanic magma are trivial and should be fled from. Ideally the player doesn't run into any of these fights due to encounter cancelling with the Lamp.
Past the magma section, the fights quickly become dangerous. The party will not be prepared to fight these battles, so the primary objective is to run. However, these formations can result in a lot of damage. The general idea is to run when it is safe, and sleep helps make running safe. Trolls and frost clouds are 75% susceptible to sleep, and minidemons are 30% susceptible. Trolls are also 30% susceptible to Nifuramu. So on any given turn, the Hero (Rariho), Sage and Mage Warrior (Sleep Staff) can all attempt to sleep at any time. Trolls hit hard with physicals, frost clouds have area-all ice damage via Hyadaruko, and minidemons have Merami to hit single targets very hard.
If the party encounters multiple Trolls or Frost Clouds, sleep then run is the best option.
If the party encounters Minidemons, running is the best option.
The player has to decide how to tackle each formation scenario, as sometimes Minidemons make the decision to flee a complicated one. But no matter what, EXP is not the goal during this outside walk. The party will want to be getting some EXP if possible in the upcoming cave, so keep characters alive is important.
If any party member dies, the party should trudge on, except if the Sage dies, in which case immediate revival is the best option - SF is too valuable a skill to not have always active, especially in this upcoming cave.
Necrogond to Silver Orb
Traverse the cave. After picking up the Thunder Sword and Swordedge Armor, give the Thunder Sword to the Hero and equip. Give the Swordedge Armor over the Warrior's Mist Staff and equip. Proceed to the end of the cave. Walk northeast, talk to shrine attendant for Silver Orb. Wing to Jipangu (L,2).
Pay close attention and make sure SF is active during this segment. This cave can be anywhere from 1 fight total to many fights.
Encounters:
| Name | Lv | HP | MP | EXP | Gold | Atk | Def | Agl | Resist 1 | Resist 2 | Resist 3 | Drop | Actions |
|---|---|---|---|---|---|---|---|---|---|---|---|---|---|
| Curer べホマスライム |
14 | 50 | 255 | 278 | 38 | 45 | 50 | 18 | FIRE: Low ICE: Low WIND: Low ZAP: None DEATH: Low |
SACRIFICE: None SLEEP: Low STOPSPELL: Low SAP: Low SURROUND: None |
MP_DRAIN: Null CONFUSION:Low SLOW: Low EXPEL: Null |
Stamina Seed スタミナのたね 2/256 (0.78%) |
Behoma (4/8) Attack (4/8) |
| Troll トロル |
33 | 250 | 0 | 1,030 | 105 | 155 | 32 | 42 | FIRE: None ICE: None WIND: None ZAP: None DEATH: High |
SACRIFICE: None SLEEP: Low STOPSPELL: Null SAP: None SURROUND: Low |
MP_DRAIN: Null CONFUSION:Low SLOW: None EXPEL: High |
Club こんぼう 4/256 (1.56%) |
Critical (2/8) Attack (6/8) |
| Ice Cloud フロストギズモ |
33 | 80 | 18 | 1,070 | 68 | 72 | 47 | 51 | FIRE: None ICE: Null WIND: Low ZAP: None DEATH: Low |
SACRIFICE: None SLEEP: Low STOPSPELL: High SAP: Low SURROUND: None |
MP_DRAIN: Low CONFUSION:Low SLOW: None EXPEL: Null |
Pachisi Ticket すごろくけん 8/256 (3.13%) |
Frost Breath (Weak) (3/8) Attack (2/8) Hyadaruko (3/8) |
| Jewelbag おどるほうせき |
16 | 50 | 255 | 10 | 1,023 | 57 | 100 | 70 | FIRE: Null ICE: Null WIND: Null ZAP: Null DEATH: Null |
SACRIFICE: Null SLEEP: Null STOPSPELL: Null SAP: Null SURROUND: Null |
MP_DRAIN: Null CONFUSION:Null SLOW: Null EXPEL: Null |
Flashy Suit はでなふく 1/256 (0.39%) |
Manusa (1/8) Attack (1/8) Rukanan (1/8) Bomiosu (1/8) Medapani (1/8) Strange Dance (1/8) Waste a turn (1/8) Run (1/8) |
| Minidemon ミニデーモン |
28 | 80 | 24 | 587 | 89 | 85 | 45 | 55 | FIRE: Low ICE: None WIND: None ZAP: None DEATH: High |
SACRIFICE: None SLEEP: High STOPSPELL: High SAP: Low SURROUND: Low |
MP_DRAIN: Low CONFUSION:High SLOW: Low EXPEL: Null |
Misery Helmet ふこうのかぶと 2/256 (0.78%) |
Frost Breath (Weak) (2/8) Merami (4/8) Attack (2/8) |
| Marauder じごくのきし |
34 | 130 | 0 | 1,190 | 73 | 115 | 63 | 58 | FIRE: Low ICE: Low WIND: Low ZAP: Low DEATH: High |
SACRIFICE: None SLEEP: High STOPSPELL: Null SAP: None SURROUND: Low |
MP_DRAIN: Null CONFUSION:High SLOW: Low EXPEL: Low |
Agility Seed すばやさのたね 1/256 (0.39%) |
Attack (6/8) Paralyze Breath (2/8) |
| Hologhost ホロゴースト |
34 | 85 | 20 | 1,040 | 42 | 67 | 47 | 59 | FIRE: High ICE: Null WIND: Low ZAP: Low DEATH: Null |
SACRIFICE: None SLEEP: High STOPSPELL: Low SAP: Low SURROUND: Low |
MP_DRAIN: Low CONFUSION:Low SLOW: Low EXPEL: Low |
Pachisi Ticket すごろくけん 16/256 (6.25%) |
Attack (5/8) Zaki (2/8) Zaraki (1/8) |
| Lion Head ライオンヘッド |
35 | 115 | 30 | 1,350 | 98 | 120 | 80 | 47 | FIRE: High ICE: Low WIND: Low ZAP: None DEATH: High |
SACRIFICE: Low SLEEP: High STOPSPELL: Low SAP: Low SURROUND: High |
MP_DRAIN: High CONFUSION:High SLOW: Low EXPEL: Null |
Ogre Shield なげきのたて 1/256 (0.39%) |
Attack (4/8) Mahoton (2/8) Begirama (2/8) |
The same strategy as above for encounters persists (safely flee from everything) until the Swordedge Armor menu happens, when the Hero has the Thunder Sword equipped.
After, encounters can and should be fought. If the Mage Warrior survived Boss Troll and was awarded 625 EXP, she will be level 7 and needs 42 EXP for the next level. In other words, any single fight here will yield another level for her, which is helpful for the upcoming Orochi fights, but not critical.
The Thunder Sword now offers a free cast of Iora (Boom) at any time. In this area, it is very good to use against the frost clouds. The skeletors are 75% susceptible to Niframu. Jewelbags and tortragons should be immediately fled from if solo. Lion Heads are generally problematic, as they resist sleep and stopspell. Physical attacks from Hero and Warrior are effective in this area (except for tortagons), and the Mage Warrior has the ability to either use Sleep Staff, Begirama (for frost clouds) or Baikiruto to boost Hero/Warrior. Sage can use Sleep Staff, Begirama, or heal. In sum, fights with frost clouds and skeletors are generally clearable, while other fights should be fled from, especially those with jewelbags and tortragons.
If any characters are dead, generally the player should trudge through. Even if the Sage dies (which is rare), and SF runs out, the player can do their best to finish the dungeon. Mage Warrior is the most likely to take significant damage from area-all spells, but she is in the last party slot, so she hould not take much physical damage.
After getting the Silver Orb, the player can either warp directly to Jipangu, or can opt to heal. If Sage used a lot of MP during this section, the player has to choose between gambling on using Prayer Rings to restore her MP, or to recover at an inn. The fastest inn to visit is Samanosa's inn (wing to L,3).
World Map to Jipangu Cave
Descend into Orochi Cave. Defeat Orochi 1.
The cave is largely trivial on encounters, and is very short. Make sure the Sage has >40 MP for the fight, and use Prayer Rings if not.
It is very important the player takes the traveler's gate warp after defeating Orochi 1. If the player has a dead character and accidentally leaves the area before taking the traveler's gate, Orochi 1 will not register as being defeated. In this case, the player should take the traveler's gate, then when near Orochi 2, wing elsewhere and prepare, then return to Jipangu and walk up to Orochi 2.
It is very important the player takes the traveler's gate warp after defeating Orochi 1. If the player has a dead character and accidentally leaves the area before taking the traveler's gate, Orochi 1 will not register as being defeated. In this case, the player should take the traveler's gate, then when near Orochi 2, wing elsewhere and prepare, then return to Jipangu and walk up to Orochi 2.
Encounters:
| Name | Lv | HP | MP | EXP | Gold | Atk | Def | Agl | Resist 1 | Resist 2 | Resist 3 | Drop | Actions |
|---|---|---|---|---|---|---|---|---|---|---|---|---|---|
| King Toad だいおうガマ |
11 | 38 | 30 | 70 | 23 | 49 | 37 | 18 | FIRE: Low ICE: Low WIND: None ZAP: None DEATH: Low |
SACRIFICE: None SLEEP: Low STOPSPELL: Low SAP: None SURROUND: Low |
MP_DRAIN: Low CONFUSION:Low SLOW: None EXPEL: Null |
Chain Whip とげのむち 4/256 (1.56%) |
Attack (6/8) Rariho (2/8) |
| Metal Slime メタルスライム |
23 | 4 | 12 | 4,140 | 5 | 40 | 1,023 | 47 | FIRE: Null ICE: Null WIND: Null ZAP: Null DEATH: Null |
SACRIFICE: Null SLEEP: Null STOPSPELL: Null SAP: Null SURROUND: Null |
MP_DRAIN: Null CONFUSION:Low SLOW: Null EXPEL: Null |
Agility Seed すばやさのたね 8/256 (3.13%) |
Attack (2/8) Run (3/8) Mera (3/8) |
| Deranger きめんどうし |
22 | 80 | 22 | 343 | 48 | 53 | 43 | 56 | FIRE: Low ICE: Low WIND: Low ZAP: None DEATH: High |
SACRIFICE: None SLEEP: High STOPSPELL: High SAP: High SURROUND: High |
MP_DRAIN: High CONFUSION:High SLOW: Low EXPEL: Null |
Pachisi Ticket すごろくけん 16/256 (6.25%) |
Waste a turn (4/8) Medapani (2/8) Behoimi (1/8) Attack (1/8) |
| Bruin ごうけつぐま |
23 | 90 | 0 | 440 | 55 | 95 | 40 | 30 | FIRE: None ICE: None WIND: None ZAP: None DEATH: Low |
SACRIFICE: None SLEEP: Low STOPSPELL: Null SAP: Low SURROUND: Null |
MP_DRAIN: Null CONFUSION:High SLOW: None EXPEL: Null |
Strength Seed ちからのたね 4/256 (1.56%) |
Attack (8/8) |
| Lava Man ようがんまじん |
24 | 60 | 0 | 417 | 61 | 81 | 40 | 18 | FIRE: Null ICE: None WIND: Low ZAP: None DEATH: Low |
SACRIFICE: None SLEEP: Low STOPSPELL: Null SAP: None SURROUND: Low |
MP_DRAIN: Null CONFUSION:Low SLOW: Low EXPEL: Null |
Yggdrasil Leaf せかいじゅのは 2/256 (0.78%) |
Attack (5/8) Flame Breath (Medium) (2/8) Flame Breath (Weak) (1/8) |
Encounters are generally unlikely during this section. Any of them can be fled from. Don't be tempted by Metal Slimes, it's a complete waste of time.
Equipment check:
Boss: Orochi 1
Strategy:
| Name | Lv | HP | MP | EXP | Gold | Atk | Def | Agl | Resist 1 | Resist 2 | Resist 3 | Drop | Actions |
|---|---|---|---|---|---|---|---|---|---|---|---|---|---|
| Orochi 1 やまたのおろち |
63 | 1,800 | 12 | 2,080 | 0 | 130 | 68 | 40 | FIRE: Null ICE: None WIND: None ZAP: None DEATH: Null |
SACRIFICE: Null SLEEP: High STOPSPELL: Null SAP: Low SURROUND: Low |
MP_DRAIN: Null CONFUSION:Null SLOW: Null EXPEL: Null |
Kusanagi Sword くさなぎのけん 256/256 (100.00%) |
Flame Breath (Medium) (3/8) Attack (5/8) |
Orochi 1 can either attack once or twice per turn. Its attack patterns are either medium fire breath for ~25-40 damage, and single target physical for ~40-50 unbuffed. It is 75% susceptible to Manusa and Mahoton, and 30% susceptible to Rariho.
Orochi 1 is generally considered a simple fight compared to some other boss formations. But the fight still can certainly be dangerous. Danger levels for healing are roughly around ~60HP or less. In the worst case possible, Orochi 1 can attack twice with medium fire breath and easily deal over 50 damage, potentially more.
The Sage should be healing foremost, but otherwise landing Manusa then Rukani as soon as possible. Afterwards, she can use Piorimu to speed the party up to save a turn by the end, or Sleep Staff to try for sleep. The Warrior & Hero only attack. The Mage Warrior is responsible for Baikiruto on the Warrior & Hero, then using Sleep Staff aftewards. All characters may need to defend at any point, except the Sage who can reliably outspeed Orochi to use Behoimi.
A typical Orochi 1 fight looks like:
Turn 1 - Sage casts Manusa, Warrior & Hero attack, Mage Warrior casts Baikiruto on Hero
Turn 2 - Sage casts Rukani, Warrior & Hero attack, Mage Warrior casts Baikiruto on Warrior
Onwards - Sage heals party with Behoimi & uses Piorimu or Sleep Staff, Warrior & Hero either attack or defend, and Mage Warrior uses Sleep Staff or herbs to help heal.
If any of the Sage's spells fail, simply try again, but again prioritizing healing.
Take the traveler's gate warp. Give the Kusanagi Sword (dropped from previous battle) to Mage Warrior & equip. Heal and restore Sage's MP if necessary. Talk to Himiko and say no. Defeat Orochi 2.
It is common for most players to use a Prayer Ring either once or twice here to restore Sage's MP. A typical Orochi 2 fight will utilize roughly 30-40MP.
Boss: Orochi 2
Strategy:
| Name | Lv | HP | MP | EXP | Gold | Atk | Def | Agl | Resist 1 | Resist 2 | Resist 3 | Drop | Actions |
|---|---|---|---|---|---|---|---|---|---|---|---|---|---|
| Orochi 2 やまたのおろち |
63 | 2,000 | 12 | 8,040 | 1,000 | 140 | 68 | 50 | FIRE: Null ICE: None WIND: None ZAP: None DEATH: Null |
SACRIFICE: Null SLEEP: Null STOPSPELL: Null SAP: Low SURROUND: Low |
MP_DRAIN: Null CONFUSION:Null SLOW: Null EXPEL: Null |
------------------ ------------------ 256/256 (100.00%) |
Attack (5/8) Flame Breath (Medium) (2/8) Flame Breath (Weak) (1/8) |
Orochi 2 is a slightly buffed version of Orochi 1 stat-wise. It can attack twice per turn, and has 3 attacks - weak fire breath for ~10 damage, medium fire breath for ~25-40 damage, and physical attacks for ~50 damage unbuffed. Notably, Orochi 2 gains an AI slot for weak fire breath over Orochi 1. Orochi 2 cannot be put to sleep, and is 75% susceptible to Manusa and Rukani.
The strategy for Orochi 2 is somewhat similar and somewhat different from Orochi 1. The general idea of casting Baikiruto on the party and physically attacking is the same, except now the Mage Warrior joins in with physical attacks. But there's a few key differences. Because Orochi 2 cannot be put to sleep, the Mage Warrior's role is to Baikiruto and eventually attack rather than try to put Orochi 2 to sleep. Orochi 2's slightly higher stats mean physical attacks are more threatening, and the battle is slightly longer due to higher HP and defense. The rest of the characters primarily serve the same role.
There is a divergence in strategy for the beginning of this fight. The options are:
1) Sage & Mage Warrior casts Sukuruto to increase defense, and Warrior & Hero defend
2) Sage casts Manusa, Mage Warrior casts Baikiruto or Sukuruto (safer), and Warrior & Hero defend (or attack, more aggressive)
The idea is to either rely upon buffed defense and ignore the percentage chance of Manusa missing, or to play more risky.
A typical Orochi 2 fight looks like:
Turn 1 - Sage & Mage Warrior cast Sukuruto, Warrior & Hero defend
Turn 2 - Sage casts Rukani, Hero/Warrior attack, Mage Warrior uses Baikiruto on Hero
Turn 3 - Sage casts Behoimi to heal, Hero/Warrior attack, Mage Warrior uses Baikiruto on Warrior
Turn 4 - Sage casts Behoimi or Piorimu, Hero/Warrior attack, Mage Warrior uses Baikiruto on Mage Warrior
Turn 5+ - Sage heals, all 3 attack
Similar to Orochi 1, this fight is fairly straightforward and is often unproblematic. But like Orochi 1, the enemy consistently using area all attacks can stack damage quickly on the party. The player can defend with non-Sage characters any time to be safe.
Casting Rura saves a Wing here, as the party is about to heal at an inn.
The player can buy 9x Chimera Wings at the shop north of the inn here, if running low.
The Warrior being left at the Tavern will clear out his non-equipment inventory. These notes asked the player to switch the Warrior's Mist Staff to the Sage during the Necrogond, which avoids it landing in the bag.
The Warrior being left at the Tavern will clear out his non-equipment inventory. These notes asked the player to switch the Warrior's Mist Staff to the Sage during the Necrogond, which avoids it landing in the bag.
World Map to Merchant Town
Sail west then north to Merchant Town. Enter the town, talk to the old man to leave the Merchant behind. Talk to the old man once more. Leave town, board the ship, then re-enter the town. Talk to the Merchant in the north, leave town, re-enter immediately (do not board the ship). Repeat twice more, leaving and re-entering. When in the final town form, use the Hero's (2nd character) Lamp to make it night time in town. Witness the villagers gossiping in the southwest of town. Re-enter a final time, inspect behind throne for Yellow Orb. SF, wing to Noaniels (1,5).
Watch a VOD during this segment to ensure the pattern is followed. The Merchant Town is a section of the game comprised of “furthering” the town based on internal flags, and some of them aren't totally understood. In short, be careful about changing day/night and leaving this area incorrectly while doing this segment.
If the Merchant dies on the way to Merchant Town, immediately leave and revive. Unless the player has a Yggdrasil Leaf, there is no alternative. If a Leaf is in the player's inventory, use it after reaching the Merchant Town.
If the Merchant dies on the way to Merchant Town, immediately leave and revive. Unless the player has a Yggdrasil Leaf, there is no alternative. If a Leaf is in the player's inventory, use it after reaching the Merchant Town.
Encounters:
| Name | Lv | HP | MP | EXP | Gold | Atk | Def | Agl | Resist 1 | Resist 2 | Resist 3 | Drop | Actions |
|---|---|---|---|---|---|---|---|---|---|---|---|---|---|
| Mad Condor ヘルコンドル |
23 | 100 | 28 | 367 | 71 | 69 | 60 | 33 | FIRE: Low ICE: None WIND: None ZAP: None DEATH: Low |
SACRIFICE: None SLEEP: Low STOPSPELL: High SAP: None SURROUND: Low |
MP_DRAIN: Low CONFUSION:Low SLOW: None EXPEL: Null |
Pachisi Ticket すごろくけん 16/256 (6.25%) |
Attack (5/8) Bashirura (3/8) |
| Stingwing しびれあげは |
18 | 40 | 0 | 165 | 35 | 62 | 10 | 30 | FIRE: Low ICE: None WIND: None ZAP: None DEATH: None |
SACRIFICE: None SLEEP: Low STOPSPELL: Null SAP: None SURROUND: Low |
MP_DRAIN: Null CONFUSION:None SLOW: None EXPEL: Null |
Full Moon Herb まんげつそう 8/256 (3.13%) |
Paralysis Attack (4/8) Attack (4/8) |
| Blue Beak アカイライ |
23 | 60 | 16 | 372 | 32 | 60 | 52 | 33 | FIRE: None ICE: None WIND: Low ZAP: None DEATH: Low |
SACRIFICE: None SLEEP: Low STOPSPELL: Low SAP: Low SURROUND: Low |
MP_DRAIN: None CONFUSION:None SLOW: None EXPEL: Null |
------------------ ------------------ 0/256 (0.10%) |
Attack (5/8) Bagi (3/8) |
| Shaman シャーマン |
22 | 93 | 18 | 358 | 50 | 65 | 52 | 37 | FIRE: Low ICE: Low WIND: Low ZAP: None DEATH: High |
SACRIFICE: None SLEEP: Low STOPSPELL: Low SAP: Low SURROUND: High |
MP_DRAIN: High CONFUSION:Low SLOW: Low EXPEL: Null |
Luck Seed ラックのたね 8/256 (3.13%) |
Run (1/8) Attack (4/8) Call Hork (2/8) Behoimi (1/8) |
All encounters should be fled from immediately if there is no opportunity to use sleep spells effectively on enemies, which is likely during this segment. Most enemies have low resistance to sleep, so a single group encounter may be worth the attempt to put the enemies to sleep, especially Blue Beaks as they attack twice per turn and 1 cast of Bagi can kill the Merchant. The Merchant is very flimsy and the player should hope for no encounters.
World Map to Ramia Shrine
Sail north to Ramia Shrine. Place all six Orbs- 3 from Sage's inventory, sort items within bag (last misc item menu, then first selection), place last 3 Orbs from Red Orb onward in bag. Talk to shrine attendants, watch the custcene, then walk down to leave. Wing to Dharma (2,5).
The player can opt to use the Lamp during the sail north. However, it is not crucial to do so. Older runners used to do this segment with 4 characters, but the Parabirds in this area can cast Bashirura, sending a player back to Ruida's Tavern.
After the camera pans while talking to the attendant, the player gets a roughly 1 minute cutscene break with no required inputs.
After the camera pans while talking to the attendant, the player gets a roughly 1 minute cutscene break with no required inputs.
Encounters:
| Name | Lv | HP | MP | EXP | Gold | Atk | Def | Agl | Resist 1 | Resist 2 | Resist 3 | Drop | Actions |
|---|---|---|---|---|---|---|---|---|---|---|---|---|---|
| Bruin ごうけつぐま |
23 | 90 | 0 | 440 | 55 | 95 | 40 | 30 | FIRE: None ICE: None WIND: None ZAP: None DEATH: Low |
SACRIFICE: None SLEEP: Low STOPSPELL: Null SAP: Low SURROUND: Null |
MP_DRAIN: Null CONFUSION:High SLOW: None EXPEL: Null |
Strength Seed ちからのたね 4/256 (1.56%) |
Attack (8/8) |
| Parabird ごくらくちょう |
32 | 90 | 20 | 980 | 85 | 88 | 40 | 60 | FIRE: Low ICE: Low WIND: Low ZAP: Low DEATH: High |
SACRIFICE: None SLEEP: Low STOPSPELL: Low SAP: None SURROUND: None |
MP_DRAIN: Low CONFUSION:Low SLOW: None EXPEL: Null |
Pachisi Ticket すごろくけん 8/256 (3.13%) |
Behomara (3/8) Run (3/8) Waste a turn (2/8) |
| Ice Dragon スノードラゴン |
25 | 110 | 0 | 440 | 90 | 93 | 60 | 50 | FIRE: None ICE: Null WIND: None ZAP: None DEATH: High |
SACRIFICE: None SLEEP: Low STOPSPELL: Null SAP: Low SURROUND: Low |
MP_DRAIN: Null CONFUSION:Low SLOW: Low EXPEL: Null |
Life Nut いのちのきのみ 2/256 (0.78%) |
Frost Breath (Medium) (1/8) Attack (4/8) Frost Breath (Weak) (3/8) |
Now, while the party is only comprised of 3 allies, if Bashirura happens, the party is going back to Aliahan anyways in an upcoming segment to get the Warrior back, so there's no reason to risk having to warp back to Aliahan twice if this segment can be done now. In other words, do not panic if someone is sent back to Aliahan - the player is going to Ruida's Tavern soon anyways.
World Map to Dragon Queen's Castle
Board Ramia. Sail north, retrieving a Yggdrasil Leaf if necessary. Sail north/west to Dragon Queen's Castle. Talk to her to receive the Light Orb. Wing to Aliahan (1,1).
Most players will have their first visit for a Yggdrasil Leaf during this section, if one was not retrieved earlier in the run during the sail to Cape Olivia.
The Sage should have the Light Orb on her for the rest of the game. It is unimportant for any other purpose besides being required to fight Zoma in his non-Dark form.
The Sage should have the Light Orb on her for the rest of the game. It is unimportant for any other purpose besides being required to fight Zoma in his non-Dark form.
Aliahan to Baramos Castle entrance
The Warrior's non-equipped inventory is cleared out. Some players take a menu here, but this guide will be waiting to menu until the chests in Baramos Castle are retrieved.
Baramos Castle
Proceed through the castle, using SF and Toramana. Retrieve the 3 chests from top down, containing Genie Axe, Misery Helmet and a Prayer Ring. Before Baramos, perform a menu- Give Sage's Genie Axe to Warrior over Zombie Killer and equip, then equip Zombie Killer on Sage. Give Sage's Sleep Staff to Warrior, the Sage's Mist Staff to Warrior, the Sage's Misery Helmet to the Hero and do not equip, the Sage's Leaf to the Hero, and the Sage's Prayer Ring to the Hero. Set the party order to Warrior/Hero/Mage Warrior/Sage. Defeat Baramos.
The player has the highest chance of getting into a fight in the very first screen of the Castle. Afterwards, because staircases and doors are so close to each other in this area, encounter threat levels are often reset per transition, and the threat of getting into an encounter is relatively low.
This dungeon is the first to have barrier tiles (damaging ground tiles) - the Mage Warrior is responsible for casting Toramana (StepGuard). Be very careful not to menu too fast and use Riremito instead of Toramana.
Regarding the large menu before Baramos, there are a few key take-aways for the party's inventory afterwards:
The Sage should have a Prayer Ring in her inventory
The Hero should have a Prayer Ring, the unequipped Misery Helmet, and the Yggdrasil Leaf in his inventory
The Mage Warrior should have the Sleep Staff in her first inventory slot
The Warrior should have the Sleep Staff in his first inventory slot, and the Mist Staff in his second
Many players use different party orders for Baramos. It is entirely preference and sometimes can be changed if HP levels are different for a given run, but with flexibility comes the player's responsibility to menu differently in the battle. It is recommended for new players to stick to one ally formation
Encounters:
| Name | Lv | HP | MP | EXP | Gold | Atk | Def | Agl | Resist 1 | Resist 2 | Resist 3 | Drop | Actions |
|---|---|---|---|---|---|---|---|---|---|---|---|---|---|
| Evil Mage エビルマージ |
30 | 95 | 255 | 1,650 | 85 | 99 | 85 | 58 | FIRE: High ICE: High WIND: Low ZAP: Low DEATH: High |
SACRIFICE: None SLEEP: High STOPSPELL: High SAP: Low SURROUND: None |
MP_DRAIN: Low CONFUSION:Null SLOW: High EXPEL: Low |
Yggdrasil Leaf せかいじゅのは 2/256 (0.78%) |
Behoma (1/8) Flame Breath (Medium) (1/8) Mahyado (2/8) Mahoton (1/8) Rariho (1/8) Medapani (1/8) Merami (1/8) |
| Ice Dragon スノードラゴン |
25 | 110 | 0 | 440 | 90 | 93 | 60 | 50 | FIRE: None ICE: Null WIND: None ZAP: None DEATH: High |
SACRIFICE: None SLEEP: Low STOPSPELL: Null SAP: Low SURROUND: Low |
MP_DRAIN: Null CONFUSION:Low SLOW: Low EXPEL: Null |
Life Nut いのちのきのみ 2/256 (0.78%) |
Frost Breath (Medium) (1/8) Attack (4/8) Frost Breath (Weak) (3/8) |
| Marauder じごくのきし |
34 | 130 | 0 | 1,190 | 73 | 115 | 63 | 58 | FIRE: Low ICE: Low WIND: Low ZAP: Low DEATH: High |
SACRIFICE: None SLEEP: High STOPSPELL: Null SAP: None SURROUND: Low |
MP_DRAIN: Null CONFUSION:High SLOW: Low EXPEL: Low |
Agility Seed すばやさのたね 1/256 (0.39%) |
Attack (6/8) Paralyze Breath (2/8) |
| Hologhost ホロゴースト |
34 | 85 | 20 | 1,040 | 42 | 67 | 47 | 59 | FIRE: High ICE: Null WIND: Low ZAP: Low DEATH: Null |
SACRIFICE: None SLEEP: High STOPSPELL: Low SAP: Low SURROUND: Low |
MP_DRAIN: Low CONFUSION:Low SLOW: Low EXPEL: Low |
Pachisi Ticket すごろくけん 16/256 (6.25%) |
Attack (5/8) Zaki (2/8) Zaraki (1/8) |
| Stone Man うごくせきぞう |
37 | 195 | 0 | 1,780 | 82 | 140 | 40 | 29 | FIRE: High ICE: Low WIND: Low ZAP: Low DEATH: High |
SACRIFICE: Low SLEEP: Low STOPSPELL: Null SAP: Low SURROUND: High |
MP_DRAIN: Null CONFUSION:High SLOW: None EXPEL: Null |
Terra Armor だいちのよろい 2/256 (0.78%) |
Critical (1/8) Attack (7/8) |
| Metabble はぐれメタル |
24 | 6 | 255 | 40,200 | 10 | 55 | 1,023 | 150 | FIRE: Null ICE: Null WIND: Null ZAP: Null DEATH: Null |
SACRIFICE: Null SLEEP: Null STOPSPELL: Null SAP: Null SURROUND: Null |
MP_DRAIN: Null CONFUSION:Null SLOW: Null EXPEL: Null |
Happiness Shoes しあわせのくつ 4/256 (1.56%) |
Run (5/8) Attack (1/8) Gira (2/8) |
| Lion Head ライオンヘッド |
35 | 115 | 30 | 1,350 | 98 | 120 | 80 | 47 | FIRE: High ICE: Low WIND: Low ZAP: None DEATH: High |
SACRIFICE: Low SLEEP: High STOPSPELL: Low SAP: Low SURROUND: High |
MP_DRAIN: High CONFUSION:High SLOW: Low EXPEL: Null |
Ogre Shield なげきのたて 1/256 (0.39%) |
Attack (4/8) Mahoton (2/8) Begirama (2/8) |
There are a myriad of enemies here that all have situational solutions. Skeletors and evil mages are susceptible to Nifuramu. Stonemen and Ice Dragons are susceptible to Rariho. The experience from these enemies can be quite good, but between the skeletors hitting twice per turn, the stonemen having large HP and physical attack damage, and the evil mages & Ice Dragons having decently strong area-all damage, these fights can be dangerous. The primary objective in this segment is to stay at as close to fully healed on HP and MP for the upcoming boss fight, and the player's use of resources entirely lies on how willing they are to use Prayer Rings to restore MP.
Metabbles are present here, but in pretty rare circumstances should the player take the time to actually try to defeat one- only when the battle is safe and fast. A general concept for Metabble encounters is that first and foremost the priority is to finish the battle as quickly as possible, which often means to ignore the Metabble entirely and clear the other enemies. Unfortunately the ally enemies in Baramos Castle are not great for using the moth powder method for damaging metals.
Metabbles are present here, but in pretty rare circumstances should the player take the time to actually try to defeat one- only when the battle is safe and fast. A general concept for Metabble encounters is that first and foremost the priority is to finish the battle as quickly as possible, which often means to ignore the Metabble entirely and clear the other enemies. Unfortunately the ally enemies in Baramos Castle are not great for using the moth powder method for damaging metals.
Equipment check:
Boss: Baramos
Strategy:
| Name | Lv | HP | MP | EXP | Gold | Atk | Def | Agl | Resist 1 | Resist 2 | Resist 3 | Drop | Actions |
|---|---|---|---|---|---|---|---|---|---|---|---|---|---|
| Baramos バラモス |
63 | 2,500 | 255 | 65,535 | 0 | 240 | 200 | 85 | FIRE: High ICE: Low WIND: Low ZAP: None DEATH: Null |
SACRIFICE: Null SLEEP: High STOPSPELL: High SAP: Low SURROUND: Low |
MP_DRAIN: Null CONFUSION:Null SLOW: Null EXPEL: Null |
------------------ ------------------ 0/256 (0.10%) |
Ionazun (2/8) Attack (2/8) Flame Breath (Strong) (1/8) Merazoma (1/8) Medapani (1/8) Bashirura (1/8) |
Baramos is the single most complicated fight in the entirety of the speedrun. The fight is unlike any other fight, and arguably the most extreme example of a party being mostly unprepare to take a boss of this caliber, but the party can do so with careful planning and execution. There are many variables to keep track of, and one small misstep can easily cause a full party death.
Baramos has 2500 HP and regenerates between ~90-110 HP per turn. Although incredibly resilient, Baramos is susceptible to a few important status conditions. 30% susceptible to Rariho and Mahoton, and 75% susceptible to Rukani and Manusa.
Baramos will take either 1 or 2 actions per turn. His AI is set on a pattern loop, so every next sequential action he takes is predetermined, but whether he takes one or two actions a turn is a 50/50 chance.
While not stopspelled (Mahoton):
Ionazun → Attack → Intense Flame → Attack → Merazoma → Medapani → Ionazun → Bashirura
While stopspelled:
Attack → Intense Flame → Attack → Bashirura
All of his moves are dangerous. For the following damage ranges, the Sage gets hit for slightly less damage due to higher defense & magic resistance. Ionazun hits for ~60-80 all, strong fire breath hits for ~80-100 all (with no resistance), Merazoma single targets for ~92-128, and single target physicals hit for 70-110 unbuffed.
Medapani landing on an ally is extremely problematic. It is a rare occurrence, but the player must use a character, ideally the fastest one available, to target the confused ally with a physical attack to cancel their confused status. It is a top priority, even if the player has to play risky to undo Medapani's affects.
Bashirura landing on an ally is an instant loss - a party member being sent back to Ruida's Tavern is an unrecoverable scenario.
Although he is much less dangerous while stopspelled, strong fire breath (“Intense Flame”) is his single most damaging attack and occurs every 4 actions. Thankfully, Baramos still casts Bashirura even though he is stopspelled, meaning it is effectively a wasted action every time it occurs. So theoretically with Manusa and increased Sukuruto defenses, the party can be relatively safe outside of strong fire breath.
The overall strategy for Baramos is to perform a party wide full setup before doing any damage. This is because Baramos regens ~90-110 HP per turn, so any chip damage is immediately recovered. So the player must put Baramos to sleep, perform all debuffs and buffs while keeping Baramos asleep, then when ready to do damage, prepare to go all in and do as much damage as possible to win. At any time if Rariho, Manusa or Mahoton fail to cooperate to land on Baramos, the player will likely lose.
Before the Hero uses Asuturon on turn 1, he equips the Misery Helmet in battle, which is a cursed item. Equipping in battle skips the cursed jingle that ordinarily plays outside of battle when the player equips a cursed item, so it is a much faster process. The Misery Helmet's cursed effect is that it reduces the Hero's luck to zero, which makes Hero more susceptible to status effects than other allies. But the benefits of the good defense outweigh this risk.
To start, the player uses the Hero's spell Asuturon to bypass a few turns in battle. This is done to avoid the initial strong fire breath attack, as seen above is the third attack in Baramos' attack pattern. Often this puts the attack pattern somewhere around the Merazoma to second Ionazun area, depending on how many actions Baramos takes over the course of three turns.
The above concept of Asuturon is important to understand, as the player has the ability to bypass the next few actions of Baramos at any time with the Hero at the cost of MP. This too is why attacking before truly being ready to do so is a bad idea, and the player can properly avoid a dangerous upcoming attack, most importantly strong fire breath. In cases where this strategy is used, what will happen is that the player failed to put Baramos to sleep, and due to the cycle the player knows that Baramos is about to use strong fire breath, so the decision is to use Asuturon to bypass the next few actions to avoid the fire breath. The hope is that the pattern loops around twice for two fire breaths. The below is an ideal example:
The player is on the following bolded action in the cycle shown below, meaning Baramos' next action is strong fire breath:
Attack → Intense Flame → Attack → Bashirura
Hopefully, using Asuturon causes 5 actions to take place, which would be strong fire breath, attack, Bashirura, attack, strong fire breath, leaving the player at this part of the cycle:
Attack → Intense Flame → Attack → Bashirura
So now instead of the next action being strong fire breath, it is instead the 3rd physical attack, giving the player 4 actions before the next strong fire breath. This can be a critical way to give the player multiple turns to attempt to put Baramos back to sleep.
The following is a breakdown of role by ally:
Warrior - During setup, primarily uses Sleep Staff, even when Baramos is sleeping, to try to catch Baramos awakening and re-attempting to sleep. Warrior is the slowest character, so will almost always get outsped by Baramos. Mist Staff gives the Warrior ability to stopspell, important to land early on. As soon as the party is ready to deal damage, Warrior solely physical attacks or defends. Importantly, the Genie Axe has a ⅛ critical chance and a ⅛ miss chance.
Sage - During setup, Sage uses a combination of Rariho (usually turn 2), Manusa, Mahoton, Rukani to debuff the boss, and Sukuruto to buff allies. She will have to spend her turn healing with Behoimi at any point. After setup has occurred, her primarily goal is to heal or cast Rariho to keep Baramos sleeping.
Mage Warrior - During setup, she starts with Sleep Staff, then spends turns casting Sukuruto multiple times to buff the party's defenses. During the latter part of setup, she is responsible for casting Baikiruto primarily on Hero and Warrior, and possibly herself & Sage depending on momentum. During the attacking phase, she can either attack or use Sleep Staff to keep Baramos asleep
Hero - During setup, Hero uses Rariho and Mahoton. Hero's MP is low, and often the player needs to use the Prayer Ring in battle once to recover MP, especially to potentially use Asuturon again as described above. The Hero can use Hoimi to heal party members to be safe from an undefended strong fire breath from Baramos, which entails healing a party member from ~65-80 to ~95-110. Once in attack mode, the Hero is the primary damage dealer, and needs to keep all possible momentum to keep up with Baramos' regenerating HP
The way that sleep works in this game is that an enemy is put to sleep, and given an internal counter of 4. Every action they take, the counter decreases. As it decreases, the battle participant has a chance of waking up based on how low the counter is. The following counter numbers have the following percent chance to wake up:
4 - 12.5%
3 - 33%
2 - 50%
1 - 100%
In other words, Baramos' first action after being put to sleep is a 12.5% chance to wake up, then 33%, then 50%, then 100%. So after 4 actions, guarantee wake up. This is not turns, this is actions. Generally these are favorable - Baramos has a 50/50 chance to take 1 or 2 actions per turn, and can ideally be left to sleep for multiple turns while the party gets to set up.
Afterwards, the goal is to put Baramos to sleep continually as he awakens, and cast other support spells to get ready for being able to deal damage and win. The fight can roughly be broken down into a few phases:
Phase 1 - Immediately Asuturon and bypass flame breath
Phase 2 - Put Baramos to sleep and stopspell
- Each party member has the ability to cast Rariho, either by spell (Sage & Hero) or by item (Sleep Staves on Warrior and Mage).
- Sage & Hero can cast Mahoton, and Warrior has Mahoton
Phase 3 - Cast initial debuffs and buffs while keeping Baramos asleep
- All characters can pivot to casting Rariho at any time if Baramos awakens
- Mahoton is the next priority if it hasn't landed yet
- Sukuruto will need to be cast a total of ~2-4 times, the more being safer. If enough Sukuruto has landed, the player can opt to ignore Manusa.
- Warrior continues by using Sleep Staff, Mist Staff and defending
- Sage casts Manusa and Rukani, optionally healing or cast Sukuruto.
- Mage Warrior primarily casts Sukuruto, then can start Baikiruto on the Hero then Warrior, but should be more focused on keeping Baramos to sleep
- Hero to use Mahoton and Rariho, otherwise playing safe with defending, recovering MP with prayer ring, or using Hoimi.
Phase 4 - Finalize buffs and prepare for damage dealing.
- The player has to make the choice about how to defend against incoming damage. Often players will try to max their party HP, put Baramos to sleep, then start attacking with everyone possible. Hero and Warrior absolutely attack, Mage Warrior and Sage can opt to attack, heal, or try to put Baramos to sleep. If strong fire breath is coming, often the best call is to defend with some characters, usually 1-2, and shrug off the attack and keep going & healing. Once the player gets momentum in the fight, they have to keep it up as much as possible. Deal damage to win without fear.
Baramos awards 65535 EXP, which is a very significant amount. The player very much should be doing their best to keep every party member alive. Any dead character causes them to miss out on this EXP and will force the player to pay much more attention to that character's EXP during the dark world.
This will be the party order for the remainder of the game.
There is a Strength Seed hidden in the trees to the west/south of entering the harbor area.
Route Deviation
Deviation notes:
At this point, there are two routes for getting through the Dark World. One of them gets the King Sword, and the other doesn't.
There are many benefits to King Sword. It comes with much more attack power for the Hero (+38 over the Thunder Sword), and comes with a free in-battle cast of Bagikurosu. Because of the routing to get the King Sword, the player gets access to much more money, and thus can afford a Sage's Staff for the Sage, which is a free in-battle cast of Behoimi.
The non-King Sword route relies purely on the Sage's MP to heal, which is particularly stressful when dealing with prayer rings. And the relatively low damage with the Thunder Sword makes the final bosses of the game more difficult. However, an entire dungeon and town visit is skipped, and the Dark World routing is much more efficient.
This guide is going to cover both deviations up through the end. Zoma's Castle onwards will converge, but some extra inventorying notes will be made for the final boss rush.
King Sword Get - Rudatorm
Proceed east to the castle. Walk to the vault room. Retrieve the Agility Seed from the barrel, use immediately on Sage. Retrieve the Sun Stone. Sort all items to bag. Give the bag's Sleep Staff to the Warrior over his Mist Staff. Give a Sleep Staff to Sage over her 2nd armor slot (Traveler's Clothes). Give the Mist Staff to the Sage. If available, give 1-2 Poison Moth Powders to the Sage. SF, Wing to Rudatorm (L,1).
This is a good time to review the party's inventory and make sure things are in order. Both the Warrior's and Sage's first non-equipped item should be the Sleep Staff. The Sage will keep the Mist Staff for free Mahoton casts as well. The powders allow for the Sage to potentially throw on an enemy allied with a Metabble.
King Sword Get - World Map to Mountain Cave
Walk southwest to Mountain Cave.
No notes.
Encounters:
| Name | Lv | HP | MP | EXP | Gold | Atk | Def | Agl | Resist 1 | Resist 2 | Resist 3 | Drop | Actions |
|---|---|---|---|---|---|---|---|---|---|---|---|---|---|
| Slime スライム |
1 | 8 | 0 | 4 | 2 | 9 | 5 | 4 | FIRE: None ICE: None WIND: None ZAP: None DEATH: None |
SACRIFICE: None SLEEP: None STOPSPELL: Null SAP: None SURROUND: None |
MP_DRAIN: Null CONFUSION:None SLOW: None EXPEL: Low |
Herb やくそう 1/256 (0.39%) |
Attack (6/8) Run (2/8) |
| Healer ホイミスライム |
4 | 30 | 255 | 24 | 8 | 14 | 10 | 15 | FIRE: High ICE: High WIND: Low ZAP: None DEATH: Low |
SACRIFICE: None SLEEP: High STOPSPELL: Null SAP: None SURROUND: None |
MP_DRAIN: High CONFUSION:Low SLOW: None EXPEL: Null |
Strength Seed ちからのたね 2/256 (0.78%) |
Attack (2/8) Hoimi (6/8) |
| Snaily スライムつむり |
19 | 20 | 15 | 210 | 28 | 23 | 200 | 35 | FIRE: Null ICE: Null WIND: Null ZAP: Null DEATH: Low |
SACRIFICE: None SLEEP: Null STOPSPELL: Low SAP: High SURROUND: None |
MP_DRAIN: Null CONFUSION:Null SLOW: None EXPEL: Low |
Cypress Stick ひのきのぼう 8/256 (3.13%) |
Run (1/8) Call Hoimi Slime (3/8) Hyado (3/8) Rariho (1/8) |
| Marauder じごくのきし |
34 | 130 | 0 | 1,190 | 73 | 115 | 63 | 58 | FIRE: Low ICE: Low WIND: Low ZAP: Low DEATH: High |
SACRIFICE: None SLEEP: High STOPSPELL: Null SAP: None SURROUND: Low |
MP_DRAIN: Null CONFUSION:High SLOW: Low EXPEL: Low |
Agility Seed すばやさのたね 1/256 (0.39%) |
Attack (6/8) Paralyze Breath (2/8) |
| Stone Man うごくせきぞう |
37 | 195 | 0 | 1,780 | 82 | 140 | 40 | 29 | FIRE: High ICE: Low WIND: Low ZAP: Low DEATH: High |
SACRIFICE: Low SLEEP: Low STOPSPELL: Null SAP: Low SURROUND: High |
MP_DRAIN: Null CONFUSION:High SLOW: None EXPEL: Null |
Terra Armor だいちのよろい 2/256 (0.78%) |
Critical (1/8) Attack (7/8) |
| Salamander サラマンダー |
42 | 200 | 0 | 6,000 | 180 | 150 | 59 | 70 | FIRE: High ICE: None WIND: None ZAP: None DEATH: High |
SACRIFICE: None SLEEP: High STOPSPELL: Null SAP: Low SURROUND: Low |
MP_DRAIN: Null CONFUSION:High SLOW: Low EXPEL: Null |
Strength Seed ちからのたね 2/256 (0.78%) |
Flame Breath (Strong) (4/8) Attack (4/8) |
| Red Slime スライムべス |
63 | 6 | 0 | 8 | 2 | 18 | 6 | 7 | FIRE: None ICE: None WIND: None ZAP: None DEATH: None |
SACRIFICE: None SLEEP: None STOPSPELL: None SAP: None SURROUND: None |
MP_DRAIN: None CONFUSION:None SLOW: None EXPEL: Null |
Herb やくそう 4/256 (1.56%) |
Attack (5/8) Run (3/8) |
| Goopi マドハンド |
35 | 70 | 0 | 720 | 78 | 90 | 75 | 59 | FIRE: None ICE: Low WIND: Low ZAP: None DEATH: Low |
SACRIFICE: None SLEEP: Low STOPSPELL: Null SAP: Low SURROUND: Low |
MP_DRAIN: Null CONFUSION:Low SLOW: Low EXPEL: Null |
Iron Claw てつのつめ 4/256 (1.56%) |
Attack (3/8) Call Same Kind (4/8) Call Ally (1/8) |
For the most part, these fights should be fought. There are some large formations that take a long time to flee from. The Hero's Thunder Sword free cast of Iora is particularly helpful for large groups of slimes. Marauders can be Nifuramu'd, and Stone Men and Salamanders put to sleep. Goopis can summon Grand Titans if there is space in battle, so do not let them get a turn - they are susceptible to sleep and are a top priority. To reliably defeat Goopis, have Sage use Sleep Staff, Mage Warrior cast Begirama and use the Thunder Sword's Iora to uniformly defeat them. A single target Merami spell from the Mage Warrior is also a good option.
King Sword Get - Mountain Cave
Descend into the cave, encounter cancelling once. Retrieve the Sword of Destruction and Devil's Armor. Cast Riremito.
There is an optional Prayer Ring in this cave - head east from the beginning and open the first chest on the east wall. Then cast Riremito, and complete the dungeon normally.
Encounters:
| Name | Lv | HP | MP | EXP | Gold | Atk | Def | Agl | Resist 1 | Resist 2 | Resist 3 | Drop | Actions |
|---|---|---|---|---|---|---|---|---|---|---|---|---|---|
| Tortralord ガメゴンロード |
36 | 120 | 15 | 1,420 | 120 | 113 | 200 | 90 | FIRE: High ICE: High WIND: High ZAP: High DEATH: High |
SACRIFICE: Low SLEEP: Low STOPSPELL: High SAP: None SURROUND: Low |
MP_DRAIN: High CONFUSION:High SLOW: Low EXPEL: Null |
Luck Seed ラックのたね 4/256 (1.56%) |
Attack (4/8) Flame Breath (Medium) (2/8) Sukuruto (1/8) Mahokanta (1/8) |
| Jewelbag おどるほうせき |
16 | 50 | 255 | 10 | 1,023 | 57 | 100 | 70 | FIRE: Null ICE: Null WIND: Null ZAP: Null DEATH: Null |
SACRIFICE: Null SLEEP: Null STOPSPELL: Null SAP: Null SURROUND: Null |
MP_DRAIN: Null CONFUSION:Null SLOW: Null EXPEL: Null |
Flashy Suit はでなふく 1/256 (0.39%) |
Manusa (1/8) Attack (1/8) Rukanan (1/8) Bomiosu (1/8) Medapani (1/8) Strange Dance (1/8) Waste a turn (1/8) Run (1/8) |
| Marauder じごくのきし |
34 | 130 | 0 | 1,190 | 73 | 115 | 63 | 58 | FIRE: Low ICE: Low WIND: Low ZAP: Low DEATH: High |
SACRIFICE: None SLEEP: High STOPSPELL: Null SAP: None SURROUND: Low |
MP_DRAIN: Null CONFUSION:High SLOW: Low EXPEL: Low |
Agility Seed すばやさのたね 1/256 (0.39%) |
Attack (6/8) Paralyze Breath (2/8) |
| Hologhost ホロゴースト |
34 | 85 | 20 | 1,040 | 42 | 67 | 47 | 59 | FIRE: High ICE: Null WIND: Low ZAP: Low DEATH: Null |
SACRIFICE: None SLEEP: High STOPSPELL: Low SAP: Low SURROUND: Low |
MP_DRAIN: Low CONFUSION:Low SLOW: Low EXPEL: Low |
Pachisi Ticket すごろくけん 16/256 (6.25%) |
Attack (5/8) Zaki (2/8) Zaraki (1/8) |
| Goopi マドハンド |
35 | 70 | 0 | 720 | 78 | 90 | 75 | 59 | FIRE: None ICE: Low WIND: Low ZAP: None DEATH: Low |
SACRIFICE: None SLEEP: Low STOPSPELL: Null SAP: Low SURROUND: Low |
MP_DRAIN: Null CONFUSION:Low SLOW: Low EXPEL: Null |
Iron Claw てつのつめ 4/256 (1.56%) |
Attack (3/8) Call Same Kind (4/8) Call Ally (1/8) |
| Darth Bear ダースリカント |
39 | 150 | 0 | 2,080 | 130 | 155 | 70 | 58 | FIRE: Low ICE: None WIND: Low ZAP: None DEATH: Low |
SACRIFICE: None SLEEP: Low STOPSPELL: Null SAP: Low SURROUND: High |
MP_DRAIN: Null CONFUSION:Low SLOW: Low EXPEL: Null |
Agility Seed すばやさのたね 4/256 (1.56%) |
Critical (2/8) Run (2/8) Attack (4/8) |
Many of these battles can and should be fought. EXP from here on out is valuable for the party, and many battles are not safe to flee from anyways. Use Nifuramu on Hologhosts. Darth Bear can be put to sleep (and have a critical attack). Otherwise use the same strategies from the previous segment.
King Sword Get - Dark World Map to Domdora
Walk south to Domdora.
No notes.
Encounters:
| Name | Lv | HP | MP | EXP | Gold | Atk | Def | Agl | Resist 1 | Resist 2 | Resist 3 | Drop | Actions |
|---|---|---|---|---|---|---|---|---|---|---|---|---|---|
| Wyvern キメラ |
38 | 80 | 0 | 1,780 | 75 | 120 | 70 | 68 | FIRE: Low ICE: None WIND: None ZAP: None DEATH: High |
SACRIFICE: None SLEEP: Low STOPSPELL: Null SAP: Low SURROUND: Low |
MP_DRAIN: Null CONFUSION:Low SLOW: Low EXPEL: Null |
Chimera Wing キメラのつばさ 4/256 (1.56%) |
Critical (1/8) Attack (4/8) Flame Breath (Medium) (2/8) Flame Breath (Weak) (1/8) |
| Stone Man うごくせきぞう |
37 | 195 | 0 | 1,780 | 82 | 140 | 40 | 29 | FIRE: High ICE: Low WIND: Low ZAP: Low DEATH: High |
SACRIFICE: Low SLEEP: Low STOPSPELL: Null SAP: Low SURROUND: High |
MP_DRAIN: Null CONFUSION:High SLOW: None EXPEL: Null |
Terra Armor だいちのよろい 2/256 (0.78%) |
Critical (1/8) Attack (7/8) |
| Red Slime スライムべス |
63 | 6 | 0 | 8 | 2 | 18 | 6 | 7 | FIRE: None ICE: None WIND: None ZAP: None DEATH: None |
SACRIFICE: None SLEEP: None STOPSPELL: None SAP: None SURROUND: None |
MP_DRAIN: None CONFUSION:None SLOW: None EXPEL: Null |
Herb やくそう 4/256 (1.56%) |
Attack (5/8) Run (3/8) |
| Vile Shade まおうのかげ |
38 | 130 | 30 | 1,710 | 77 | 105 | 60 | 80 | FIRE: Low ICE: Null WIND: Low ZAP: None DEATH: High |
SACRIFICE: None SLEEP: Null STOPSPELL: None SAP: Low SURROUND: Low |
MP_DRAIN: High CONFUSION:Null SLOW: High EXPEL: High |
Life Stone いのちのいし 4/256 (1.56%) |
Attack (3/8) Zaki (3/8) Sleep Breath (2/8) |
Wyverns are susceptible to sleep. Wyverns have a critical attack. Vile Shades are major problems, with sleep breath and Zaki - they usually warrant being immediately fled from, but the player can use Mist Staff on them before fleeing.
King Sword Get - Domdora
Proceed southeast and search the hidden tile for the Orichalcum. Wing to Rudatorm (L,1).
No notes.
King Sword Get - Dark World Map to Maira
The encounter cancels here are fairly important. As usual, if the player gets into a fight just near where an encounter cancel would take place, ignore the cancel and keep going. This is usually mostly relevant for the Garin's Shrine cancel.
Encounters:
| Name | Lv | HP | MP | EXP | Gold | Atk | Def | Agl | Resist 1 | Resist 2 | Resist 3 | Drop | Actions |
|---|---|---|---|---|---|---|---|---|---|---|---|---|---|
| Sea Slime マリンスライム |
18 | 38 | 4 | 197 | 35 | 47 | 100 | 28 | FIRE: Low ICE: High WIND: Low ZAP: None DEATH: Low |
SACRIFICE: None SLEEP: Low STOPSPELL: Low SAP: Low SURROUND: Low |
MP_DRAIN: Low CONFUSION:Low SLOW: Low EXPEL: Null |
Chimera Wing キメラのつばさ 4/256 (1.56%) |
Sukuruto (4/8) Attack (3/8) Run (1/8) |
| Man O' War しびれくらげ |
18 | 40 | 0 | 180 | 38 | 55 | 50 | 35 | FIRE: Low ICE: Low WIND: Low ZAP: Low DEATH: Low |
SACRIFICE: None SLEEP: Low STOPSPELL: Null SAP: None SURROUND: Low |
MP_DRAIN: Null CONFUSION:High SLOW: Low EXPEL: Null |
Full Moon Herb まんげつそう 4/256 (1.56%) |
Call Same Kind (2/8) Attack (3/8) Paralysis Attack (3/8) |
| Ice Cloud フロストギズモ |
33 | 80 | 18 | 1,070 | 68 | 72 | 47 | 51 | FIRE: None ICE: Null WIND: Low ZAP: None DEATH: Low |
SACRIFICE: None SLEEP: Low STOPSPELL: High SAP: Low SURROUND: None |
MP_DRAIN: Low CONFUSION:Low SLOW: None EXPEL: Null |
Pachisi Ticket すごろくけん 8/256 (3.13%) |
Frost Breath (Weak) (3/8) Attack (2/8) Hyadaruko (3/8) |
| Tentacles テンタクルス |
35 | 200 | 0 | 1,280 | 120 | 107 | 15 | 36 | FIRE: None ICE: Low WIND: None ZAP: None DEATH: Low |
SACRIFICE: None SLEEP: Low STOPSPELL: Null SAP: None SURROUND: Low |
MP_DRAIN: Null CONFUSION:Low SLOW: Low EXPEL: Null |
Fighting Suit ぶとうぎ 2/256 (0.78%) |
Attack (8/8) |
| Hologhost ホロゴースト |
34 | 85 | 20 | 1,040 | 42 | 67 | 47 | 59 | FIRE: High ICE: Null WIND: Low ZAP: Low DEATH: Null |
SACRIFICE: None SLEEP: High STOPSPELL: Low SAP: Low SURROUND: Low |
MP_DRAIN: Low CONFUSION:Low SLOW: Low EXPEL: Low |
Pachisi Ticket すごろくけん 16/256 (6.25%) |
Attack (5/8) Zaki (2/8) Zaraki (1/8) |
| Merking キングマーマン |
36 | 120 | 12 | 1,590 | 110 | 125 | 85 | 72 | FIRE: Low ICE: High WIND: Low ZAP: None DEATH: High |
SACRIFICE: None SLEEP: High STOPSPELL: Low SAP: None SURROUND: None |
MP_DRAIN: Low CONFUSION:High SLOW: Low EXPEL: Null |
Magical Bikini まほうのビキニ 4/256 (1.56%) |
Attack (4/8) Call Parabird (2/8) Hyadaruko (2/8) |
| Kragon クラーゴン |
38 | 450 | 0 | 2,090 | 160 | 150 | 10 | 52 | FIRE: Low ICE: High WIND: None ZAP: None DEATH: Low |
SACRIFICE: None SLEEP: Low STOPSPELL: Null SAP: None SURROUND: Low |
MP_DRAIN: Null CONFUSION:Low SLOW: Low EXPEL: Null |
Life Nut いのちのきのみ 2/256 (0.78%) |
Critical (1/8) Run (1/8) Attack (6/8) |
Merkings are somewhat resilient and have decent resistances. They can safely be fled from at full health, but still can deal a lot of damage with Hyadaruko, so the player can choose. Kragons are very scary - they can attack 1-3 times per turn and can critical. Generally the safe play is to put them to sleep with Warrior & Sage, cast Sukuruto with the Mage Warrior, then flee. They can be defeated, but unfortunately they have huge HP and often come as a group of three. If the player opts to defeat them, use Baikiruto on the Hero. Do not underestimate Hologhosts and their ability to instant kill.
Refer to World Map to Maira for Maira area encounters.
Refer to World Map to Maira for Maira area encounters.
King Sword Get - Maira
Walk west, then enter the 2nd floor item shop. Sell the Sword of Destruction (33750G), the Devil's Amor (5250G), the Orichalcum (30000G), and the Sage's Zombie Killer (7350G). Wing to Maira (L,B).
Selling the Orichalcum and leaving triggers the shop keeper to forge the King Sword.
Maira is the Japanese name for Kol.
Maira is the Japanese name for Kol.
Revisit the item shop, buy the King Sword for the Hero and equip. Give the Hero's Thunder Sword to the Mage Warrior over the Kusanagi Sword and equip. Give the Kusanagi Sword to the Sage and equip.
This switches everyone's equipment around such that the next best weapon goes to each party member. Keep in mind how this impacts battles, Hero now has access to Bagikurosu, Mage Warrior has access to Iora, and Sage has access to Rukanan as free item casts.
In town, go to the weapon shop. Buy Sage's Staff (15000G) for the Mage Warrior. Buy Water Dress (12500G) for the Sage and equip. Buy Blade Armor (6500G) for the Mage Warrior and equip.
Sage's Staff is a free cast of Behoimi in battle. The Water Dress is incredible armor for the Sage. Blade Armor will allow Mage Warrior to deal reflect damage to Zoma, a very important of the fight.
Give the Mage Warrior's Sage's Staff to the Sage over the Meteorite Armband, then give the Meteorite Armband back to her and equip. Find the Echo Flute, SF, Wing to Maira (L,B).
This menu allows preservation of Sage's inventory. By giving the Meteorite Armband back to Sage, her inventory equipment will bump down the rest of the non-equipped items. Ideally her inventory looks like her equipment, then Sage's Staff, then Sleep Staff, then the rest, including the Mist Staff, the Light Orb, and 1-2 powders.
Stay at the Inn if low on HP/MP.
Stay at the Inn if low on HP/MP.
King Sword Get - Dark World Map to Rubiss Tower
Sail west and north to Rubiss Tower.
No notes.
Encounters:
| Name | Lv | HP | MP | EXP | Gold | Atk | Def | Agl | Resist 1 | Resist 2 | Resist 3 | Drop | Actions |
|---|---|---|---|---|---|---|---|---|---|---|---|---|---|
| Goopi マドハンド |
35 | 70 | 0 | 720 | 78 | 90 | 75 | 59 | FIRE: None ICE: Low WIND: Low ZAP: None DEATH: Low |
SACRIFICE: None SLEEP: Low STOPSPELL: Null SAP: Low SURROUND: Low |
MP_DRAIN: Null CONFUSION:Low SLOW: Low EXPEL: Null |
Iron Claw てつのつめ 4/256 (1.56%) |
Attack (3/8) Call Same Kind (4/8) Call Ally (1/8) |
| Ghoul グール |
36 | 170 | 5 | 1,270 | 48 | 95 | 10 | 45 | FIRE: None ICE: None WIND: None ZAP: None DEATH: High |
SACRIFICE: None SLEEP: Null STOPSPELL: Low SAP: None SURROUND: Null |
MP_DRAIN: Null CONFUSION:High SLOW: Low EXPEL: Low |
Cloak of Evasion みかわしのふく 1/256 (0.39%) |
Attack (4/8) Call Witch Doctor (2/8) Manusa (2/8) |
| Skullgon スカルゴン |
39 | 200 | 0 | 2,350 | 78 | 130 | 65 | 62 | FIRE: None ICE: Null WIND: Low ZAP: None DEATH: High |
SACRIFICE: None SLEEP: Low STOPSPELL: Null SAP: Low SURROUND: Low |
MP_DRAIN: Null CONFUSION:Low SLOW: Low EXPEL: High |
Strength Seed ちからのたね 2/256 (0.78%) |
Attack (4/8) Frost Breath (Medium) (2/8) Frost Breath (Weak) (2/8) |
| Wing Demon サタンパピー |
41 | 125 | 48 | 2,490 | 90 | 115 | 80 | 58 | FIRE: Low ICE: Null WIND: Low ZAP: None DEATH: High |
SACRIFICE: None SLEEP: High STOPSPELL: Low SAP: Low SURROUND: None |
MP_DRAIN: High CONFUSION:Low SLOW: Null EXPEL: High |
Sword of Seduction ゆうわくのけん 1/256 (0.39%) |
Run (1/8) Attack (4/8) Merazoma (2/8) Behomara (1/8) |
Wing Demons don't have much health, but can deal a lot of damage. Skullgon can be put to sleep. Use Nifuramu on Ghouls. As always, be cautious around Goopis.
King Sword Get - Rubiss Tower
Climb the Tower, using Toramana on the first and second floors. Retrieve the two Life Nuts and the Benevolent Ring. Retrieve the Light Armor and give to the Hero immediately to equip.
Learn the trick tiles in advance - in the room with the Light Armor, the tiles require 3x Up input, then 3x Down input. Hold right for falling off the tower to the ledge. Then for the 2 sets of 2 final tiles, they all require Down inputs.
The Benevolent Ring is used as an optional accessory for the Sage to equip during the final boss for reducing her speed intentionally.
The Benevolent Ring is used as an optional accessory for the Sage to equip during the final boss for reducing her speed intentionally.
No notes.
Encounters:
| Name | Lv | HP | MP | EXP | Gold | Atk | Def | Agl | Resist 1 | Resist 2 | Resist 3 | Drop | Actions |
|---|---|---|---|---|---|---|---|---|---|---|---|---|---|
| Voodoo Wiz マクロべータ |
38 | 150 | 255 | 1,930 | 105 | 80 | 60 | 72 | FIRE: High ICE: Low WIND: Low ZAP: None DEATH: High |
SACRIFICE: None SLEEP: Low STOPSPELL: High SAP: Low SURROUND: Low |
MP_DRAIN: High CONFUSION:Low SLOW: Low EXPEL: Null |
Poison Claw どくがのこな 4/256 (1.56%) |
Run (1/8) Attack (1/8) Flame Breath (Weak) (1/8) Strange Dance (1/8) Sukuruto (1/8) Merami (1/8) Call Hork (1/8) Behoma (1/8) |
| Metabble はぐれメタル |
24 | 6 | 255 | 40,200 | 10 | 55 | 1,023 | 150 | FIRE: Null ICE: Null WIND: Null ZAP: Null DEATH: Null |
SACRIFICE: Null SLEEP: Null STOPSPELL: Null SAP: Null SURROUND: Null |
MP_DRAIN: Null CONFUSION:Null SLOW: Null EXPEL: Null |
Happiness Shoes しあわせのくつ 4/256 (1.56%) |
Run (5/8) Attack (1/8) Gira (2/8) |
| Leona ラゴンヌ |
42 | 140 | 24 | 2,780 | 90 | 139 | 80 | 70 | FIRE: Low ICE: Low WIND: None ZAP: None DEATH: High |
SACRIFICE: None SLEEP: High STOPSPELL: High SAP: High SURROUND: High |
MP_DRAIN: Null CONFUSION:High SLOW: High EXPEL: Null |
Ogre Shield なげきのたて 2/256 (0.78%) |
Attack (4/8) Mahyado (2/8) Behoma (2/8) |
| Magiwyvern メイジキメラ |
30 | 100 | 53 | 2,240 | 125 | 105 | 80 | 150 | FIRE: High ICE: Low WIND: Low ZAP: None DEATH: High |
SACRIFICE: None SLEEP: High STOPSPELL: Low SAP: None SURROUND: None |
MP_DRAIN: Low CONFUSION:High SLOW: Low EXPEL: Null |
Strange Hat ふしぎなぼうし 4/256 (1.56%) |
Run (1/8) Mahokanta (1/8) Medapani (3/8) Behoma (3/8) |
| Wing Demon サタンパピー |
41 | 125 | 48 | 2,490 | 90 | 115 | 80 | 58 | FIRE: Low ICE: Null WIND: Low ZAP: None DEATH: High |
SACRIFICE: None SLEEP: High STOPSPELL: Low SAP: Low SURROUND: None |
MP_DRAIN: High CONFUSION:Low SLOW: Null EXPEL: High |
Sword of Seduction ゆうわくのけん 1/256 (0.39%) |
Run (1/8) Attack (4/8) Merazoma (2/8) Behomara (1/8) |
Leonas and Wing Demons together can do a lot of damage. Do not engage in battles with Magiwyverns - they only cast support spells, and when dealing with the 4x formation of them, they are actually completely harmless, just flee. The party is strong enough to handle any fight in this area, but it is a priority to quickly clear them.
If Metabble appears, use the same methodology from Baramos Castle - largely ignore and clear the battle otherwise. Now that Mage Warrior and Warrior have Blade Armors, they can take significant reflect damage from physicals. But the priority is still to clear the battles as quickly as possible.
If Metabble appears, use the same methodology from Baramos Castle - largely ignore and clear the battle otherwise. Now that Mage Warrior and Warrior have Blade Armors, they can take significant reflect damage from physicals. But the priority is still to clear the battles as quickly as possible.
King Sword Get - Dark World Map to Rainbow Drop
Sail south, then east to Rubiss attendant for the Rain Staff. Continue sailing east, visit southeast shrine. Sort the Mage Warrior's items to bag. Hand in the Rain Staff and retrieve the Rainbow Drop.
Sorting the Mage Warrior's items allows for clean inventory management from here on out - the Rainbow Drop will be immediately accessible for the upcoming bridge, then she can collect the Zoma Castle's chests easily.
Encounters:
| Name | Lv | HP | MP | EXP | Gold | Atk | Def | Agl | Resist 1 | Resist 2 | Resist 3 | Drop | Actions |
|---|---|---|---|---|---|---|---|---|---|---|---|---|---|
| Wyvern キメラ |
38 | 80 | 0 | 1,780 | 75 | 120 | 70 | 68 | FIRE: Low ICE: None WIND: None ZAP: None DEATH: High |
SACRIFICE: None SLEEP: Low STOPSPELL: Null SAP: Low SURROUND: Low |
MP_DRAIN: Null CONFUSION:Low SLOW: Low EXPEL: Null |
Chimera Wing キメラのつばさ 4/256 (1.56%) |
Critical (1/8) Attack (4/8) Flame Breath (Medium) (2/8) Flame Breath (Weak) (1/8) |
| Bomb Crag ばくだんいわ |
26 | 500 | 4 | 660 | 105 | 0 | 0 | 0 | FIRE: None ICE: None WIND: None ZAP: None DEATH: Null |
SACRIFICE: None SLEEP: Null STOPSPELL: Null SAP: None SURROUND: None |
MP_DRAIN: Null CONFUSION:Null SLOW: Null EXPEL: High |
Life Stone いのちのいし 2/256 (0.78%) |
Waste a turn (5/8) Megante (3/8) |
| Marauder じごくのきし |
34 | 130 | 0 | 1,190 | 73 | 115 | 63 | 58 | FIRE: Low ICE: Low WIND: Low ZAP: Low DEATH: High |
SACRIFICE: None SLEEP: High STOPSPELL: Null SAP: None SURROUND: Low |
MP_DRAIN: Null CONFUSION:High SLOW: Low EXPEL: Low |
Agility Seed すばやさのたね 1/256 (0.39%) |
Attack (6/8) Paralyze Breath (2/8) |
| Ghoul グール |
36 | 170 | 5 | 1,270 | 48 | 95 | 10 | 45 | FIRE: None ICE: None WIND: None ZAP: None DEATH: High |
SACRIFICE: None SLEEP: Null STOPSPELL: Low SAP: None SURROUND: Null |
MP_DRAIN: Null CONFUSION:High SLOW: Low EXPEL: Low |
Cloak of Evasion みかわしのふく 1/256 (0.39%) |
Attack (4/8) Call Witch Doctor (2/8) Manusa (2/8) |
| Gold Man ゴールドマン |
40 | 210 | 0 | 390 | 1,023 | 165 | 50 | 60 | FIRE: None ICE: Null WIND: Null ZAP: Null DEATH: Null |
SACRIFICE: None SLEEP: Low STOPSPELL: Null SAP: Low SURROUND: Low |
MP_DRAIN: Null CONFUSION:Low SLOW: None EXPEL: Null |
Golden Claw おうごんのつめ 1/256 (0.39%) |
Attack (6/8) Run (2/8) |
| Darth Bear ダースリカント |
39 | 150 | 0 | 2,080 | 130 | 155 | 70 | 58 | FIRE: Low ICE: None WIND: Low ZAP: None DEATH: Low |
SACRIFICE: None SLEEP: Low STOPSPELL: Null SAP: Low SURROUND: High |
MP_DRAIN: Null CONFUSION:Low SLOW: Low EXPEL: Null |
Agility Seed すばやさのたね 4/256 (1.56%) |
Critical (2/8) Run (2/8) Attack (4/8) |
Refer to Dark World Map to Maira for ocean encounters.
These are low value encounters on the land to the items, and are very infrequent. Flee if possible.
These are low value encounters on the land to the items, and are very infrequent. Flee if possible.
Proceed to Dark World Map to Rainbow Drop Bridge
King Sword Cut - Rudatorm
Proceed east to the castle. Walk to the vault room. Retrieve the Agility Seed from the barrel, use immediately on Sage. Retrieve the Sun Stone. Sort all items to bag. Give the bag's Sleep Staff to the Warrior (Mist Staff in first slot already, Sleep Staff second). Give a Sleep Staff to Sage over her 2nd armor slot (Traveler's Clothes). If available, give 1-2 Poison Moth Powders to the Sage. SF, Wing to Portoga (2,3).
This is a good time to review the party's inventory and make sure things are in order. The Warrior's first non-equipped items should be Mist Staff and Sleep Staff, and the Sage's first non-equipped item should be the Sleep Staff. The powders allow for the Sage to potentially throw on an enemy allied with a Metabble.
King Sword Cut - Portoga
Immediately proceed south and talk to woman at table for the Sword of Seduction. SF, Wing to Rudatorm (L,1).
The Sword of Seduction will be sold as soon as the party reaches Maira. It is available as soon as Baramos is defeated.
King Sword Cut - Dark World Map to Maira
The encounter cancels here are fairly important. As usual, if the player gets into a fight just near where an encounter cancel would take place, ignore the cancel and keep going. This is usually mostly relevant for the Garin's Shrine cancel.
Encounters:
| Name | Lv | HP | MP | EXP | Gold | Atk | Def | Agl | Resist 1 | Resist 2 | Resist 3 | Drop | Actions |
|---|---|---|---|---|---|---|---|---|---|---|---|---|---|
| Sea Slime マリンスライム |
18 | 38 | 4 | 197 | 35 | 47 | 100 | 28 | FIRE: Low ICE: High WIND: Low ZAP: None DEATH: Low |
SACRIFICE: None SLEEP: Low STOPSPELL: Low SAP: Low SURROUND: Low |
MP_DRAIN: Low CONFUSION:Low SLOW: Low EXPEL: Null |
Chimera Wing キメラのつばさ 4/256 (1.56%) |
Sukuruto (4/8) Attack (3/8) Run (1/8) |
| Man O' War しびれくらげ |
18 | 40 | 0 | 180 | 38 | 55 | 50 | 35 | FIRE: Low ICE: Low WIND: Low ZAP: Low DEATH: Low |
SACRIFICE: None SLEEP: Low STOPSPELL: Null SAP: None SURROUND: Low |
MP_DRAIN: Null CONFUSION:High SLOW: Low EXPEL: Null |
Full Moon Herb まんげつそう 4/256 (1.56%) |
Call Same Kind (2/8) Attack (3/8) Paralysis Attack (3/8) |
| Ice Cloud フロストギズモ |
33 | 80 | 18 | 1,070 | 68 | 72 | 47 | 51 | FIRE: None ICE: Null WIND: Low ZAP: None DEATH: Low |
SACRIFICE: None SLEEP: Low STOPSPELL: High SAP: Low SURROUND: None |
MP_DRAIN: Low CONFUSION:Low SLOW: None EXPEL: Null |
Pachisi Ticket すごろくけん 8/256 (3.13%) |
Frost Breath (Weak) (3/8) Attack (2/8) Hyadaruko (3/8) |
| Tentacles テンタクルス |
35 | 200 | 0 | 1,280 | 120 | 107 | 15 | 36 | FIRE: None ICE: Low WIND: None ZAP: None DEATH: Low |
SACRIFICE: None SLEEP: Low STOPSPELL: Null SAP: None SURROUND: Low |
MP_DRAIN: Null CONFUSION:Low SLOW: Low EXPEL: Null |
Fighting Suit ぶとうぎ 2/256 (0.78%) |
Attack (8/8) |
| Hologhost ホロゴースト |
34 | 85 | 20 | 1,040 | 42 | 67 | 47 | 59 | FIRE: High ICE: Null WIND: Low ZAP: Low DEATH: Null |
SACRIFICE: None SLEEP: High STOPSPELL: Low SAP: Low SURROUND: Low |
MP_DRAIN: Low CONFUSION:Low SLOW: Low EXPEL: Low |
Pachisi Ticket すごろくけん 16/256 (6.25%) |
Attack (5/8) Zaki (2/8) Zaraki (1/8) |
| Merking キングマーマン |
36 | 120 | 12 | 1,590 | 110 | 125 | 85 | 72 | FIRE: Low ICE: High WIND: Low ZAP: None DEATH: High |
SACRIFICE: None SLEEP: High STOPSPELL: Low SAP: None SURROUND: None |
MP_DRAIN: Low CONFUSION:High SLOW: Low EXPEL: Null |
Magical Bikini まほうのビキニ 4/256 (1.56%) |
Attack (4/8) Call Parabird (2/8) Hyadaruko (2/8) |
| Kragon クラーゴン |
38 | 450 | 0 | 2,090 | 160 | 150 | 10 | 52 | FIRE: Low ICE: High WIND: None ZAP: None DEATH: Low |
SACRIFICE: None SLEEP: Low STOPSPELL: Null SAP: None SURROUND: Low |
MP_DRAIN: Null CONFUSION:Low SLOW: Low EXPEL: Null |
Life Nut いのちのきのみ 2/256 (0.78%) |
Critical (1/8) Run (1/8) Attack (6/8) |
Merkings are somewhat resilient and have decent resistances. They can safely be fled from at full health, but still can deal a lot of damage with Hyadaruko, so the player can choose. Kragons are very scary - they can attack 1-3 times per turn and can critical. Generally the safe play is to put them to sleep with Warrior & Sage, cast Sukuruto with the Mage Warrior, then flee. They can be defeated, but unfortunately they have huge HP and often come as a group of three. If the player opts to defeat them, use Baikiruto on the Hero. Do not underestimate Hologhosts and their ability to instant kill.
Refer to World Map to Maira for Maira area encounters.
Refer to World Map to Maira for Maira area encounters.
King Sword Cut - Maira
In town, go to the weapon shop. Sell the Mage Warrior's Sword of Temptation (7350G), the Warrior's Mist Staff (2475G), the Hero's Iron Helmet (750G), and the Sage's Zombie Sword (7350G). Buy Water Dress (12500G) for the Sage and equip. Buy Blade Armor (6500G) for the Mage Warrior and equip.
Water Dress (aka Water Flying Clothes) is incredible armor for the Sage. Blade Armor will allow Mage Warrior to deal reflect damage to Zoma, a very important of the fight.
Stay at the Inn if low on HP/MP.
King Sword Cut - Rubiss Tower
Climb the Tower, using Toramana on the first and second floors. Retrieve the two Life Nuts and the Benevolent Ring. Retrieve the Light Armor and give to the Hero immediately to equip.
Learn the trick tiles in advance - in the room with the Light Armor, the tiles require 3x Up input, then 3x Down input. Hold right for falling off the tower to the ledge. Then for the 2 sets of 2 final tiles, they all require Down inputs.
The Benevolent Ring is used as an optional accessory for the Sage to equip during the final boss for reducing her speed intentionally.
The Benevolent Ring is used as an optional accessory for the Sage to equip during the final boss for reducing her speed intentionally.
Proceed to the Rubiss statue. Use the Echo Flute. Cast Riremito.
No notes.
Encounters:
| Name | Lv | HP | MP | EXP | Gold | Atk | Def | Agl | Resist 1 | Resist 2 | Resist 3 | Drop | Actions |
|---|---|---|---|---|---|---|---|---|---|---|---|---|---|
| Voodoo Wiz マクロべータ |
38 | 150 | 255 | 1,930 | 105 | 80 | 60 | 72 | FIRE: High ICE: Low WIND: Low ZAP: None DEATH: High |
SACRIFICE: None SLEEP: Low STOPSPELL: High SAP: Low SURROUND: Low |
MP_DRAIN: High CONFUSION:Low SLOW: Low EXPEL: Null |
Poison Claw どくがのこな 4/256 (1.56%) |
Run (1/8) Attack (1/8) Flame Breath (Weak) (1/8) Strange Dance (1/8) Sukuruto (1/8) Merami (1/8) Call Hork (1/8) Behoma (1/8) |
| Metabble はぐれメタル |
24 | 6 | 255 | 40,200 | 10 | 55 | 1,023 | 150 | FIRE: Null ICE: Null WIND: Null ZAP: Null DEATH: Null |
SACRIFICE: Null SLEEP: Null STOPSPELL: Null SAP: Null SURROUND: Null |
MP_DRAIN: Null CONFUSION:Null SLOW: Null EXPEL: Null |
Happiness Shoes しあわせのくつ 4/256 (1.56%) |
Run (5/8) Attack (1/8) Gira (2/8) |
| Leona ラゴンヌ |
42 | 140 | 24 | 2,780 | 90 | 139 | 80 | 70 | FIRE: Low ICE: Low WIND: None ZAP: None DEATH: High |
SACRIFICE: None SLEEP: High STOPSPELL: High SAP: High SURROUND: High |
MP_DRAIN: Null CONFUSION:High SLOW: High EXPEL: Null |
Ogre Shield なげきのたて 2/256 (0.78%) |
Attack (4/8) Mahyado (2/8) Behoma (2/8) |
| Magiwyvern メイジキメラ |
30 | 100 | 53 | 2,240 | 125 | 105 | 80 | 150 | FIRE: High ICE: Low WIND: Low ZAP: None DEATH: High |
SACRIFICE: None SLEEP: High STOPSPELL: Low SAP: None SURROUND: None |
MP_DRAIN: Low CONFUSION:High SLOW: Low EXPEL: Null |
Strange Hat ふしぎなぼうし 4/256 (1.56%) |
Run (1/8) Mahokanta (1/8) Medapani (3/8) Behoma (3/8) |
| Wing Demon サタンパピー |
41 | 125 | 48 | 2,490 | 90 | 115 | 80 | 58 | FIRE: Low ICE: Null WIND: Low ZAP: None DEATH: High |
SACRIFICE: None SLEEP: High STOPSPELL: Low SAP: Low SURROUND: None |
MP_DRAIN: High CONFUSION:Low SLOW: Null EXPEL: High |
Sword of Seduction ゆうわくのけん 1/256 (0.39%) |
Run (1/8) Attack (4/8) Merazoma (2/8) Behomara (1/8) |
Leonas and Wing Demons together can do a lot of damage. Do not engage in battles with Magiwyverns - they only cast support spells, and when dealing with the 4x formation of them, they are actually completely harmless, just flee. The party is strong enough to handle any fight in this area, but it is a priority to quickly clear them.
If Metabble appears, use the same methodology from Baramos Castle - largely ignore and clear the battle otherwise. Now that Mage Warrior and Warrior have Blade Armors, they can take significant reflect damage from physicals. But the priority is still to clear the battles as quickly as possible.
If Metabble appears, use the same methodology from Baramos Castle - largely ignore and clear the battle otherwise. Now that Mage Warrior and Warrior have Blade Armors, they can take significant reflect damage from physicals. But the priority is still to clear the battles as quickly as possible.
King Sword Cut - Dark World Map to Rainbow Drop
Sail east, then south and through the strait to Rubiss attendant for the Rain Staff. Continue sailing east, visit southeast shrine. Sort the Mage Warrior's items to bag. Hand in the Rain Staff and retrieve the Rainbow Drop.
Sorting the Mage Warrior's items allows for clean inventory management from here on out - the Rainbow Drop will be immediately accessible for the upcoming bridge, then she can collect the Zoma Castle's chests easily.
Encounters:
| Name | Lv | HP | MP | EXP | Gold | Atk | Def | Agl | Resist 1 | Resist 2 | Resist 3 | Drop | Actions |
|---|---|---|---|---|---|---|---|---|---|---|---|---|---|
| Wyvern キメラ |
38 | 80 | 0 | 1,780 | 75 | 120 | 70 | 68 | FIRE: Low ICE: None WIND: None ZAP: None DEATH: High |
SACRIFICE: None SLEEP: Low STOPSPELL: Null SAP: Low SURROUND: Low |
MP_DRAIN: Null CONFUSION:Low SLOW: Low EXPEL: Null |
Chimera Wing キメラのつばさ 4/256 (1.56%) |
Critical (1/8) Attack (4/8) Flame Breath (Medium) (2/8) Flame Breath (Weak) (1/8) |
| Bomb Crag ばくだんいわ |
26 | 500 | 4 | 660 | 105 | 0 | 0 | 0 | FIRE: None ICE: None WIND: None ZAP: None DEATH: Null |
SACRIFICE: None SLEEP: Null STOPSPELL: Null SAP: None SURROUND: None |
MP_DRAIN: Null CONFUSION:Null SLOW: Null EXPEL: High |
Life Stone いのちのいし 2/256 (0.78%) |
Waste a turn (5/8) Megante (3/8) |
| Marauder じごくのきし |
34 | 130 | 0 | 1,190 | 73 | 115 | 63 | 58 | FIRE: Low ICE: Low WIND: Low ZAP: Low DEATH: High |
SACRIFICE: None SLEEP: High STOPSPELL: Null SAP: None SURROUND: Low |
MP_DRAIN: Null CONFUSION:High SLOW: Low EXPEL: Low |
Agility Seed すばやさのたね 1/256 (0.39%) |
Attack (6/8) Paralyze Breath (2/8) |
| Ghoul グール |
36 | 170 | 5 | 1,270 | 48 | 95 | 10 | 45 | FIRE: None ICE: None WIND: None ZAP: None DEATH: High |
SACRIFICE: None SLEEP: Null STOPSPELL: Low SAP: None SURROUND: Null |
MP_DRAIN: Null CONFUSION:High SLOW: Low EXPEL: Low |
Cloak of Evasion みかわしのふく 1/256 (0.39%) |
Attack (4/8) Call Witch Doctor (2/8) Manusa (2/8) |
| Gold Man ゴールドマン |
40 | 210 | 0 | 390 | 1,023 | 165 | 50 | 60 | FIRE: None ICE: Null WIND: Null ZAP: Null DEATH: Null |
SACRIFICE: None SLEEP: Low STOPSPELL: Null SAP: Low SURROUND: Low |
MP_DRAIN: Null CONFUSION:Low SLOW: None EXPEL: Null |
Golden Claw おうごんのつめ 1/256 (0.39%) |
Attack (6/8) Run (2/8) |
| Darth Bear ダースリカント |
39 | 150 | 0 | 2,080 | 130 | 155 | 70 | 58 | FIRE: Low ICE: None WIND: Low ZAP: None DEATH: Low |
SACRIFICE: None SLEEP: Low STOPSPELL: Null SAP: Low SURROUND: High |
MP_DRAIN: Null CONFUSION:Low SLOW: Low EXPEL: Null |
Agility Seed すばやさのたね 4/256 (1.56%) |
Critical (2/8) Run (2/8) Attack (4/8) |
Refer to Dark World Map to Maira for ocean encounters.
These are low value encounters on the land to the items, and are very infrequent. Flee if possible.
These are low value encounters on the land to the items, and are very infrequent. Flee if possible.
Dark World Map to Rainbow Drop Bridge
Sail north, then head east on land to bridge. Use the Rainbow Drop.
If the Mage Warrior properly sorted her items before the Rain Staff, the Rainbow Drop will be the first item in her inventory.
Encounters:
| Name | Lv | HP | MP | EXP | Gold | Atk | Def | Agl | Resist 1 | Resist 2 | Resist 3 | Drop | Actions |
|---|---|---|---|---|---|---|---|---|---|---|---|---|---|
| Salamander サラマンダー |
42 | 200 | 0 | 6,000 | 180 | 150 | 59 | 70 | FIRE: High ICE: None WIND: None ZAP: None DEATH: High |
SACRIFICE: None SLEEP: High STOPSPELL: Null SAP: Low SURROUND: Low |
MP_DRAIN: Null CONFUSION:High SLOW: Low EXPEL: Null |
Strength Seed ちからのたね 2/256 (0.78%) |
Flame Breath (Strong) (4/8) Attack (4/8) |
| Goopi マドハンド |
35 | 70 | 0 | 720 | 78 | 90 | 75 | 59 | FIRE: None ICE: Low WIND: Low ZAP: None DEATH: Low |
SACRIFICE: None SLEEP: Low STOPSPELL: Null SAP: Low SURROUND: Low |
MP_DRAIN: Null CONFUSION:Low SLOW: Low EXPEL: Null |
Iron Claw てつのつめ 4/256 (1.56%) |
Attack (3/8) Call Same Kind (4/8) Call Ally (1/8) |
| Metabble はぐれメタル |
24 | 6 | 255 | 40,200 | 10 | 55 | 1,023 | 150 | FIRE: Null ICE: Null WIND: Null ZAP: Null DEATH: Null |
SACRIFICE: Null SLEEP: Null STOPSPELL: Null SAP: Null SURROUND: Null |
MP_DRAIN: Null CONFUSION:Null SLOW: Null EXPEL: Null |
Happiness Shoes しあわせのくつ 4/256 (1.56%) |
Run (5/8) Attack (1/8) Gira (2/8) |
| Skullgon スカルゴン |
39 | 200 | 0 | 2,350 | 78 | 130 | 65 | 62 | FIRE: None ICE: Null WIND: Low ZAP: None DEATH: High |
SACRIFICE: None SLEEP: Low STOPSPELL: Null SAP: Low SURROUND: Low |
MP_DRAIN: Null CONFUSION:Low SLOW: Low EXPEL: High |
Strength Seed ちからのたね 2/256 (0.78%) |
Attack (4/8) Frost Breath (Medium) (2/8) Frost Breath (Weak) (2/8) |
| Darth Bear ダースリカント |
39 | 150 | 0 | 2,080 | 130 | 155 | 70 | 58 | FIRE: Low ICE: None WIND: Low ZAP: None DEATH: Low |
SACRIFICE: None SLEEP: Low STOPSPELL: Null SAP: Low SURROUND: High |
MP_DRAIN: Null CONFUSION:Low SLOW: Low EXPEL: Null |
Agility Seed すばやさのたね 4/256 (1.56%) |
Critical (2/8) Run (2/8) Attack (4/8) |
Skullgons can reliably be put to sleep. Salamanders are difficult with strong fire breath, but can be put to sleep and do award a lot of EXP.
This is the most significant chance the player has to defeat a Metabble. If Metabble comes with allies, notably Darth Bear, the Sage can throw a powder on the Darth Bear. Unlike Metaly, Metabble is not at all susceptible to confusion. Metabble runs 62.5% of the time for its action. They have maximum 6 HP. The Warrior's Genie Axe has a ⅛ chance of critical hit. But as always, the priority is to clear the battle quickly.
This is the most significant chance the player has to defeat a Metabble. If Metabble comes with allies, notably Darth Bear, the Sage can throw a powder on the Darth Bear. Unlike Metaly, Metabble is not at all susceptible to confusion. Metabble runs 62.5% of the time for its action. They have maximum 6 HP. The Warrior's Genie Axe has a ⅛ chance of critical hit. But as always, the priority is to clear the battle quickly.
Dark World Map to Zoma's Castle
Cast Toramana. Walk to Zoma's Castle.
No notes.
Encounters:
| Name | Lv | HP | MP | EXP | Gold | Atk | Def | Agl | Resist 1 | Resist 2 | Resist 3 | Drop | Actions |
|---|---|---|---|---|---|---|---|---|---|---|---|---|---|
| Stone Man うごくせきぞう |
37 | 195 | 0 | 1,780 | 82 | 140 | 40 | 29 | FIRE: High ICE: Low WIND: Low ZAP: Low DEATH: High |
SACRIFICE: Low SLEEP: Low STOPSPELL: Null SAP: Low SURROUND: High |
MP_DRAIN: Null CONFUSION:High SLOW: None EXPEL: Null |
Terra Armor だいちのよろい 2/256 (0.78%) |
Critical (1/8) Attack (7/8) |
| Goopi マドハンド |
35 | 70 | 0 | 720 | 78 | 90 | 75 | 59 | FIRE: None ICE: Low WIND: Low ZAP: None DEATH: Low |
SACRIFICE: None SLEEP: Low STOPSPELL: Null SAP: Low SURROUND: Low |
MP_DRAIN: Null CONFUSION:Low SLOW: Low EXPEL: Null |
Iron Claw てつのつめ 4/256 (1.56%) |
Attack (3/8) Call Same Kind (4/8) Call Ally (1/8) |
| Voodoo Wiz マクロべータ |
38 | 150 | 255 | 1,930 | 105 | 80 | 60 | 72 | FIRE: High ICE: Low WIND: Low ZAP: None DEATH: High |
SACRIFICE: None SLEEP: Low STOPSPELL: High SAP: Low SURROUND: Low |
MP_DRAIN: High CONFUSION:Low SLOW: Low EXPEL: Null |
Poison Claw どくがのこな 4/256 (1.56%) |
Run (1/8) Attack (1/8) Flame Breath (Weak) (1/8) Strange Dance (1/8) Sukuruto (1/8) Merami (1/8) Call Hork (1/8) Behoma (1/8) |
| Metabble はぐれメタル |
24 | 6 | 255 | 40,200 | 10 | 55 | 1,023 | 150 | FIRE: Null ICE: Null WIND: Null ZAP: Null DEATH: Null |
SACRIFICE: Null SLEEP: Null STOPSPELL: Null SAP: Null SURROUND: Null |
MP_DRAIN: Null CONFUSION:Null SLOW: Null EXPEL: Null |
Happiness Shoes しあわせのくつ 4/256 (1.56%) |
Run (5/8) Attack (1/8) Gira (2/8) |
| Gold Man ゴールドマン |
40 | 210 | 0 | 390 | 1,023 | 165 | 50 | 60 | FIRE: None ICE: Null WIND: Null ZAP: Null DEATH: Null |
SACRIFICE: None SLEEP: Low STOPSPELL: Null SAP: Low SURROUND: Low |
MP_DRAIN: Null CONFUSION:Low SLOW: None EXPEL: Null |
Golden Claw おうごんのつめ 1/256 (0.39%) |
Attack (6/8) Run (2/8) |
| Archmage アークマージ |
43 | 130 | 100 | 2,850 | 140 | 90 | 150 | 75 | FIRE: High ICE: High WIND: None ZAP: None DEATH: High |
SACRIFICE: None SLEEP: Null STOPSPELL: High SAP: Low SURROUND: Low |
MP_DRAIN: Low CONFUSION:Low SLOW: High EXPEL: Null |
Staff of Reflection さざなみのつえ 2/256 (0.78%) |
Frost Breath (Weak) (1/8) Attack (1/8) Ionazun (2/8) Zaoriku (4/8) |
| Troll King トロルキング |
57 | 250 | 27 | 3,050 | 120 | 150 | 78 | 67 | FIRE: Low ICE: Low WIND: Low ZAP: Low DEATH: High |
SACRIFICE: None SLEEP: Low STOPSPELL: Low SAP: Low SURROUND: Low |
MP_DRAIN: High CONFUSION:High SLOW: Low EXPEL: Null |
Thor Sword らいじんのけん 1/256 (0.39%) |
Bashirura (3/8) Attack (5/8) |
| Dragon ドラゴン |
42 | 120 | 0 | 2,600 | 107 | 140 | 75 | 62 | FIRE: High ICE: Low WIND: Low ZAP: None DEATH: Low |
SACRIFICE: None SLEEP: Null STOPSPELL: Null SAP: Low SURROUND: Low |
MP_DRAIN: Null CONFUSION:Low SLOW: Low EXPEL: Null |
Stamina Seed スタミナのたね 4/256 (1.56%) |
Flame Breath (Medium) (4/8) Call Parabird (2/8) Attack (2/8) |
These swamp tiles have the single highest threat depletion in the game, so multiple encounters are likely during this section. Troll Kings can cast Bashirura and send an ally home (and also regen health) - use sleep and physicals on them. Hydras don't have much HP but attack twice per turn - use Baikiruto attacks. Dragons are terribly slow encounters with their long animations, the player can use Hero's Bagikurosu (with the King Sword) with some success, otherwise use physicals. Archmages show up solo here, so use physical attacks for now. Many of these fights can either be fought or fled from, as it is entirely preference.
For King Sword Cut, many of these encounters, especially with 4x Dragon, are extremely slow to fight and the player has to risk fleeing in order to not bleed time.
For King Sword Cut, many of these encounters, especially with 4x Dragon, are extremely slow to fight and the player has to risk fleeing in order to not bleed time.
Zoma's Castle 1F - B1F
Cast Toramana immediately. Walk east, north, west then through gate for 3x Grand Titan x2 fights. Search behind throne for staircase.
Casting Toramana immediately is the safest play to both not forget and not accidentally menu to Riremito.
Stay healed after every single fight. Use Mantan (first option in Misc menu).
From here on out, the player has to make sure to balance using Prayer Rings on characters as much as necessary, including using them in battle to save time if the Sage has a turn in battle where she doesn't need to be doing anything else. There's nothing wrong with using it outside of battle though, the odds of Prayer Rings breaking is the same.
Miniboss: Grand Titan x2
Strategy:
| Name | Lv | HP | MP | EXP | Gold | Atk | Def | Agl | Resist 1 | Resist 2 | Resist 3 | Drop | Actions |
|---|---|---|---|---|---|---|---|---|---|---|---|---|---|
| GrandTitan だいまじん |
43 | 350 | 0 | 2,500 | 150 | 200 | 90 | 35 | FIRE: None ICE: Low WIND: High ZAP: None DEATH: High |
SACRIFICE: None SLEEP: Low STOPSPELL: Null SAP: Low SURROUND: Low |
MP_DRAIN: Null CONFUSION:Low SLOW: Low EXPEL: Null |
Thor Sword らいじんのけん 1/256 (0.39%) |
Attack (6/8) Critical (2/8) |
These fights are both straightforward and dangerous. Grand Titans hit hard and can critical the team, and can go up to twice per turn. They are susceptible to sleep. The goal is to have Sage go first and attempt Sleep, then Warrior goes last and attempts Sleep again if either enemy wasn't asleep or has awoken.
The standard turn 1 tactic is:
- Mage Warrior: Baikiruto Hero
- Warrior: Sleep Staff
- Hero: Attack
- Sage: Sleep Staff
Afterwards, primarily the first the characters attack, and Sage pivots. She can either use Sleep Staff again, heal if she has Sage's Staff, or use a Prayer Ring to recover MP.
The standard turn 1 tactic is:
- Mage Warrior: Baikiruto Hero
- Warrior: Sleep Staff
- Hero: Attack
- Sage: Sleep Staff
Afterwards, primarily the first the characters attack, and Sage pivots. She can either use Sleep Staff again, heal if she has Sage's Staff, or use a Prayer Ring to recover MP.
Descend to the maze floor.
Follow any VOD for movement, but know that the first two sets of two tiles are Right inputs, then the remainder of the movement is simply holding up. It is much less difficult than it looks.
Encounters are extremely rare here.
Encounters are extremely rare here.
Encounters:
| Name | Lv | HP | MP | EXP | Gold | Atk | Def | Agl | Resist 1 | Resist 2 | Resist 3 | Drop | Actions |
|---|---|---|---|---|---|---|---|---|---|---|---|---|---|
| Metabble はぐれメタル |
24 | 6 | 255 | 40,200 | 10 | 55 | 1,023 | 150 | FIRE: Null ICE: Null WIND: Null ZAP: Null DEATH: Null |
SACRIFICE: Null SLEEP: Null STOPSPELL: Null SAP: Null SURROUND: Null |
MP_DRAIN: Null CONFUSION:Null SLOW: Null EXPEL: Null |
Happiness Shoes しあわせのくつ 4/256 (1.56%) |
Run (5/8) Attack (1/8) Gira (2/8) |
| Archmage アークマージ |
43 | 130 | 100 | 2,850 | 140 | 90 | 150 | 75 | FIRE: High ICE: High WIND: None ZAP: None DEATH: High |
SACRIFICE: None SLEEP: Null STOPSPELL: High SAP: Low SURROUND: Low |
MP_DRAIN: Low CONFUSION:Low SLOW: High EXPEL: Null |
Staff of Reflection さざなみのつえ 2/256 (0.78%) |
Frost Breath (Weak) (1/8) Attack (1/8) Ionazun (2/8) Zaoriku (4/8) |
| Troll King トロルキング |
57 | 250 | 27 | 3,050 | 120 | 150 | 78 | 67 | FIRE: Low ICE: Low WIND: Low ZAP: Low DEATH: High |
SACRIFICE: None SLEEP: Low STOPSPELL: Low SAP: Low SURROUND: Low |
MP_DRAIN: High CONFUSION:High SLOW: Low EXPEL: Null |
Thor Sword らいじんのけん 1/256 (0.39%) |
Bashirura (3/8) Attack (5/8) |
| Dragon ドラゴン |
42 | 120 | 0 | 2,600 | 107 | 140 | 75 | 62 | FIRE: High ICE: Low WIND: Low ZAP: None DEATH: Low |
SACRIFICE: None SLEEP: Null STOPSPELL: Null SAP: Low SURROUND: Low |
MP_DRAIN: Null CONFUSION:Low SLOW: Low EXPEL: Null |
Stamina Seed スタミナのたね 4/256 (1.56%) |
Flame Breath (Medium) (4/8) Call Parabird (2/8) Attack (2/8) |
| Balrog バルログ |
43 | 93 | 21 | 3,270 | 80 | 100 | 57 | 55 | FIRE: Low ICE: High WIND: High ZAP: None DEATH: Null |
SACRIFICE: High SLEEP: High STOPSPELL: Low SAP: Low SURROUND: Low |
MP_DRAIN: Null CONFUSION:High SLOW: Low EXPEL: High |
Magic Hat ふしぎなぼうし 2/256 (0.78%) |
Attack (5/8) Zaraki (3/8) |
| Lionroar マントゴーア |
44 | 160 | 50 | 3,060 | 120 | 145 | 60 | 78 | FIRE: None ICE: High WIND: None ZAP: None DEATH: High |
SACRIFICE: Low SLEEP: Low STOPSPELL: Low SAP: None SURROUND: None |
MP_DRAIN: Low CONFUSION:High SLOW: Low EXPEL: Null |
Ogre Shield なげきのたて 2/256 (0.78%) |
Bagikurosu (2/8) Attack (2/8) Merazoma (2/8) Mahokanta (2/8) |
Every encounter in Zoma's Castle should be handled with extreme caution.
Balrogs - High priority. They are susceptible to Mahoton, and should be stopspelled due to their Zaraki spell. They have low HP so 1-2 hits will often be enough to defeat.
Archmages - Also high priority. Archmages will cast Ionazun for huge party damage, and will cast Zaoriku to revive fallen allies. They don't have much HP, but they have very high defense. When fighting, the player should be very careful to clear Archmages first to avoid reviving situations, especially with 2 Archmages. Use of Bagikurosu (King Sword) or Baikiruto is perfectly acceptable. They can be stopspelled, but not efficiently.
Troll Kings - Generally a lower threat, but still can cast Bashirura on a party member, which is effectively immediate run-ender. Put them to sleep
Lionroar - They are lower threat as well, but still can dish out decent damage. Standard physicals work fine for them.
Dragon - Unfortunately slow, no matter what, but not very threatening. Bagikurosu (King Sword) and physicals, and Hyadaruko if the player is feeling lucky.
The most challenging scenarios arise when problematic enemies come in pairs. For example, having to choose to prioritize between Balrogs and Archmages. In such a situation, the Sage should attempt to debilitate Balrog with Mahoton and hope for the best, while all others take out the Archmages. On turn 2, Sage can hopefully outspeed everyone and snipe any surviving Archmages. These scenarios take time and practice to understand how to handle, and the player has to continually decide between safety and speed.
Zoma's Castle B2F - B3F
Descend into Zoma's Castle. Watch Ortega cutscene. Retrieve the Yggdrasil Leaf, Sage's Stone and Prayer Ring. Descend to Altar.
Some players give the Sage's Stone to the Sage or Warrior right away, it is entirely preference.
Encounters:
| Name | Lv | HP | MP | EXP | Gold | Atk | Def | Agl | Resist 1 | Resist 2 | Resist 3 | Drop | Actions |
|---|---|---|---|---|---|---|---|---|---|---|---|---|---|
| Salamander サラマンダー |
42 | 200 | 0 | 6,000 | 180 | 150 | 59 | 70 | FIRE: High ICE: None WIND: None ZAP: None DEATH: High |
SACRIFICE: None SLEEP: High STOPSPELL: Null SAP: Low SURROUND: Low |
MP_DRAIN: Null CONFUSION:High SLOW: Low EXPEL: Null |
Strength Seed ちからのたね 2/256 (0.78%) |
Flame Breath (Strong) (4/8) Attack (4/8) |
| GrandTitan だいまじん |
43 | 350 | 0 | 2,500 | 150 | 200 | 90 | 35 | FIRE: None ICE: Low WIND: High ZAP: None DEATH: High |
SACRIFICE: None SLEEP: Low STOPSPELL: Null SAP: Low SURROUND: Low |
MP_DRAIN: Null CONFUSION:Low SLOW: Low EXPEL: Null |
Thor Sword らいじんのけん 1/256 (0.39%) |
Attack (6/8) Critical (2/8) |
| Archmage アークマージ |
43 | 130 | 100 | 2,850 | 140 | 90 | 150 | 75 | FIRE: High ICE: High WIND: None ZAP: None DEATH: High |
SACRIFICE: None SLEEP: Null STOPSPELL: High SAP: Low SURROUND: Low |
MP_DRAIN: Low CONFUSION:Low SLOW: High EXPEL: Null |
Staff of Reflection さざなみのつえ 2/256 (0.78%) |
Frost Breath (Weak) (1/8) Attack (1/8) Ionazun (2/8) Zaoriku (4/8) |
| Balrog バルログ |
43 | 93 | 21 | 3,270 | 80 | 100 | 57 | 55 | FIRE: Low ICE: High WIND: High ZAP: None DEATH: Null |
SACRIFICE: High SLEEP: High STOPSPELL: Low SAP: Low SURROUND: Low |
MP_DRAIN: Null CONFUSION:High SLOW: Low EXPEL: High |
Magic Hat ふしぎなぼうし 2/256 (0.78%) |
Attack (5/8) Zaraki (3/8) |
| Putrigon ドラゴンゾンビ |
44 | 350 | 0 | 3,500 | 53 | 170 | 45 | 43 | FIRE: None ICE: Null WIND: High ZAP: Low DEATH: Null |
SACRIFICE: Low SLEEP: High STOPSPELL: Null SAP: None SURROUND: Low |
MP_DRAIN: Null CONFUSION:High SLOW: Low EXPEL: Low |
Strength Seed ちからのたね 2/256 (0.78%) |
Frost Breath (Weak) (1/8) Attack (3/8) Frost Breath (Medium) (4/8) |
| Lionroar マントゴーア |
44 | 160 | 50 | 3,060 | 120 | 145 | 60 | 78 | FIRE: None ICE: High WIND: None ZAP: None DEATH: High |
SACRIFICE: Low SLEEP: Low STOPSPELL: Low SAP: None SURROUND: None |
MP_DRAIN: Low CONFUSION:High SLOW: Low EXPEL: Null |
Ogre Shield なげきのたて 2/256 (0.78%) |
Bagikurosu (2/8) Attack (2/8) Merazoma (2/8) Mahokanta (2/8) |
| Swordoid ソードイド |
45 | 170 | 31 | 3,180 | 87 | 158 | 72 | 99 | FIRE: Low ICE: High WIND: High ZAP: Low DEATH: High |
SACRIFICE: High SLEEP: High STOPSPELL: High SAP: Low SURROUND: High |
MP_DRAIN: Low CONFUSION:High SLOW: Low EXPEL: Low |
Frost Blade ふぶきのつるぎ 2/256 (0.78%) |
Critical (1/8) Attack (5/8) Behoimi (2/8) |
Swordoids and Putrigons are unique enemies to this area. Both can be reliably Nifuramu'd. Salamanders and Grand Titans make this area even more troublesome.
The fabled 1x Grand Titan 2x Archmage encounter is one of the worst encounters in the game. If the Sage still has a moth powder, it can be thrown at the Grand Titan with some success. If not, use a Sleep Staff on Grand Titan, then take out Archmages as a priority and do anything possible to get them to not revive each other.
The fabled 1x Grand Titan 2x Archmage encounter is one of the worst encounters in the game. If the Sage still has a moth powder, it can be thrown at the Grand Titan with some success. If not, use a Sleep Staff on Grand Titan, then take out Archmages as a priority and do anything possible to get them to not revive each other.
Zoma's Altar
Fully heal HP on everyone and MP on Mage Warrior/Sage. Give the Sage's Stone to the Sage over her accessory slot, then give her accessory (Meteorite Armband) back to her and equip. Defeat King Hydra.
During this segment, the player ideally has two Yggdrasil Leaves. If anyone dies at any time, the player pretty much immediately has to use them.
Some players with the Sage's Staff opt to give it to the Warrior for this fight, and it will be swapped back to the Sage afterwards. Other players keep the Sage's Stone on the Warrior the whole time for this segment. Sage getting the Sage's Stone is an arguably more sensible strategy for King Hydra, however.
Some players with the Sage's Staff opt to give it to the Warrior for this fight, and it will be swapped back to the Sage afterwards. Other players keep the Sage's Stone on the Warrior the whole time for this segment. Sage getting the Sage's Stone is an arguably more sensible strategy for King Hydra, however.
Equipment check (King Sword Get):
Equipment check (King Sword Cut):
Boss: King Hydra
Strategy:
| Name | Lv | HP | MP | EXP | Gold | Atk | Def | Agl | Resist 1 | Resist 2 | Resist 3 | Drop | Actions |
|---|---|---|---|---|---|---|---|---|---|---|---|---|---|
| King Hydra キングヒドラ |
46 | 1,600 | 0 | 12,200 | 350 | 280 | 150 | 50 | FIRE: Null ICE: Low WIND: None ZAP: None DEATH: Null |
SACRIFICE: Null SLEEP: High STOPSPELL: Null SAP: Low SURROUND: Null |
MP_DRAIN: Null CONFUSION:Null SLOW: Null EXPEL: Null |
Dragon Mail ドラゴンメイル 2/256 (0.78%) |
Attack (5/8) Flame Breath (Medium) (3/8) |
King Hydra is a straightforward boss, but is by no means safe. It boasts high attack and can easily double physical an ally and kill them. It is susceptible to sleep.
Players use a variety of strategies on this boss, but a common one is for turn 1 is:
Mage Warrior - Cast Baikiruto on Hero
Warrior - Sleep Staff
Hero - Attack
Sage - Rukani
After Rukani lands, Sage will keep using Sage's Stone to keep the party healed. If Rukani doesn't land, the player has to decide between trying Rukani again or healing. The Warrior can pivot between Sleep Staff and attack, and the Mage Warrior should Baikiruto herself then join the Hero with physical attacks.
In any of the upcoming battles, being either outsped or outspeeding when not expecting it on a bad turn can be disastrous.
Heal party HP/MP. Sort all items to bag. Give the Sage's Stone to the Warrior in his first slot. Defeat Baramos Bomus.
Important items like the Light Orb will still be on the Sage after sorting.
Boss: Baramos Bomus
Strategy:
| Name | Lv | HP | MP | EXP | Gold | Atk | Def | Agl | Resist 1 | Resist 2 | Resist 3 | Drop | Actions |
|---|---|---|---|---|---|---|---|---|---|---|---|---|---|
| Barabros バラモスブロス |
63 | 1,100 | 255 | 13,500 | 450 | 210 | 300 | 72 | FIRE: Low ICE: Low WIND: Low ZAP: Low DEATH: Null |
SACRIFICE: Null SLEEP: Null STOPSPELL: High SAP: Low SURROUND: Low |
MP_DRAIN: Null CONFUSION:Null SLOW: Null EXPEL: Null |
Ogre Shield なげきのたて 1/256 (0.39%) |
Flame Breath (Strong) (2/8) Ionazun (4/8) Attack (2/8) |
Baramos Bomus is a glass cannon sort of fight. He can attack 1-3 times, and if he attacks 3 times he can severely cripple the party. Between Ionazun, strong physicals and strong fire breath, he deals a ton of damage. He only has 1100HP, but his innate defense is very high. Although he is susceptible to Mahoton, his AI loop while stopspelled is arguably more dangerous.
Turn 1:
Mage Warrior - Cast Baikiruto on Hero
Warrior - Sage's Stone
Hero - Attack
Sage - Rukani
The goal is to immediately lower his defense with Sage's Rukani, boost the Mage Warrior and Hero with Baikiruto, and the Warrior only uses Sage's Stone every turn. Afterwards, the Sage will be on pivot healing duty to make sure anyone with low HP (<120) gets healed (Sage's Staff or Behoimi), except to give Warrior a significant priority to keep his HP near max.
For every turn, the player will have to decide whether or not characters should attack or defend. The Hero will be taking less damage from Bomus' area all attacks due to the Light Armor's resistances, but anytime Bomus takes 3 actions in a turn with multiple area all attacks, the damage adds up very fast. In pretty much every situation, however, the Warrior should always be using the Sage's Stone (and not defending), and the Sage should be making sure the Warrior is healed.
If Sage's Rukani doesn't land on turn 1, the player should heavily consider defending with Mage Warrior / Hero until it lands - the fight is borderline unwinnable without it landing.
Heal party HP/MP. Defeat Zombie Baramos.
No notes.
Boss: Zombie Baramos
Strategy:
| Name | Lv | HP | MP | EXP | Gold | Atk | Def | Agl | Resist 1 | Resist 2 | Resist 3 | Drop | Actions |
|---|---|---|---|---|---|---|---|---|---|---|---|---|---|
| Barazomb バラモスゾンビ |
63 | 3,000 | 0 | 14,300 | 115 | 400 | 0 | 0 | FIRE: None ICE: None WIND: None ZAP: None DEATH: Null |
SACRIFICE: Null SLEEP: Null STOPSPELL: Null SAP: Null SURROUND: High |
MP_DRAIN: Null CONFUSION:Null SLOW: Null EXPEL: Null |
Sword Of Destruction はかいのつるぎ 1/256 (0.39%) |
Attack (8/8) |
Zombie Baramos does one thing only - physical attack for a ton of damage, either once or twice per turn. It is a rather simple fight, but very much not safe until the party is set up. A bad double physical on turn 1 or 2 to any character can immediately yield death. Zombie Baramos has 0 defense and 0 agility, so in almost all cases the party will outspeed him and there's not point in casting Rukani.
The strategy is to bolster defense on the first three turns:
Turn 1: Sukuruto / Defend / Defend / Sukuruto
Turn 2: Sukuruto / Sage's Stone / Defend / Sukuruto
Turn 3: Sukuruto / Sage's Stone / Defend / Sukuruto
Then the Mage Warrior can start using Baikiruto on the rest of the team (including Warrior and optionally Sage). The Warrior can take off turns to attack instead of Sage's Stone and let the Sage heal during some turns. The Sage can use a Prayer Ring to restore MP during this battle if there is downtime for healing, to save menuing time for the next battle.
The priority to keep Warrior alive is still very much in effect, but otherwise this is a relatively simple fight and usually safe once the first 1-2 turns pass.
Give the Warrior's Genie Axe to the Mage Warrior and equip. Give the bag's Heavy Metal Ring to the Mage Warrior and equip (if not already.) Give the bag's Benevolent Ring to the Sage and do not equip. Use all Life Nuts and any other seeds.
The Warrior will never be attacking in this fight, so Mage Warrior gets the better weapon. The Heavy Metal Ring gives Mage Warrior some extra speed to hopefully outspeed Hero when trying to buff him. The Benevolent Ring gives the Sage the ability to reduce her speed back to normal levels (instead of 2x) so that she willingly lets Zoma outspeed her.
All of the Life Nuts collected during the game are to be used right now. The reasoning is that using Life Nuts earlier in the run is effectively washed away by the HP gaining system (where the game aligns max HP based on current Stamina), so by waiting until the very end of the game, the player both gets the most out of the seeds they have relative to current stamina, but they also get to control which party member(s) get a necessary boost.
The general rules are:
- Warrior needs at least 300HP as top priority
- Mage Warrior should have ~290-300HP
- Hero and Sage ideally have 200HP
If Warrior is especially low, then all Life Nuts go to him. He is far and away the most important character to have high max HP.
Heal party HP/MP. Give any Prayer Rings available to the Mage Warrior and Sage. Defeat Zoma.
いくぞ!
Boss: Zoma
Strategy:
| Name | Lv | HP | MP | EXP | Gold | Atk | Def | Agl | Resist 1 | Resist 2 | Resist 3 | Drop | Actions |
|---|---|---|---|---|---|---|---|---|---|---|---|---|---|
| Zoma ゾーマ |
63 | 4,500 | 255 | 0 | 0 | 500 | 350 | 255 | FIRE: Null ICE: Null WIND: Null ZAP: Null DEATH: Null |
SACRIFICE: Null SLEEP: Null STOPSPELL: Null SAP: Null SURROUND: Null |
MP_DRAIN: Null CONFUSION:Null SLOW: Null EXPEL: Null |
------------------ ------------------ 0/256 (0.10%) |
Frost Breath (Strong) (4/8) Mahyado (1/8) Attack (1/8) Freezing Wave (1/8) Mahokanta (1/8) |
| Zoma ゾーマ |
63 | 4,700 | 255 | 0 | 0 | 360 | 200 | 80 | FIRE: None ICE: Null WIND: High ZAP: None DEATH: Null |
SACRIFICE: Null SLEEP: Null STOPSPELL: Null SAP: None SURROUND: Null |
MP_DRAIN: Null CONFUSION:Null SLOW: Null EXPEL: Null |
------------------ ------------------ 0/256 (0.10%) |
Mahyado (1/8) Frost Breath (Strong) (2/8) Attack (3/8) Freezing Wave (2/8) |
Zoma is a terrifying final boss, with strong physicals, unique ability to remove all buffs and his own debuffs with Freezing Waves, and area all attacks with Mahyado (~55-65 damage without resistance) and strong ice breath (~100-139 without resistance, and with standard equipment, Warrior 75-104, Hero 50-69, and Sage 66-92). It is both a simple fight and complex fight in nature. The core strategy is simple - stay healed, buff party, reapply buffs after freezing waves, and pray the party survives long enough. Compared to some other fights, there is not much decision making. However, there are many subtleties to the fight about going fast and taking appropriate risks.
Zoma begins in his dark form. The first turn is commonly:
- Mage Warrior: Cast Baikiruto on Hero
- Warrior: Sage's Stone
- Hero: Attack
- Sage: Use item Light Orb
The Light Orb will activate the true battle. If the player doesn't have the Light Orb, it's an immediate loss (unless Dark Zoma somehow succumbs to the same strategies, which is not likely considering he regens HP per turn and has much higher stats).
Breakdown of role by characters:
- Mage Warrior: Her primary role is to Baikiruto the Hero, then to defend. Aggressively she can use physical attacks and hope for criticals with her Genie Axe (⅛). She is the lead party member and will take 40% of Zoma's physical attacks. There are many cases where her defending to soak damage can turn the tide of battle. She likely will have to use a Prayer Ring, which she can only really do at max HP.
- Warrior: Use Sage's Stone. There are no subtleties. Do not think defending with Warrior is a good idea - it's not. Always Sage's Stone. Only if the player is somehow counting exact damage and Zoma is about to die can the Warrior ever attack, but in no other situation does Warrior deviate.
- Hero: Attack or defend. Mostly attack, but can defend when low on HP and the Sage cannot dedicate the next turn to healing him. Having the King Sword will invariably speed up this fight due to higher damage output. Remember that the Hero's Light Armor will help ward off damage from all attacks more than any other ally, but also remember that a physical hit to the Hero (20%) can be devastating.
- Sage: By far the most complex character, as usual. Her first priority is to heal the Warrior. In the vast majority of cases where the Warrior is not at max HP, Sage should heal him. Otherwise, she has a lot of flexibility. While wearing the Meteorite Armband, she has the ability to (hopefully) outspeed any party member and Zoma, so some characters that might otherwise defend can instead do their action. For example, if Hero has 100 HP, it might seem risky to attack instead of defend, but if the Sage can go first and heal, the Hero will be near max HP and defending would be somewhat of a wasted turn for him. When not healing, her priority is to either buff or debuff. There are two main buff/debuff options for Sage: Rukani or Sukuruto, offensive or defensive.
A subtlety of Sage's play is that she can unequip her Meteorite Armband with the Benevolent Ring to lose her double speed, hopefully allowing Zoma to outspeed her. This is useful in situations where no one needs to be healed, and the goal is for Zoma to outspeed her so that her buff or debuff can go after Zoma attacks. That way, in case he uses Freezing Waves, her spell won't immediately go to waste. This is particularly helpful when trying to align the Hero to attack when the Mage Warrior is trying to Baikiruto and the Sage can use Rukani on the same turn. Be very careful using this strategy to re-equip the Sage with the Meteorite Armband when healing the party.
The player has the opportunity to use up to two Yggdrasil Leaf during the fight. The Mage Warrior and Hero ideally have one each. Usually they are saved for when a character is dead, but there are some instances in which the Warrior has very low HP, and a smart safety option is for a party member to preemptively use a Yggdrasil Leaf on the Warrior when he is still alive, under the assumption Zoma will kill him. If the Warrior does not die, the Leaf will not be wasted, which is different than accidentally using a Leaf outside of battle, where it will be wasted. But if the Warrior does die, then he'll be revived with full HP, which can turn around the fight with good momentum. It's recommended to play very safe with this play and have other characters either healing or defending.
Most players have some internal feelings about how long the fight is going, and when it's going to end (in the absence of counting damage). This comes with time and practice. Near the end of the fight, the player can start to be riskier - Sage can use the Merami spell for extra damage, and the Mage Warrior and Hero can maybe take riskier attacks. But be warned that Zoma can easily wipe a party in a few turns, so be confident it's close to the end if aggressive plays are chosen.
Zoma's Castle to Rudatorm
Timing ends after the “To be continued” appears after the credits finish.
Guide Outro
Special thanks:
- Thanks to the DQRTA community for inspiration, competition and overall fun over the years.
- Special thanks to Maru for helping me with DQIII data analysis, and for being my original inspiration to learn and run this game.
- Special thanks to Maru for helping me with DQIII data analysis, and for being my original inspiration to learn and run this game.
